Is LeadsLeap for me?
That depends on what you're looking for.
Are you looking to increase traffic to your website?
If your target audience includes online marketers and opportunity seekers, LeadsLeap is exactly what you need. Our platform is frequented by these audiences. We also have a coop network that gives you exposure to traffic in other traffic networks. Read the guide 'How to advertise and get traffic?' to learn how to start.
Are you a beginner trying to make some money online?
LeadsLeap is the perfect starting point for you. We offer very simple ways to make money, like viewing ads, to more advanced methods like building your online business. We have all the tools you need to make money at different levels. Read the guide 'How to make money in LeadsLeap?' to learn more.
Are you a budding marketer trying to build an online business?
LeadsLeap is your ideal partner. Most of the marketing tools we provide are free. For instance, our list building service is forever free, ensuring you never lose your list due to missed payments. As a budding marketer, you may need time to learn the ropes. With LeadsLeap, you have no pressure to pay, allowing you to grow at your own pace.
Additionally, I encourage you to read the Insider Ad Report. This free report contains all the answers you need to build a successful online business. If you follow the practices outlined in the report, success is inevitable. Anyone who fails to achieve online success likely hasn't implemented the strategies detailed within.
Are you a team leader wanting to elevate your business to the next level?
LeadsLeap offers advanced marketing tools like the PDF Link Rebrander and Share Code system. Imagine being able to create duplicable marketing system that your leads can replicate, so that they can achieve the same success you enjoy. And since most of our tools are free, your leads can follow your footsteps without breaking the bank. They will thank you for using LeadLeap system to guide them.
I need support. Who can help me?
1) Use our 'Side-by-side Tutorial' system
On almost every page of your Member Area, you'll find a Tutorial link (see arrow 1 in the screenshot below)

Click on it to open our "Side-By-Side Tutorial" system
It is displayed alongside your Member Area. You can read and follow along at the same time.
The video below shows how easy it is to follow the step by step instructions in the Tutorial:
The Tutorial also includes a search function. Use it to quickly find the answers to your questions.

2) Open a support ticket
To get to the support page, click this.

I reply all the support tickets within 24 hours, usually within minutes if I'm at my desk.
3) Email us
This is not the best way to contact us. Our mailbox is overwhelmed. While we try to sift through all incoming emails, important messages can get lost in the shuffle. For the quickest and most reliable assistance, please open a support ticket instead of emailing us. This ensures your request receives prompt attention.
How to view ads and earn credits?
There are 3 ways to view ads.
1) In your member area
Below is what your member area looks like:

Arrows 1 and 2 show the locations of the ads.
Click on them and surf the site for at least 5 seconds to start earning credits. The longer you surf, the more credits you earn. You can earn credits for up to 60 seconds.
2) In your daily email
We send you one email every day.
Below is what the email looks like:

Arrow 3 shows the location of the ads.
Click on them to earn credits.
3) In the ad viewer
When you click any ad from the member area or daily email, it will open in a special ad viewer like this:

Note that the ad opens in a separate popup window.
When you are done viewing the ad, simply close the popup window.
After closing it, you will see more ads as shown below:

You can continue surfing ads one after another and earn credits continuously.
How to advertise and get traffic?
If you want traffic, look under the Traffic section of the navigation panel.

There are 2 ways LeadsLeap can send you traffic. Below are the explanation of the 2 ways.
1) Advertising
Since you are a PRO Member, the fastest and easiest way to get you traffic is by posting Pro Ads. (You can post Credit Ads too, but that will require credits. You can learn more about Credit Ads from the Tutorial in the Credit Ads page.)
How to post Pro Ads?
Go to Post Pro Ads.
When you're there, click Tutorial (arrow 1 below), then click How to post / activate a Pro Ad? (arrow 2). Follow the instructions there to set up your Pro Ad.

2) Social Reviews
LeadsLeap runs a review directory. It ranks well in the Search Engines, hence getting high-quality prospects from the Search Engines.
You can check out the directory at:
https://leadsleap.com/socialreview/
Only PRO Members can submit a review. And you're a Pro Member.
Here's how it works:
- You write an insightful review about a program you've experienced with.
- You submit your affiliate link of that program.
- Your affiliate link will be rotated together with other added links.
- When people learn about the program and join, they will join under one of the rotated links, which can be your link.
To submit a Social Review, go to My Review (arrow 1).

When you have a few reviews, you should also set up My Top Recommendation (arrow 2) to get the full benefit of the Social Review system.
Action Steps
1) Click Post PRO Ads and follow the tutorial on that page.
2) Go to My Review and follow the tutorial on that page to submit a Social Review on the programs that you have experience with. (Please note that reviews are human checked. Poorly written reviews will be rejected.)
How to make money in LeadsLeap?
There are 5 ways to make money in LeadsLeap.
You can find each of these methods in the navigation panel on the left, or in the dropdown menu at the top right corner if you're using a mobile device.

Let's start with the method that offers the highest earning potential.
1) Affiliate Commissions
When you promote LeadsLeap, you'll earn 25%-50% recurring commissions when your referrals upgrade.
How hard is it to promote LeadsLeap?
Not hard at all.
You just have to use our FREE tools to build your own business.
Our FREE tools carry LeadsLeap branding. The better you are in using our tools, the more your audience will realize the power of LeadsLeap, and the more of them will join you in LeadsLeap for their own business.
Easy isn't it?
We call it "Promote Without Promoting".
If you have an email list, or you have access to other traffic networks, you can also promote LeadsLeap using your affiliate links here.
2) Coop Earnings
You can get your Coop Link here.
Promote your Coop Link in other traffic networks. When people surf the link for at least 5 seconds, you'll earn 2 things at the SAME TIME: Credits and Cash.
Talking about killing two birds with one stone.
You can use the Credits for traffic to your websites, or encash it for MORE cash through our Credit Encashment program. This is IN ADDITION to the cash that you'll be earning from our Traffic Co-Op Program.
This means the traffic that you send to your Coop Link can earn you money 2 times, one under Traffic Coop scheme, another under Credit Encashment scheme.
For more details, please refer to the Tutorial at Coop Earnings.

3) PPC Earnings
The difference between Co-Op and PPC is that in Co-Op, you simply send traffic to your Coop Link to make money. In PPC, you have to show our Ad Widget on your website. You make money only when your visitors click the ad and surf the advertised website.
Since Co-Op is easier, why PPC?
Because the pay per click is much higher in PPC.
There are many ways to participate in our PPC program.
For more details, please refer to the Tutorial at PPC Earnings.

4) Credit Encashment
First, understand that there are many ways to earn Credits.
You can earn credits by surfing Member Ads (arrow 1) and Associate Messages (arrow 2). You can find them in your Member Area and our Daily Email to you.

About our Ad Viewing System (arrow 1 above)
Our ad viewer is the first-of-its-kind in the market. If you are new, please read Introduction To Our New Ad Viewer – Surf And Earn Continuously
About Associate Messages (arrow 2 above)
When you join LeadsLeap, you are automatically placed in a 10-level network, with your sponsor being your immediate upline. This means every member has up to 10 uplines. If they have a message for you, they will appear under Associate Messages. (Note: LeadsLeap is not an MLM. The network is only for communication purpose.)
You can also earn Credits through our Coop and PPC program. I've introduced them to you earlier.
You can also earn Overiding Credits from your 10-levels of followers.
All of these Credits can be converted into cash.
For more details, please refer to Credit Encashment.
5) Daily Active Bonus
You can earn cash bonus everyday by simply viewing at least 10 ads personally in a day.
Once you've surfed a minimum of 10 ads, ALL the credits you've accumulated on that day will be used to calculate your Daily Active Bonus.
How is Daily Active Bonus different from Credit Encashment?
In Credit Encashment, you convert Credits into Cash. The Credits are no longer available for advertising use.
In Daily Active Bonus, you simply earn Cash bonus. You will keep the Credits for either adverting or encashment into MORE cash.
Daily Active Bonus is calculated automatically everyday. You don't have to do any conversion like the case of Credit Encashment.
For more details, please refer to the Tutorial at Daily Active Bonus.
There you have it. The 5 ways to make money in LeadsLeap.
Action Steps
If you are just starting out, the easiest is to surf ads yourself and promote your Coop Link in all the traffic networks you're involved in.
Anyone can do that. Minimal skills needed.
If you do just these two (surf ads and promote your Coop Link) and encash your Credits everyday at Credit Encashment, you should be able to make your first $10 withdrawal after 1 month.
Small money? I know. It's just a start.
If you promote LeadsLeap, you can earn hundreds to thousands a month, as what some members are earning.
To promote LeadsLeap, get your affiliate links at Affiliate Links & Tools.
How to build a list?
To build a list, you need the following tools:
1) Email Marketing System, aka autoresponder.
2) Page Builder.
3) Form / Popup Creator.
Let's go through them one by one...
1) Email Marketing System
We call it SendSteed.
It allows you to collect opt-in emails, send follow-up emails (we call it Email Series), send email broadcast and do other email automation.
The links to our Email Marketing services are shown below:

To start, click 'List Manager' (arrow 1).
When you're there, click Tutorial (arrow 1 below), then click How to set up a list? (arrow 2). Follow the instructions there to set up your list.
Tip: Our 'side-by-side' tutorial system is created to allow you to read one step and do one step, without you leaving the page. Make sure you read and execute the step, before reading the next step.
2) Page Builder
After setting up your list, you need an opt-in page to present to your audience, so that they can opt in to your list.
Some of you may also want a thank you page or bridge page.
Whatever page you want, chances are our Page Builder can make it.
And we host it for you.
The navigation link to our Page Builder is shown below:

To start, click 'Page Manager' (see screenshot above).
When you're there, click Tutorial (arrow 1 below), then click How to build a page? (arrow 2). Follow the instructions there to set up your first opt-in page.

Tip: DO NOT skip any instruction in the Tutorial. Go through the process at least once to set up your first page. Once you get the hang of it, you can do anything you want.
3) Form / Popup Creator
You may or may not need this. This is a tool to create an opt-in form which you can insert to your own blog or website.
You probably have seen those popup form that ask you to opt in? That's the job of our Form / Popup Creator.
The navigation link to our Form / Popup Creator is shown below:

To start, click 'Form / Popup Manager' (see screenshot above).
When you're there, click Tutorial (arrow 1 below), then click How to create a Form/Popup? (arrow 2). Follow the instructions there to set up your first opt-in popup form.
With these 3 tools, you more or less have everything you need to build a successful list.
Action Steps
1) Go to List Manager and follow the tutorial there to set up a list.
2) Go to Page Manager and follow the tutorial there to set up an opt-in page.
3) You probably don't need a popup form now. But if you do, go to Form / Popup Manager and follow the tutorial there to set up an opt-in form.
4) Send traffic to your opt-in page. (For maximum exposure, promote your page in LeadsLeap Advertising, as well as across all other traffic networks you can find.)
How to build a landing page?
To build a landing page, splash page, conversion page, opt-in page, or any type of webpage, go to Page Manager. You can find the navigation link as shown in the screenshot below:
Once there, click Tutorial (arrow 1 below), then click How to build a page? (arrow 2).

Follow the instructions to set up your first opt-in page.
Note: The step-by-step tutorial above explains how to build an opt-in page. If you want to build other types of pages, simply skip the opt-in settings. The other steps remain the same.
Tip: DO NOT skip any instructions in the tutorial (except for the opt-in settings mentioned above). Go through the process at least once to set up your first page. Once you get the hang of it, you can create any page you want.
Action Steps
Go to Page Manager and follow the tutorial to create your first page.
How to build a marketing funnel?
The term marketing funnel has been overhyped.
The tools you need to create a marketing funnel are the same tools you need to build a list.
To build a marketing funnel, just follow the guide in 'I want to build a list'.
Having said that, when you have many Pages to manage, things can get a bit messy.
To help you to organize your Pages, we've created a Funnel Manager.
The navigation link to the Funnel Manager is shown below:

The concept of Funnel Manager needs a bit of understanding.
Before you start using it, please go to the Tutorial and read What can Funnel Manager do? (see arrow 3 below)

After that, click How to set up a funnel? (arrow 2) and follow the step by step instructions to set up your first funnel.
Action Steps
If you're just starting out and want to build a marketing funnel, what you want is to build a list. Follow the guide in 'I want to build a list'.
If you have more than 10 pages across more than 3 projects, you can explore the Funnel Manager function. The Tutorial on that page is the best place to start.
How to use the Link Tracker?
Someone recommended you to our Link Tracker?
Good choice.
Our link tracker is probably the only tracker in the market that can track the surfing duration for third-party links and tell you if the traffic is a real human.
Action Steps
To use our Link Tracker, please go to the navigation panel and click 'Track Links' as shown below.

You can also explore the Rotators and Ad Bars functions.
Remember to use the Tutorial on the respective page if you have question.
I got a Share Code. What should I do?
Someone gave you a Share Code?
First, you need to know what is the Share Code for.
You can tell the purpose of the Share Code from the prefix. Refer to the table below.
| Share code starting with | Purpose | Where to use |
| list- | Email series | Email Series |
| page- | Page | Page Manager |
| form- | Form/Popup | Form / Popup Manager |
| funnel- | Funnel (which includes a group of Pages, Forms/Popups and Ad Bar.) | Funnel Manager |
| (no prefix) | It is our old share code. Please contact the giver of the share code and ask for the purpose. | |
Follow the 'Where to use' above to go to the correct URL, then click the Tutorial link there.
Below is an illustration.
Let's say you get a share code starting with list-. Go to Email Series, then click Tutorial (arrow 1).

Type Share in the search box (arrow 2) to show only tutorial topics with the word 'Share'. Then click How to import a Share Code? (arrow 3) and follow the step by step instruction.
There are other topics on Share Code that you can read in the Tutorial. Read them to master the use of our Share Code function.
Action Steps
Do what is told.
I don't know what I want. What should I do?
No worries. That is possible.
You joined because you have a desire to succeed.
You felt that LeadsLeap can help you to achieve that. It's good to follow your intuition.
Below are what you can do.
1) Read 'Success Lessons' Email Series
Every few days, you will receive a Success Lesson in your email, like this:

In these lessons, I'll share my 'Wrecks To Riches' story.
I hope that my story can inspire you.
Here're what others say about the 'Success Lessons' series.
"The daily lessons are the most educative I have ever come across. I am spellbound." - Kwakar James
"I enjoy reading your emails even thought I don't always have time to read them right away. I usually save them on a folder because they always have something of value and they inspired me to learn from you." - Ellen Suazo
Look out for these lessons in your email.
2) Read Insider Ad Report
This report shows you how ordinary people advertise with success.
If you want to play the game of Internet Marketing, one day, you're going to be advertising.
It makes sense for you to start learning the art of advertising.
Let's just say, if you fully understand and practice what is written in this report, success is inevitable. It's a bold claim but I stand by it.
The link to read the report is as shown below.

3) Surf Tons Of Ads
There are lots of ads in LeadsLeap.
They look like these:
You may wonder, how will ads help you?
Let me ask you,
"How does a chef learn to cook?"
First, he must enjoy eating. Then he finds out what are the different ingredients and how to combine them to form different taste and presentation.
Likewise, surfing ads and learning about different programs is your first step to becoming a successful marketer and online business owner.
That's how I learnt. I am sure other successful marketers will say the same.
4) Mess Around With LeadsLeap Tools
I use 'mess around' because chances are at this point, you have no idea what you are doing. It's fine. LeadsLeap tools are mostly free, especially the fundamental ones. Have fun experimenting with these tools.
5) Read The Tutorials
The difference between a newbie and an expert is knowledge. Our tutorial is the vault for that knowledge. When you have full knowledge of how internet marketing works, you will not say "I don't know what I want" again!
After you've gained enough confidence (probably from reading the Success Lessons and the Insider Ad Report), learned how different programs work (probably through ad surfing), and mastered the internet marketing tools (by following the guides in our Tutorials), you will be on your way to building your own business.
When I first started, there wasn't a free testing ground like LeadsLeap. Everything cost money.
Now you have LeadsLeap. There is no more excuse.
You already have the desire, if not you won't sign up.
Now you just need to take action to first learn, then apply what you've learnt.
There are 6 ways to earn credits. The table below summarizes them.
| Way To Earn | Amount Earned |
| 1) Visit any 'Surf & Earn' link in this Member's Area and your daily email. Below are some examples:(Click to enlarge)  Please note that some links are meant to trap bot click. Do not click them. Below is an example: 
|
You earn credits based on surfing duration. The longer you surf, the more credits you earn. Credits earned as follow: For Free Members First 5 sec > 0.2 credit For Pro Members First 5 sec > 0.4 credit Our ad surfing system is different from all other systems you've seen. We believe in surfing for interest, not surfing for timer. For more details, please visit how LeadsLeap ad system works. |
| 2) Promote your Coop Link | When people visit your Coop Link, you will earn credits. (The clicks will also earn you Coop income.) Credits earned as follow: First 5 sec > 0.2 credit |
| 3) Report problem ads | 1 credit per ad. False report will not be credited. |
| 4) Add PPC Ad Widget to your blog/website | When people click the ads in the widget, you will earn 0.2 credits. (The clicks will also earn you PPC income.) |
| 5) Use our Link Tracker with Ad Widget activated | When people click the ads in the widget, you will earn 0.2 credits. (The clicks will also earn you PPC income.) |
| 6) Earn credits whenever your 10-levels of followers view ads | When your followers surf ads, you'll earn overriding credits from 10 levels (if you have more than 20 direct referrals), or from the first level (if you have less than 20 direct referrals). |
VA stands for Virtual Assistant.
If someone helps you to manage your list, page, form etc, you have to set up this password for that person.
This password can access everything except earning, upgrade, profile and account pages.
NOTE: This password is less secure, as we will allow anyone with this password to log in. If you do not need it, please leave it blank.
How to set up a VA password?
Go to Account, under the field VA Password, enter a password that is different from your account password.
WARNING: If you don't need a VA password, leave it blank. Otherwise, you may forget you set it and mistakenly use it to log in, then wonder why some functions don't work.
Go to Account, under the field VA Password, enter a password that is different from your account password.
Go to Account, under the field Account Password to change.
Go to Account, under the field Email to change.
Go to Account, under the field Preferred Time Zone to change.
The answer is no. The system will try to stop that person because we do not know if that person is a hacker.
If someone is helping you with your account, please go to Account, under the field VA Password, enter a password that is different from your Account Password.
Ask that someone to log in using your Username and the VA Password you've set.
VA stands for Virtual Assistant. VA Password allows other people to log in to your account and help you with different aspects of your account except important matters such as earning, upgrade, profile and account pages.
Your LeadsLeap username or userid or affiliate ID is
Your main affiliate link is https://leadsleap.com/?r=.
There are other affiliate links you can use.you can find on this page, under My Affiliate Links.
When editing your password, Paypal or Wise email, if you experience the error message 'Security check failed', it is because your current login location is different from the location where you first registered your account.
For example, you may have registered your account in US but you now log in from Canada.
If you are staying in your current country for good, we can change your country of registration. To do that, please open a support ticket with the following:
"I have read the Tutorial. Please change my country of registration from [original country] to [current country]."
If you do not know the original country, leave it blank. We will do an email verification with you.
'Pro Member' is just a term we use differentiate paid members from free members.
It does not refer to 'professional' member, or maybe it does.
Everyone who joins LeadsLeap join as a Free Member.
Those who decide to upgrade will become the Pro Member.
To become a Pro Member or to learn more about the benefits of being a Pro Member, you can go to Upgrade
Many things are linked to your username.
Imagine you change your gmail username. Can it be changed technically, yes. But practically, changing it is as good as creating a new gmail.
We can effect the change for you. But the following will stop working and need to be replaced by you manually:
1) Your affiliate link
2) Your popup
3) Your coop link
4) Your ad widget
5) URL of the images hosted in LeadsLeap
6) Your sendsteed opt in form (if you use the raw html form code)
7) Your pro subscription (you will need to go through the process of upgrading again, no payment needed.)
If you have not used these or are okay to change them, then we can effect the change for you.
To proceed, please open a support ticket and write the following:
"I have read the tutorial. Please proceed to change my username from [xxx] to [yyy]. I will do the necessary updates later."
There is no direct way to update the info. You will have to renew your subscription using the new card, which means going through the subscription process again. When done, the subscription with the old card will be cancelled automatically.
Here are the steps to do it:
1) Click here
2) Upgrade again using the new card.
If your existing subscription hasn't lapsed, no payment will be made. Payment will only start at the end of the current subscription.
Unfortunately, we cannot change the payment agreement on your behalf. Only you can make this change. Here are the steps involved:
1) Calculate the Shortfall: We will calculate any shortfall in the subscription fee. (For example, if your original due date is the 20th and you want to change it to the 1st, there will be a 10-day shortfall.)
2) Top Up the Shortfall: You will need to add the shortfall amount to your account.
3) Subscription Adjustment: We will cancel your current subscription agreement with PayPal or your credit card and extend your Pro Membership due date to the new preferred date.
4) Renew Your Subscription: You will need to renew your Pro Subscription. The system will start the payment on your new preferred due date.
If you are okay with the above process, please Open a support ticket with the following message:
"I have read the tutorial and would like to change my payment due date to XXX. Please proceed."
Please go to Cancel Pro to cancel your Pro subscription.
You can cancel it as soon as you've made up your mind. It will just cancel the auto-billing agreement with Paypal or the bank, so that no future charges will be made.
Your account will only be downgraded at the end of the current subscription.
Please go to Account, under the field Email, enter your preferred email address.
Then click 'Save Account Settings'.
If you only want to cancel your Pro Membership but remain as a Free Member, please go to Cancel Pro.
If you only want to terminate your entire account, please go to Delete Account.
There are 2 common reasons.
1) The email is already in use.
Solution:
Open a support ticket with the email address you want to change to.
2) You get the error 'Security check failed'.
Solution:
Open a support ticket with the following:
"I have read the Tutorial. Please change my country of registration from [original country] to [current country]."
If you do not know the original country, leave it blank. We will do an email verification with you.
If you try to upgrade your account but your credit/debit card is declined, it's usually due to one of the following reasons:
1) Insufficient card.
2) Your bank disallows recurring payment.
If it is the first reason, top up your card and try again.
If it is the second reason, go to Income & Withdrawal and click the 'Top Up' button to make a one-time top-up.

Then go to Upgrade and upgrade using your LeadsLeap Balance.
If you upgrade using this method, you will have to manually top up your account before the next billing.
Alternatively, you can upgrade using Paypal as the payment gateway.
If you prefer to use Bitcoin, you can contact our support.
There are 2 common reasons.
1) The email is already used in another account.
Solution:
Open a support ticket with your Paypal or Wise email address.
2) You get the error 'Security check failed'.
Solution:
Open a support ticket with the following:
"I have read the Tutorial. Please change my country of registration from [original country] to [current country]."
If you do not know the original country, leave it blank. We will do an email verification with you.
Next to the 'Preferred Time Zone' title, you will see a small print that says (Your local time zone is UTC/GMT +/-xx:xx)

It is our system's best guess, based on the setting in your computer.
You can also go to Google.com and search 'what is the time zone for [your country]'. Then look for the GMT value.
Please note that the +/- in the GMT value is important. Do not omit the sign.
In most cases, your account is banned because you have clicked ads that are designed for bots to click.
For us to unflag your account, we need to make sure that you can tell the difference between a bot ad and actual ad.
Please take a look at the bot ads below. For EACH of them, please let us know how they are different from normal ads.
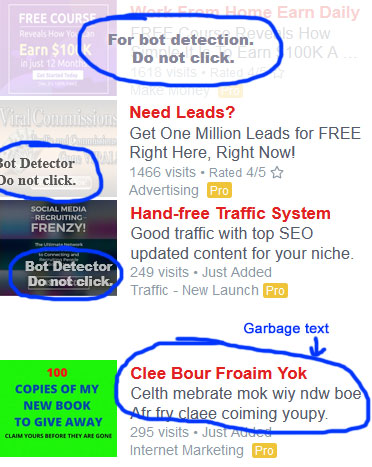
Then please open a support ticket with the following message:
"I have read the Tutorial. I will not click bot ads again. I understand that each account can only be unbanned once. Please unban my account."
Your account can be flagged due to, but not limited to, the followings:
1) Using bots or programs to automate or help you in the surfing process.
2) Mindlessly clicking ads.
3) Surfing ads using multiple devices or multiple windows at the same time.
4) Creating multiple accounts to surf ads.
If you come across a problem ad, you can report it to us using the report button shown below:

You can find the button in the ad viewer.
You will earn 1 credit for every validated report.
If you come across a problem LeadsLeap link, meaning the link is from leadsleap.com, please open a support ticket and let us know the link and how you arrive at that link.
The table below summarizes all the ways to earn credits.
| Way To Earn | Amount Earned |
| 1) Visit any 'Surf & Earn' link in this Member's Area and your daily email. Below are some examples:(Click to enlarge) Please note that some links are meant to trap bot click. Do not click them. Below is an example:
|
You earn credits based on surfing duration. The longer you surf, the more credits you earn. Credits earned as follow: For Free Members First 5 sec > 0.2 credit For Pro Members First 5 sec > 0.4 credit Our ad surfing system is different from all other systems you've seen. We believe in surfing for interest, not surfing for timer. For more details, please visit how LeadsLeap ad system works. |
| 2) Promote your Coop Link | When people visit your Coop Link, you will earn credits. (The clicks will also earn you Coop income.) Credits earned as follow: First 5 sec > 0.2 credit |
| 3) Report problem ads | 1 credit per ad. False report will not be credited. |
| 4) Add PPC Ad Widget to your blog/website | When people click the ads in the widget, you will earn 0.2 credits. (The clicks will also earn you PPC income.) |
| 5) Use our Link Tracker with Ad Widget activated | When people click the ads in the widget, you will earn 0.2 credits. (The clicks will also earn you PPC income.) |
| 6) Earn credits whenever your 10-levels of followers view ads | When your followers surf ads, you'll earn overriding credits from 10 levels (if you have more than 20 direct referrals), or from the first level (if you have less than 20 direct referrals). |
1) Earn you Daily Cash Bonus.
2) Get you traffic through Credit Ads.
3) Convert into cash through Credit Encashment.
Clicks are the number of ads visited.
Credits are the points you've earned.
Credits can be earned through many ways, not just through viewing ads. You can also earn credits by participating in our Traffic Coop, reporting problem ads and when your referrals view ads.
No. Credits are not for sale. If you have the budget, you can upgrade to a Pro Member. Pro Members can post Pro Ads, which will be shown in the system 24/7 without the need of credits.
You can learn more about our Pro Membership here.
Check if any of the 5 possibilities applies to you:
1) Check if there is an error message in the Ad Viewer. Your account may have been flagged.

2) You may have clicked many links but not surfed them. Only links that have been surfed for at least 5 seconds are considered as clicks.
3) You may be earning credits but your credits are used up as traffic to your Credit Ad. So it appears as if you are not earning credits.
4) Your account may be inactive due to email failure. If so, when you login to your account, you will see an alert message asking you to verify your email.
5) An add-on/extension in your browser may be blocking our system. Try using a different browser.
6) If only a particular website fails to work, the website may interfere with our system. Report the url to our support.
If none of reasons applies, please contact our support.
This is because you have Credit Ads running. As you earn credits, your Credit Ads are also using up credits for traffic.
1) Your Credit Ad.
2) Credit Encashment.
3) Credits will expire after 6 months.
Personal clicks measure the ads that you view personally via your emails, member's area or our blog. These clicks will earn you credits.
Coop clicks measure the number of times your Coop Link has been surfed for at least 5 seconds. These clicks not only earn you credits but also Coop income.
PPC clicks measure the ads viewed by third-party visitors via your ad widget or tracker. These clicks not only earn you credits but also PPC income.
(Please note that you should not click on your own Coop Link and PPC ads. Personal clicks are only allowed in the emails sent to you, your member's area and our blog with your account logged in.)
Those are Overriding Credits. When any of your 10 levels of followers, including your spillover level if you are a Pro Member, click ads, you'll earn overriding credits.
When any of your 10 levels of followers, including your spillover level if you are a Pro Member, click ads, you'll earn overriding credits.
As a Pro Member, earning credit is optional.
You can get traffic from your Pro Ads without the need of credits.
But if you have credits, you can get more traffic from your Credit Ads and enjoy Daily Active Bonus.
Yes. Credits will expire after 6 months.
If you have excess credits, it makes sense to convert them into cash using Credit Encashment. Cash will not expire.
1) Click 'Add a new ad'.
An ad setup form similar to the screenshot below will be added.

2) Enter the URL of the website you want to promote (arrow 1).
3) Enter a catchy Title (max 25 characters) (arrow 2)
Usually it is the main reason why visitors should click your ad.
For inspiration, take a look at other members' ads on this page. See what kind of title can catch your attention.
4) Enter the Ad Text (max 60 characters) (arrow 3).
Ad Text allows more words. You can add in more details here.
5) Upload an ad image
The ad image can be an interesting screenshot from the program you're promoting or an image that is related to your ad.
The minimum image size is 300x250 pixels (width × height), which is roughly the size of a credit card. Be sure to use an image that is at least this size or larger.
The steps to upload the image require a bit more explanation. We will split this step into several sub-steps.
5.1) Click (arrow 4 above).
An image uploader similar to the screenshot below will be shown.

5.2) Choose one of the following 3 methods to upload an image:
Method 1 – Upload Image From Local Drive (arrow 5)
If you have a preferred image, first save it to your local device. Then, use Method 1 to upload the image.
This method works on all systems, including PC, laptop, mobile phone, and tablet.
If you’re using a phone or tablet, you may want to check out the tutorial below:
Demo > 'How to upload ad image using a mobile device?'
Method 2 – Upload Image by Copy & Paste (arrow 6)
This method only works on a PC or Mac.
Simply take a screenshot of an image and paste it directly into the Image Uploader.
More details will be provided in the subsequent steps.
Method 3 – Use an Image from pixabay.com (arrow 7)
This method allows you to select a matching image from pixabay.com.
The system will load matching images based on your ad title and text. Simply select one that is suitable for your ad.
This method works on all systems, including PC, laptop, mobile phone, and tablet.
5.3) Follow the steps and demo below based on the method you selected:
Method 1 – Upload Image From Local Drive (arrow 5)
If you use Method 1, save the image to your local drive. Then click the 'Upload Image' button to upload it.
See the demo below:

Method 2 – Upload Image by Copy & Paste (arrow 6)
Take a screenshot of the image you want to use, then paste it into the Image Uploader.
The method for taking a screenshot depends on your device:
For PC: Use the Snipping Tool to take a screenshot. (If you're unsure where it is, search for "Snipping Tool" in your Start menu. See screenshot below.)

Below is a demo showing how to copy and paste using the Snipping Tool:

For Mac: Go to the image, then press and hold Shift + Command + 4. A crosshair cursor will appear. Click and drag to select the area to capture. When you release the mouse button, the screenshot is copied automatically. Go to the Image Uploader and paste it there.
Method 3 – Use an Image from pixabay.com (arrow 7)
To use this method, the ad title and text must first be filled up.
Next, click the button indicated by arrow 7. The system will then load matching images for you to choose from.
Below is a demo showing how to load, select and upload the image.

6) Select a category that best fit your ad (arrow 7).

7) Link the ad to your Social Review (arrow 8).
If you have written a Social Review on the product you're advertising here, you can link the Review to this Ad. When visitors view this Ad, they can also read your Review by clicking the button below in the Ad Viewer.

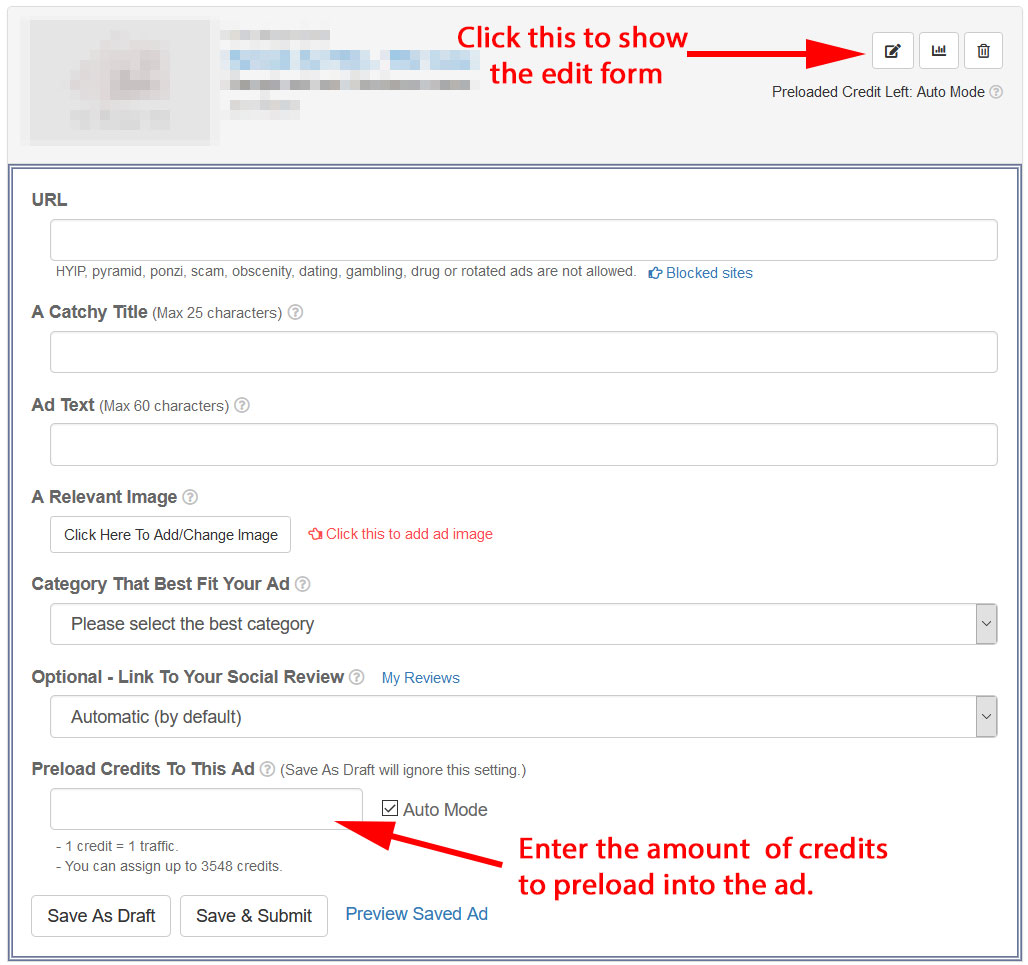
8) Decide whether you want to run the ad on Auto Mode or Preload Mode.
You can run your Credit Ad in Auto Mode or Preload Mode.
In Auto Mode, your Ad will get traffic as long as you have Credits in your account.
But if you prefer to allocate the Credits yourself, you can Preload credits by entering how much Credits you want to allocate for this ad.
If your ad is in Preload Mode, your ad will stop running once the Preloaded Credits are used up, regardless of whether your account has Credits or not.
Most of the time, it is easier to run the ad on Auto Mode (which is the default mode).
If you want to run on Auto Mode, skip this step.
If you want to run on Preload Mode, enter the amount of Credits you want to preload (arrow 9).
9) Click 'Save & Submit' (arrow 10) to activate the ad.

10) Click 'Preview Save Ad' (arrow 11) to view your ad and see if it works.
Once you click 'Save & Submit' (arrow 10), your ad will start running in the network if you are a Pro Member. Our reviewer will review your ad later. If you are a Free Member, your ad will be queued for review. The review process should take less than 24 hours.
If you are not ready to activate the ad, click 'Save As Draft' (arrow 12) to save without activating.
Note #1: To ensure that ads in the network are up to date, Credit Ads will expire after 14 days. Please update your Credit Ad at least every two weeks.
Note #2: To conserve server resources, if your account is inactive for more than 180 days, your credit ads will be deleted.
Credit Ad is fueled by credits. Whenever your credit ad receives a real visit, 1 credit will be deducted.
You can earn credits by surfing other ads in the network, participating in our Coop program and through other means such as reporting problem ads and overriding credits from your 10-levels of followers.
Credit Ads will expire after 14 days. This is to ensure that ads in the network are up to date.
You can earn credits from the following:
1) Surf other ads or Associate Message
You can surf both Member Ads (arrow 1) and Associate Messages (arrow 2). You can find them in your Member Area and our Daily Email to you.
About our Ad Viewing System
Our ad viewer is the first-and-only in the market. If you are new, please read Introduction To Our New Ad Viewer – Surf And Earn Continuously
2) Join our Traffic Coop
You can get your Coop Link here.
Promote the link in other traffic networks and earn credits on autopilot.
You will also earn Coop Income at the same time.
3) Report problem ads
While surfing ads, there is an option to report problem ads.

4) Overriding credits from your 10-levels of followers.
When your followers surf ads, you'll earn overriding credits.
Set up all 3 Credit Ads (10 if you are a Pro Member) and surf other ads in the network until you have 50 credits every day.
All members.
Yes. For free advertising, please go to Post Credit Ads (Free).
How to post Credit Ads?
Go to Post Credit Ads (Free).
When you're there, click Tutorial (arrow 1 below), then click How to post / activate a Credit Ad? (arrow 2). Follow the instructions there to set up your Credit Ad.

Credit Ads are fuelled by Credits.
1 Credit = 1 Visit.
Read > How to earn credits?
Basically, you just need to do 2 things to get free traffic.
1) Post Credit Ads.
2) Surf other members ads to earn credits.
There are more ways to earn credits. You can explore later.
To ensure the quality of the ads in the network, Credit Ads submitted by Free Members will be reviewed before being active.
We will review your ad within 24 hours.
Pro Members' ads will be activated immediately while queuing for approval. This means ads by Pro Members can still be rejected if issues are found.
Credit ads should all be reviewed within 24 hours. Otherwise, our admin will be informed. Our admin will then step in to do the review.
If your ad has not been reviewed after 28 hours, you can contact our support.
Please note that if you re-submit your Credit Ad, the ad will be at the end of the queue again.
Auto Mode
In Auto Mode, your Credit Ads will be shown in the network as long as you have credits in your account.
When someone visits your ad, 1 credit will be deducted from your total credits.
The advantage is that it is automatic. As long as you have credits, you will get traffic.
The disadvantage is you can’t allocate your credits.
Preload Mode
In Preload Mode, you will preload credits into your Credit Ads.
For example, you preload 100 credits to one ad, 50 credits to another ad.
Practically, since 1 credit = 1 traffic, what you are doing is to allocate 100 traffic to the first ad, and 50 traffic to the second.
The advantage is you can control how you want to use your credits. If you have a lot of credits (some of you do), you can even choose to spend some for Credit Ads and encash the rest.
The disadvantage is the Credit Ad will stop running the moment it runs out of its preloaded credits. You will have to monitor and top up the credits from time to time.
The default mode
The default mode is Auto Mode.
How to change to Preload Mode?
To change to Preload Mode, enter the amount of credits you want to preload.
See the screenshot below. It should be self-explanatory.
How to change to Auto Mode?
The default mode is Auto Mode. If you are setting up a new ad, there is no need to change.
If you have changed the ad to Preload Mode and want to change it back to Auto Mode, click the 'Auto Mode' checkbox.

Any unused credit will automatically be added back to your account.
Follow the screenshot below. Then click Save & Submit.
1) Click of the ad you want to change.
2) Click the 'Auto Mode' checkbox. Then click 'Save & Submit'.
To check the total traffic you have received, refer to arrow 1.

To check the detailed traffic stats of ALL the traffic you've received up to the past 30 days, click 'View Consolidated Traffic Stats' (arrow 2).
To check the detailed traffic stats of EACH ad, click (arrow 3) of the ad you want to check.
1) Click (arrow 4).
An image uploader similar to the screenshot below will be shown.
2) Choose one of the following 3 methods to upload an image:
Method 1 – Upload Image From Local Drive (arrow 5)
If you have a preferred image, first save it to your local device. Then, use Method 1 to upload the image.
This method works on all systems, including PC, laptop, mobile phone, and tablet.
If you’re using a phone or tablet, you may want to check out the tutorial below:
Demo > 'How to upload ad image using a mobile device?'
Method 2 – Upload Image by Copy & Paste (arrow 6)
This method only works on a PC or Mac.
Simply take a screenshot of an image and paste it directly into the Image Uploader.
More details will be provided in the subsequent steps.
Method 3 – Use an Image from pixabay.com (arrow 7)
This method allows you to select a matching image from pixabay.com.
The system will load matching images based on your ad title and text. Simply select one that is suitable for your ad.
This method works on all systems, including PC, laptop, mobile phone, and tablet.
3) Follow the steps and demo below based on the method you selected:
Method 1 – Upload Image From Local Drive (arrow 5)
If you use Method 1, save the image to your local drive. Then click the 'Upload Image' button to upload it.
See the demo below:
Method 2 – Upload Image by Copy & Paste (arrow 6)
Take a screenshot of the image you want to use, then paste it into the Image Uploader.
The method for taking a screenshot depends on your device:
For PC: Use the Snipping Tool to take a screenshot. (If you're unsure where it is, search for "Snipping Tool" in your Start menu. See screenshot below.)
Below is a demo showing how to copy and paste using the Snipping Tool:
For Mac: Go to the image, then press and hold Shift + Command + 4. A crosshair cursor will appear. Click and drag to select the area to capture. When you release the mouse button, the screenshot is copied automatically. Go to the Image Uploader and paste it there.
Method 3 – Use an Image from pixabay.com (arrow 7)
To use this method, the ad title and text must first be filled up.
Next, click the button indicated by arrow 7. The system will then load matching images for you to choose from.
Below is a demo showing how to load, select and upload the image.
1) Click (arrow 4).
An image uploader similar to the screenshot below will be shown.
2) Choose Method 1 or Method 3 to upload an image:
There are 3 methods to upload an image, but only Method 1 and 3 can be used for mobile device.
Method 1 – Upload Image From Local Drive (arrow 5)
If you have a preferred image, first save it to your phone. Then, use Method 1 to upload the image.

Below is the demo to show you the upload process:

Method 3 – Use an Image from pixabay.com (arrow 7)
This method allows you to select a matching image from pixabay.com.
The system will load matching images based on your ad title and text. Simply select one that is suitable for your ad.
To use this method, the ad title and text must first be filled up.
Next, click the button indicated by arrow 7. The system will then load matching images for you to choose from.
Below is a demo showing how to load, select and upload the image.
1) If you want to resize an image because the image is too small, it is useless. Digitally enlarging the image will make the image blurry. Please find another image with at least 300 x 250 pixel (length x height).
2) If you want to resize an image because the file size is too big (hence the system doesn't allow you to upload), you can open the image in your PC and copy the image using Snipping Tool (free tool in Windows PC) or if you use Mac, press and hold Shift, Command, and 4. Then copy and paste it into the image uploader.
3) Other than the above 2 special cases, as long as you can upload the image to the uploader, you can use the uploader to resize the image.
To resize the image horizontally, follow the demo below:

To resize the image vertically, follow the demo below:

To resize the image both horizontally and vertically, keeping the aspect ratio, follow the demo below:

To rotate the image (and resize to fit the space), follow the demo below:

Click the pause button shown below:

It's not a good idea to reuse an image. People who have clicked one ad may think the other ad is the same and hence not click it.
If you want to do it, right click on the image and copy it. Then paste it in the image editor of the new ad. (See demo below.)

Please understand that credits running out too fast means you are getting traffic too quickly.
1 traffic = 1 credit.
So do you still want your credit to run out slowly?
If you do, you can preload credits to your ad.
You can preload credits to your ad.
No. Credits are not for sale. If you have the budget, you can upgrade to a Pro Member. Pro Members can post Pro Ads, which will be shown in the system 24/7 without the need of credits.
You can learn more about our Pro Membership here.
Please check if your Credit Ad is under Preload Mode and it has 0 credit left.

If it is, you can either top up the credit or change it to Auto Mode.
If that isn't the reason, and your ad Status says 'Active', please contact support.
1 credit = 1 real visit to your Credit Ad.
3 if you are a Free Member, 10 if you are a Pro Member.
As a Pro member, you can set up Pro Ads. It is the 'Pro Ads' that bring you traffic without the need of Credits.
Your Credit Ads still require Credits for traffic.
Reason?
We try to create a system that is fair for everyone. Credit Ads are for those who put in the effort to earn credits. Pro Ads are for Pro Members who have paid.
In the ad set up form, under the URL field, you can see the link shown below:

Click on it to find out if your ad can be shown in the Coop Network.
1) Click 'Add a new ad'.
An ad setup form similar to the screenshot below will be added.
2) Enter the URL of the website you want to promote (arrow 1).
3) Enter a catchy Title (max 25 characters) (arrow 2)
Usually it is the main reason why visitors should click your ad.
For inspiration, take a look at other members' ads on this page. See what kind of title can catch your attention.
4) Enter the Ad Text (max 60 characters) (arrow 3).
Ad Text allows more words. You can add in more details here.
5) Upload an ad image
The ad image can be an interesting screenshot from the program you're promoting or an image that is related to your ad.
The minimum image size is 300x250 pixels (width × height), which is roughly the size of a credit card. Be sure to use an image that is at least this size or larger.
The steps to upload the image require a bit more explanation. We will split this step into several sub-steps.
5.1) Click (arrow 4 above).
An image uploader similar to the screenshot below will be shown.
5.2) Choose one of the following 3 methods to upload an image:
Method 1 – Upload Image From Local Drive (arrow 5)
If you have a preferred image, first save it to your local device. Then, use Method 1 to upload the image.
This method works on all systems, including PC, laptop, mobile phone, and tablet.
If you’re using a phone or tablet, you may want to check out the tutorial below:
Demo > 'How to upload ad image using a mobile device?'
Method 2 – Upload Image by Copy & Paste (arrow 6)
This method only works on a PC or Mac.
Simply take a screenshot of an image and paste it directly into the Image Uploader.
More details will be provided in the subsequent steps.
Method 3 – Use an Image from pixabay.com (arrow 7)
This method allows you to select a matching image from pixabay.com.
The system will load matching images based on your ad title and text. Simply select one that is suitable for your ad.
This method works on all systems, including PC, laptop, mobile phone, and tablet.
5.3) Follow the steps and demo below based on the method you selected:
Method 1 – Upload Image From Local Drive (arrow 5)
If you use Method 1, save the image to your local drive. Then click the 'Upload Image' button to upload it.
See the demo below:
Method 2 – Upload Image by Copy & Paste (arrow 6)
Take a screenshot of the image you want to use, then paste it into the Image Uploader.
The method for taking a screenshot depends on your device:
For PC: Use the Snipping Tool to take a screenshot. (If you're unsure where it is, search for "Snipping Tool" in your Start menu. See screenshot below.)
Below is a demo showing how to copy and paste using the Snipping Tool:
For Mac: Go to the image, then press and hold Shift + Command + 4. A crosshair cursor will appear. Click and drag to select the area to capture. When you release the mouse button, the screenshot is copied automatically. Go to the Image Uploader and paste it there.
Method 3 – Use an Image from pixabay.com (arrow 7)
To use this method, the ad title and text must first be filled up.
Next, click the button indicated by arrow 7. The system will then load matching images for you to choose from.
Below is a demo showing how to load, select and upload the image.
6) Select a category that best fit your ad (arrow 7).

7) Choose the Ad Type (arrow 8).
If you are not sure, just skip this option.
8) Link the ad to your Social Review (arrow 9).
If you have written a Social Review on the product you're advertising here, you can link the Review to this Ad. When visitors view this Ad, they can also read your Review by clicking the button below in the Ad Viewer.
9) Click 'Save & Submit' (arrow 10) to activate the ad.
10) Click 'Preview Save Ad' (arrow 11) to view your ad and see if it works.
Once you click 'Save & Submit' (arrow 10), your ad will start running in the network. Our reviewer will review your ad later.
If you are not ready to activate the ad, click 'Save As Draft' (arrow 12) to save without activating.
Pro Advertising is our premium advertising service available to Pro Members only. Pro Ads are shown 24/7 throughout our entire network without the need for credits.
1) Click (arrow 4).
An image uploader similar to the screenshot below will be shown.
2) Choose one of the following 3 methods to upload an image:
Method 1 – Upload Image From Local Drive (arrow 5)
If you have a preferred image, first save it to your local device. Then, use Method 1 to upload the image.
This method works on all systems, including PC, laptop, mobile phone, and tablet.
If you’re using a phone or tablet, you may want to check out the tutorial below:
Demo > 'How to upload ad image using a mobile device?'
Method 2 – Upload Image by Copy & Paste (arrow 6)
This method only works on a PC or Mac.
Simply take a screenshot of an image and paste it directly into the Image Uploader.
More details will be provided in the subsequent steps.
Method 3 – Use an Image from pixabay.com (arrow 7)
This method allows you to select a matching image from pixabay.com.
The system will load matching images based on your ad title and text. Simply select one that is suitable for your ad.
This method works on all systems, including PC, laptop, mobile phone, and tablet.
3) Follow the steps and demo below based on the method you selected:
Method 1 – Upload Image From Local Drive (arrow 5)
If you use Method 1, save the image to your local drive. Then click the 'Upload Image' button to upload it.
See the demo below:
Method 2 – Upload Image by Copy & Paste (arrow 6)
Take a screenshot of the image you want to use, then paste it into the Image Uploader.
The method for taking a screenshot depends on your device:
For PC: Use the Snipping Tool to take a screenshot. (If you're unsure where it is, search for "Snipping Tool" in your Start menu. See screenshot below.)
Below is a demo showing how to copy and paste using the Snipping Tool:
For Mac: Go to the image, then press and hold Shift + Command + 4. A crosshair cursor will appear. Click and drag to select the area to capture. When you release the mouse button, the screenshot is copied automatically. Go to the Image Uploader and paste it there.
Method 3 – Use an Image from pixabay.com (arrow 7)
To use this method, the ad title and text must first be filled up.
Next, click the button indicated by arrow 7. The system will then load matching images for you to choose from.
Below is a demo showing how to load, select and upload the image.
1) Click (arrow 4).
An image uploader similar to the screenshot below will be shown.
2) Choose Method 1 or Method 3 to upload an image:
There are 3 methods to upload an image, but only Method 1 and 3 can be used for mobile device.
Method 1 – Upload Image From Local Drive (arrow 5)
If you have a preferred image, first save it to your phone. Then, use Method 1 to upload the image.
Below is the demo to show you the upload process:
Method 3 – Use an Image from pixabay.com (arrow 7)
This method allows you to select a matching image from pixabay.com.
The system will load matching images based on your ad title and text. Simply select one that is suitable for your ad.
To use this method, the ad title and text must first be filled up.
Next, click the button indicated by arrow 7. The system will then load matching images for you to choose from.
Below is a demo showing how to load, select and upload the image.
1) If you want to resize an image because the image is too small, it is useless. Digitally enlarging the image will make the image blurry. Please find another image with at least 300 x 250 pixel (length x height).
2) If you want to resize an image because the file size is too big (hence the system doesn't allow you to upload), you can open the image in your PC and copy the image using Snipping Tool (free tool in Windows PC) or if you use Mac, press and hold Shift, Command, and 4. Then copy and paste it into the image uploader.
3) Other than the above 2 special cases, as long as you can upload the image to the uploader, you can use the uploader to resize the image.
To resize the image horizontally, follow the demo below:
To resize the image vertically, follow the demo below:
To resize the image both horizontally and vertically, keeping the aspect ratio, follow the demo below:
To rotate the image (and resize to fit the space), follow the demo below:
Click the pause button shown below:
To check the total traffic you have received, refer to arrow 1.

To check the detailed traffic stats of ALL the traffic you've received up to the past 30 days, click 'View Consolidated Traffic Stats' (arrow 2).
To check the detailed traffic stats of EACH ad, click (arrow 3) of the ad you want to check.
It's not a good idea to reuse an image. People who have clicked one ad may think the other ad is the same and hence not click it.
If you want to do it, right click on the image and copy it. Then paste it in the image editor of the new ad. (See demo below.)
1) Pro Ads are shown in the daily emails we send to our members.
2) Pro Ads are shown in our widget in more than 4000 other websites.
3) Pro Ads are shown in our link trackers, which are used in hundreds of other traffic networks.
4) Pro Ads are given a higher priority than Credit Ads.
5) Pro Ads don't require credit. They are rotated in the network 24/7.
The Average Monthly Pro Ad Traffic refers to the average amount of traffic that a Pro Member's account receives over a 7-day period.
This average is calculated on a trailing basis, meaning it continuously updates to reflect the most recent 7 days of data.
It's important to note that this traffic measurement is for the entire Pro Member account as a whole, rather than being specific to each individual Pro Ad within the account.
In other words, it represents the total traffic generated by all Pro Ads under a single Pro Member account, averaged over the past week.
They are shown in
1) Our blog,
2) Members Area,
3) Emails to our members,
4) PPC Ad Widget in more than 4000 other websites, and
5) Ad widget in the Link Tracker.
6) Our Coop Network, which include most traffic exchanges.
No. They are rotated 24/7 in the network. No credit needed.
Not really. There is no cap. Pro Ads will be rotated 24/7 in the network regardless of how much traffic they've received. That means interesting Pro Ads may receive more traffic whereas boring ones may get less.
However with 10 ads per Pro Member, the total traffic that each Pro Member receives usually sum up to be about the same.
1) Submit interesting ads.
2) Provide values. If people see the value, they will respond.
Yes. Make sure that your advertised page is working and it is not related to HYIP, pyramid, ponzi, scam and does not contain any offensive, malicious or adult materials, including dating, drug and gambling sites. Also, it should not have any obtrusive popup, popunder and should not contain any auto-download or frame-breaking script.
No. But it is your responsibility to keep your Pro Ad updated. If the ad is not working correctly, it will be stopped. Of course, you will be informed immediately.
A Pro Member can post 10 Pro Ads, in addition to 10 Credit Ads.
It is possible that Credit Ads receive more traffic than Pro Ads. In fact, that's one of the benefits of being a Pro Members.
Here's why.
Pro Ads are 'weighted'. Since every pro member pay the same amount of subscription fee every month, we rotate the Pro Ads evenly based on ACCOUNT, not based on number of Pro Ads. This means you will get about the same amount of TOTAL traffic everyday to all your Pro Ads.
Credit Ads on the other hand are rotated evenly among all Credit Ads with credits. Since Pro Members have 10 Credit Ads, with lots of credits, a Pro Member with 10 Credit Ads can receive a lot of traffic, even more than their Pro Ads.
In the ad set up form, under the URL field, you can see the link shown below:
Click on it to find out if your ad can be shown in the Coop Network.
Share your experience of a program you've joined.
As you submit the review, you will also submit your affiliate link for that program.
Your review will be published in our Social Review Directory, which is accessible by both our members and visitors from the Search Engines.
Your affiliate link will be rotated together with other submitted links, which will then bring you free signups to these programs.
Only Pro Members can submit a new Social Review. But if a Pro Member downgrades his account to Free Member, his review will continue to be shown and his affiliate link will continue to be rotated.
The rotation ratio is 4:1. 4 for Pro Members and 1 for Free Members.
1) Click "Add A New Review" button

2) You'll see a form similar to the one below:

3) Enter the Official Domain Name (arrow 1)

Be sure to read and follow the instruction in the blue area (see screenshot below).

4) Enter the official affiliate link (arrow 2).

In most cases, the affiliate link should start with the domain name entered in arrow 1. If the affiliate link is from common affiliate networks such as clickbank, the system will automatically recognize it too.
If you have entered the correct affiliate link, yet the system rejects it, please open a Support Ticket with the program name, Official Domain Name and Official Affiliate Link. We will resolve the issue for you asap.
5) Rate the program (arrow 3).

For example, if you want to give it 4 stars, click the 4th star (see demo below).

6) Share your experience with the program (arrow 4).

Please DO NOT submit any published review, sales kits or anything that you can obtain online. Many reviews are rejected for that reason. Just share your own experience.
7) Click 'Submit for approval' (arrow 5) if you are satisfied with your review and want to submit for approval. Otherwise, click 'Save as draft' (arrow 6) to save for work without submitting for approval.
1) Locate the review on this page.
2) Click of the review.
If you have not submitted the review before, please follow the instruction at How to submit a social review
If you have submitted the review before and it is in draft or having an issue raised, you can follow the steps below:
1) Locate the review on this page.
2) Click of the review.
3) Edit the review and click .
1) Shares more useful insights and personal experiences.
Generic review is good, but will not increase your score. Only unique insights and personal experiences can increase the score of your review.
2) Highly readable.
Short paragraphs and engaging.
3) About 1000 to 3000 characters.
1) Your affiliate link will be shown more often. The rotation ratio is 4:1.
2) If your review is good, i.e. it scores 4 and above, your review will be featured in the member's homepage and daily email.
3) When you set your reviews as your Top Recommendations, your top recommendations will be shown to your 10-levels of followers.
The way to win the system is to share your true experience and gain trust from the readers.
You need to know that whether you write a positive or negative review, your link will be rotated. There is no advantage in rating 5-stars for all the programs.
On the contrary, by being honest in your review, readers are more likely to trust you. When they trust your judgment, they will be interested to check out your top recommendations. (You can set up your top recommendation here.)
No. But please do not submit a useless or copy-and-paste review just for the sake of link rotation. All reviews are manually vetted. Only links with approved reviews are rotated in the system.
In most cases, it is because you did not enter the official affiliate link provided by the program. For example, you may have used a cloaked link, a link tracker or your own review page as the affiliate link. This is not allowed.
We make it compulsory for Affiliate Link to be the official affiliate link because that's the only way to ensure 2 things:
1. When visitor click on the program link, they will go to the program site, not hijacked to somewhere else.
2. If you have an affiliate link for the program, it means you have some experience of the program. This will help ensure that the reviews are based on experience, not opinion.
If you are sure that what you have entered is the official affiliate link, please inform our support, with the program name, its official domain name and the official affiliate link.
A reason should have been given by our reviewer.
Alternatively, read the instructions given in each field again, like the example below.
Every field has an instruction. If you follow the instructions strictly, your review must be approved.
If you need further clarification, please contact our support.
Yes. In the field that enters affiliate link, there is an option to convert the form into founder's review. (See the green button below.)

Please note that the definition of founder means you own the domain. If you are a founding member of a program, you are not a founder in this case.
You'll have to upload a special file to your server to proof the ownership. An instruction similar to the one below is given in the editor.

No. Social review directory is only for programs that are joinable.
If you submit your own blog or review site, it may be rejected or we may just approve it as a 'personal site', which will not appear in our search listing.
The way the Search Engines work is very different now.
Gone are the days of article directories, press releases etc. To really get the attention of the Search Engines, you need useful and unique contents that are regularly updated.
Don't just believe in what we say. Do your own research!
If you have posted an article or press release in an old-school publishing network, try to google the title of your article and see if you can find your writing in the search result. Chance are you can't.
On the other hand, try to google the domain name, plus the word 'review' for any product listed in our Social Review directory, for example, try googling for 'sfimg.com review' (without the ' of course), chances are you will see our Social Review listed among the top.
1) Click the 'Add a new track link' button.
2) Enter the URL that you want to track in the form shown below.

3) Click 'Preview' in the form above.
A preview of the website will be shown. Click the ? icon shown below to find out the purpose of the preview check.

4) Click one of the two options above to add the new tracker.
Regardless of which option you click, the link tracker will be added, and a tracker control panel similar to the screenshot below will appear.

By now, you have added the track link, and it is ready to use.
The following steps are optional. If you want to learn more about different settings, continue reading. If not, you can stop here.
5) For a newly added tracker, the settings panel should open by default. If it doesn't, click the edit icon (see arrow in the screenshot above) to open the settings panel.
6) Some options you can customize.
If you are a Pro Member, you can customize the URL slug (arrow 1).

You can also set up the Social Media Preview Image (arrow 2) and Private Domain (arrow 3).
To learn more about each setting, hover over the icon next to the setting.
7) Tag option (arrow 4).
If you only have 1 or 2 trackers, you can ignore this setting. When you have many trackers, you can group them using the Tag function.
Then, you can filter the trackers using the 'Filter By Tag' selector.

Read > How does Tag work?
Advanced Settings
If you did not disable cloaking, you'll see Advanced Settings.

There are many advanced settings. If you just need a simple tracker, you can skip these settings and click 'Save'.
If you want to explore more, please continue.
8) Browser Title (arrow 5 above).
The Browser Title is what appears in the browser tab.
9) Teaser.

Teaser is an optional short message shown in the browser just before the actual page loads.
It acts like a 'presell' message that can prepare your audience before they view the actual site.
Below is an example of how it works.

10) Insert Ad Bar (arrow 7).

The Ad Bar is an optional text link that you can add to the top of the tracker.
It is useful if you want to cross-promote another offer.
To use it, first, you must set up an Ad Bar at Ad Bars.
Then return to this page and select the ad bar you want to add (arrow 7).
You may ask, "Why bother using an Ad Bar?"
Imagine you have 20 track links promoting different programs all over the internet. One day, you have a special offer, and you want to reach all your traffic as soon as possible. One way is to change all your track links. Another way is to update the links in all your traffic sources. With ad bar, there is a third way. You can just add the promotion to an Ad Bar and display it in ALL your track links. In seconds, all your traffic will see the offer.
To learn more about the Ad Bar function, go to Ad Bars and read the tutorial there.
11) Insert Popup (arrow 8).

If you build lists, you can create a popup opt-in form using Form / Popup Manager.
Then, you can show the popup in the track link.
This option allows you to build your own list while promoting other people's products.
To use this function, first, you must create a popup opt-in form at Form / Popup Manager.
Then return to this page and select the popup you want to add (arrow 8).
12) Customize the monetization option (arrow 9).

You can monetize the tracker by showing our Ad Widget. When third-party traffic clicks the ads, you make money.
In this option, you can decide how soon the ad will be shown or whether not to show it at all.
Below shows the differences between the 3 available options.

Read > How to monetize my track link? to learn more.
13) Footer Tab Position
The Footer Tab is the tab that displays the Ad Widget. You can place it at the bottom left or right (arrow 10).

14) Turn on/off Responsive Mode (arrow 11).
Some websites use responsive design for mobile devices. If so, you can turn on Responsive Mode to make your website look better.
The best way to decide whether to enable this mode is by loading the tracker on your mobile device in both modes and seeing which one looks better.
15) Fixed Height to overcome IOS incompatibility (arrow 12).
Most of the time, this is unnecessary.
But if you notice that when loading your track link in an IOS browser, you have to scroll down to see your website, then you'll have to assign a fixed height here. To start off, try 500.
16) Click 'Save' (arrow 13).
LeadsLeap Tracker not only tracks clicks but also tells you whether the clicks are from real visitors.
Look at the real-life example below:

The link gets 5,793 clicks, 4,577 of them are unique, and 2,799 are real visits.
This means 50% of the clicks are not real visits. What would you do if you were paying for the clicks?
If you've been wondering whether you're getting real traffic or just bot clicks, give LeadsLeap Tracker a try. You'll be impressed by what it can do for you.
The advantage of using our tracker is that you can determine whether you're getting real traffic from the media sources you use.
There are too many bogus networks that deliver bot traffic. Our tracker will help you identify those poor networks and focus on the ones that truly deliver.
By default, our system attempts to track referral domains to provide you with detailed insights. However, there are situations where referral tracking may not be possible. For example, traffic from emails and direct URL access does not carry referral information. Additionally, some websites and visitors' browsers may have security settings that prevent our system from tracking referral domains.
For this reason, if you know where you promote the link, we highly recommend using our 'source' tracking function.
This means you specify the traffic source in your Track Link.
The way to do it is very simple.
You simply add the traffic source on the fly.
This means you do not have to set up the source beforehand.
Let's say you advertise a track link, https://llclick.com/123456/, on abc.com.
At the time of posting the link, simply add /abc/ to the end of the link, making it https://llclick.com/123456/abc/.
When this link receives traffic, the system will identify the traffic source as abc.
Or if you post the link in an email ad, you can use https://llclick.com/123456/xyz-list/.
When this link receives traffic, the system will identify the traffic source as xyz-list.
When you check the traffic stats (by clicking arrow 1 below),
![]()
you can use 'Filter By Source' (arrow 2 above) to view the traffic stats of a particular source.
In the traffic stats, you may see some traffic labeled as 'direct / unknown' Source.
Below are possible reasons why the traffic source is unknown.
1) The visitor comes from an email, PDF file, or app, so there is no trackable referral.
2) The visitor directly enters the URL in the browser, so there is no referral.
3) The referral website blocks itself from being traced.
4) Your link is HTTP, but the referral website is HTTPS. For security reasons, HTTP cannot track HTTPS.
If you know where you promote your link, it's best to specify the source rather than waiting for the system to detect it. Read > How to use 'source'? to learn more.
Follow the steps below to cloak/uncloak your Track Link.

Track links are monetized by default unless you disable cloaking.
What does monetize mean?
'Monetize' means the system will show ads in your track link. When your visitors click the ads, you will earn PPC income.
I do not see an ad in my track link. Why?
1) You may have disabled cloaking. If cloaking is disabled, the monetization option is unavailable.
2) You may have turned off the monetization option.
How to turn off the monetization option?
1) Go to the track link and click the setup icon.
2) Scroll down and find the 'Monetize' option.
![]()
3) Click 'No' to turn off monetization. Or, if you are a Pro Member and want to completely turn off the tracker counter, click 'Private'.
It is unnecessary to add other third party tracking code to your link tracker since our tracker already has its own tracking capability.
But if you need to do it, you may proceed.
Click arrow 1, enter the code into arrow 2, and click Save (arrow 3).

Note: For security, only pre-approved javascript code can be added. If the tracking code you try to enter cannot be accepted, please contact our support with the code. We will add it to our approved list.
Conversion tracking doesn't happen automatically. You need to add a special code (we call it a pixel code) to the correct page before it can work.
Let's say you have three web pages: X, Y, and Z.
If someone visits Page X and then goes to Page Y, you consider that a conversion. (Let's call it Convert A).
If the same person goes to Page Z, you consider that another conversion. (Let's call it Convert B).
You must be clear about what your Pages X, Y, and Z are. That's the first step before setting up conversion tracking.
How to set up conversion tracking?
Using the example of Pages X, Y, Z, and Convert A and B, here are the steps to set up conversion tracking:
1) Track Page X using our Link Tracker.
2) On the Link Tracker, click (arrow 1) to get the pixel code for Convert A.

3) Paste the pixel code into the HTML code of Page Y, anywhere before the </body> tag.
Convert A setup is done.
4) Do the same for Convert B. Click (arrow 2) to get the pixel code for Convert B. Paste it into the HTML code of Page Z.
Convert B setup is done. If there is no Convert B, ignore Step 4.
What if I do not have access to the HTML code of Pages Y and Z?
Scenario 1
If Page Y or Z is our page (i.e., a page you've built using our Page Builder), you can insert the pixel code into the page by clicking in the corresponding setup, like the example below:

Scenario 2
If you have access to the HTML code of Page X, you can track Page Y using our Tracker, then change the navigation link (on Page X) from the URL of Page Y to the URL of the Track Link that tracks Page Y.
This means instead of going from Page X to Page Y, visitors now go from Page X to the Track Link that tracks Page Y.
Once that is done, you can add the pixel code to the Track Link that tracks Page Y by clicking on the tracker setting, similar to the Page example shown above.
Scenario 3
If Scenarios 1 and 2 do not apply, and you have no access to the HTML of Pages Y and Z, then conversion tracking is not possible.
In the traffic stats, you can see Response, Convert A, and Convert B.
Response is a rough measurement. As long as there is a click on the tracked page—such as clicking a link, playing a video, filling out a form, clicking an AdBar, or clicking a link in our ad widget—it will be counted as 1 response.
It helps give you an idea of whether the traffic is actively browsing the link.
Response tracking is automatically available. You do not have to set it up.
Conversion tracking, on the other hand, is a precise measurement of whether the traffic takes a specific action.
The system allows two conversion tracking per link, hence Convert A and B.
For conversion tracking, you need to set it up.
This is because you've disabled cloaking for that track link.

Response tracking cannot work when cloaking is disabled.
1) Delete or archive the links.
First, sort the links by Last Visit.

This allows you to easily identify links that are no longer being visited.
Then, you can delete those links by clicking .

If you do not want to delete them, you can archive those links by clicking

You can see the number of links you've archived next to 'Filter By Tag'. (See screenshot below).

To show the archived links, click the drop-down and select 'View All Archived'.
2) Add tag to the links.
Another way to manage too many links is by using 'Tag'.
The idea of Tag is to group the links by means of a Tag that you assign, so that you can easily filter the links by Tag.

To assign a Tag, click arrow 1 and go to arrow 2.

You can either enter a new tag name or select (or deselect) existing tags by clicking the tag buttons, which will be auto-generated if you've added tags before.
Read > How does Tag work?
It is for better management.
If you need a different track link for the same URL, you can simply add a 'Source' to the link.
Read > How to use 'source'?
Unique traffic is defined as the number of distinct visitors within a 24-hour period.
To understand the issue, you need to know the difference between HTTP and HTTPS.
In layman's terms, here's what you need to know:
1) A website can be served via HTTP or HTTPS. HTTP is not secure, while HTTPS is secure.
2) An HTTP website cannot be displayed on an HTTPS website. However, an HTTPS website can be displayed on an HTTP website. (Nothing complicated—just know that a secure site can be shown on an unsecured site.)
The error message 'Someone accessed https://... but the destination URL http://...' is trying to tell you that someone visited the HTTPS version of your tracking link but couldn't access the site because the destination URL is not HTTPS.
To fix the problem, you need to change the destination URL to HTTPS.
However, please note that not all websites support HTTPS. Simply changing the destination URL to HTTPS may break the website. It's best to check with the webmaster before making the change.
What is cloaking?
It is a way to show your website inside our tracking website, so that you can hide the actual URL from the visitors and perform more functions on the page.
Most traffic exchanges and PTC systems use cloaking technology to show ads. It's very common.
The benefits of cloaking your Track Link
1) You can track Response and Surfing Duration.
2) You can add a Teaser to the link.
3) You can add an Ad Bar to the link.
4) You can add a Popup to the link.
5) You can monetize the link.
6) People will not see the actual URL in the browser address bar.
The limitations
1) Some websites cannot be cloaked, for example: YouTube, Google, Facebook.
2) If you are tracking an affiliate link, some affiliate systems do not work in a cloaked environment. That means you will not be rewarded if people buy through your link. (Read The Death Of Link Cloaking)
So should I cloak?
Check if your link can be cloaked by first enabling cloaking, then checking if your affiliate ID remains intact even after navigating through a few pages.
If you are promoting an opt-in form, try opting in. The idea is to go through the entire funnel in a cloaked environment and see if it works.
If it works, then you can cloak the link and enjoy all the benefits of cloaking.
Otherwise, uncloak the link.
To be honest, most links can be cloaked. If one can't, you can contact the owner of the website. If they want you to promote their site, it's in their interest to ensure their website can be cloaked. Moreover, if a link cannot be cloaked, it means the link cannot be promoted in most traffic exchanges, because most traffic exchanges, except LeadsLeap, use iframe (the same technology used in cloaking) to show ads.
To be honest, most links can be cloaked. If one can't, you can contact the owner of the website. If they want you to promote their site, it's in their interest to ensure their website can be cloaked.
Why my link cannot be cloaked
That is because some domains block themselves from being cloaked, by showing a blank screen or breaking out of the cloaking frame.
What should I do if my link cannot be cloaked?
You can still track these links. Just disable cloaking (see arrow 1 below).

Will I still be able to track Real Visit if I disable cloaking?
Yes, unless you also disable Real Tracking (see arrow 2 above).
The system will still be able to identify whether the traffic is Real. This is done by detecting Real Visitor activity before redirecting the visitors to your un-cloaked site. But further surfing duration will not be possible.
1) Total clicks (most trackers only provide this)
2) Unique visits
3) Real visits (proprietary)
4) Response (proprietary)
5) Conversion
6) Surfing duration (proprietary)
7) Traffic source (automatic + custom source on the fly!)
8) Country
The Tracker monitors the browser’s visibility and user activities such as mouse movement, scrolling, finger browsing, and clicking.
If someone opens your link in the background but doesn't actually look at it, or if it's a click from a web spider, bot, or some kind of software, the tracker will detect no activity from the click.
On the other hand, if it is a genuine visit, the system should register at least 1 second of surfing activity.
Using this method, we can effectively differentiate clicks from visits by defining a Real Visit as a click with at least 1 second of activity.
Every 5 seconds, the Tracker re-monitors user activities such as mouse movement, scrolling, finger browsing, and clicking. If any activity is detected, the Tracker will increase the surfing duration by 5 seconds.
If no activity is detected in a 5-second interval, the surfing duration remains unchanged until the next interval.
The surfing durations will be presented in a chart like this:

Tracking bulk traffic is not allowed.
We define Bulk Traffic as continuous traffic that hits a link more than once per second, more than 20 times a minute, more than 1,250 times an hour, or more than 20,000 times a day.
Practically speaking, if you're getting real human traffic, the chances of hitting our bulk traffic limit are low.
We ban bulk traffic tracking because many trackers in the industry have zero tolerance for it. If we allow bulk traffic, we risk our server being banned as a bulk traffic source too.
Ad Bar is a text link that you can add to your track link in the form of a top bar, i.e., it appears at the top of the browser.
It allows you to cross-promote another offer while promoting your track link.
One great use is to build your list while promoting other affiliate products.
The best part is, you can create an Ad Bar and add it to all your track links or selected ones.
Imagine you have 20 track links, all posted in different places online and bringing in traffic.
Now imagine you have an ad hoc offer — for example, a free product trial.
Instead of changing all your 20 track links to this new offer and disrupting your existing campaigns, you can simply create an Ad Bar and add it to all 20 links with a click!
A Popup is an animated widget that can capture visitors' attention.
At LeadsLeap, we offer members a free Popup Generator (see Leads Generation Tools). Members can create popups to build a list or promote an offer.
Once you've created a popup using our generator, you can add it to your own website or blog. You can also add it to a website that you DO NOT own using The Tracker.
This means you can add a popup to virtually any website you promote using The Tracker — and build your own list or promote other offers.
Now think about the possibilities!
To share the traffic stats with others, click arrow 1, then click arrow 2.

This will bring you to a shareable stats page.
You can share that link with others. They will be able to see the stats without logging into your account.
This is useful if you're tracking for clients.
Yes. Link customization is available if you are a Pro Member.
Instead of a link that looks like this:
llclick.com/rk4g9psw/
You can customize the link to anything you like, for example:
llclick.com/my-special-offer/
To customize the track link URL, click (arrow 1), then change the Custom Slug (arrow 2).

Note: Once the URL Slug is changed, the old URL will no longer work.
'Tag' is a tool that helps you to manage your links.
For example, if you have many links promoting abc.com, you can add a tag 'abc.com' to these links. Then, if you want to find all the links that promote abc.com, you can go to Filter By Tag and select abc.com. That will show all links that are tagged with abc.com.

Or you can add a tag 'health' to all the links that are in the health niche. Then, if you want to find all the links in health, just go to Filter By Tag and select health.
NOTE: Tag is different from Archive. When you add a Tag, you are not archiving the page. To archive a link, you have to click the archive button (see arrow below).
How to set up a tag?
1) Click the edit button to show the editor for the link that you are working with.
2) Look for an option called 'Tags' (see screenshot below)

3) Enter the tag name or select from existing tags.
If it is a tag you've added before in another link, you will see the tag name as a button as shown below. Simply click on the button to add the tag.

If it is a new tag, enter it into the input field.
To add multiple tags, separate each tag by a comma.
4) Save.
How to untag?
All the tags you've added to the link will be shown as an orange button (see example below).

To untag, click the orange button, then save.
How to filter by tag?
Look for the following drop down selector on this page.
Say if you want to see all the rotators tagged with abc.com, click on the drop-down and select abc.com (you'll see it if there is really such a tag being added previously).
Private Domain option allows you to show the track links and rotators in your own domain name.
What I need?
1) You need your own domain name, new or old.
2) You need a hosting server that hosts the domain.
There is no need to buy a new domain. Any domain will do. You just have to create a new folder in the domain for this purpose.
Your private domain link will look like this:
https://yourdomain.com/subdirectory/?cmad45hd
'subdirectory' is the new folder that you'll create in your server.
Can I use the same subdirectory for track link, rotator and page?
You can use the same subdirectory for track link and rotator. But you need a different subdirectory for page.
For example, you can create a 'click' subdirectory for Link Trackers and Rotators, like this:
https://yourdomain.com/click/
And create a 'page' subdirectory for Pages, like this:
https://yourdomain.com/page/
How to set up a Private Domain?
1) Click the edit button to show the editor for the track link that you are working with.
2) Look for an option called 'Private Domain'.

3) Enter your domain name, followed by /, followed by the subdirectory (which is the new folder you are going to create in this domain).
For example, if your domain name is jamestheman.com and the subdirectory is recommends, then you'll enter
jamestheman.com/recommends
not https//jamestheman.com/recommends
not www.jamestheman.com/recommends
not jamestheman.com/recommends/
4) Set up the subdirectory in your server as per the instructions shown below. (More step by step instructions below.)

5) Save the changes.
How to set up the subdirectory in my server?
1) Click the index.php link shown below and download the file to your local drive. Remember where you save it.

2) Go to the Cpanel of your server, click 'File Manager'.

3) Click the 'public_html' folder of the domain.

4) Click '+ Folder'

5) Enter the subdirectory name and click 'Create New Folder'.

The folder (or subdirectory) will be created.
6) Double-click on the newly created folder.

7) Click 'Upload'.

8) Upload the index.php file you've downloaded in Step 1.
When done, click 'Reload'.

You will see the index.php file in the folder.

Setup is completed.
NOTE 1: You only have to do this ONCE per subdirectory. Once done, this subdirectory can be used as the private domain for any link and rotator.
NOTE 2: Once you set up a private domain, the system will automatically include it in the new link tracker or rotator you add in the future.
Can I use a different domain or different subdirectory for different links?
Yes. But before you do that, think if it is necessary.
It can get messy when you have too many domains or subdirectories to manage.
If I change the subdirectory, do I have to download another index.php file?
No. The index.php file that you have downloaded from track link or rotator manager can be used for any track link and rotator.
You can upload it to any subdirectory you want to set up.
Just make sure you do not mix up this index.php file with the index.php file downloaded from Page Manager.
Can I set up the private domain link at the root, i.e. mydomain/?fd3gf5s?
No. It is a waste of your resources if you do that.
If you set it up at the root, you can't use the domain for something else. But if you set it up in a subdirectory, your main domain can be put to better use, such as a blog or a program.
A Link Rotator allows you to rotate your Tracked Links and/or Page Links. (Note: 'Page' refers to the page you build using the LeadsLeap Page Builder.)
When people visit your Rotator, they will be redirected to one of the links in the rotator based on the weight you've specified.
Important Note #1
LeadsLeap Page is a rotator on its own. If you want to create two or more page designs for split testing, you should create the designs under the same PageID and promote the Page Link, instead of creating the designs under different PageIDs and using the Link Rotator to rotate the pages.
Important Note #2
Do not use this Rotator in LeadsLeap advertising because rotators are not allowed in LeadsLeap ads. Moreover, our system already automatically sends you unique traffic whenever possible.
Before you add a rotator, make sure that you've already added the links you want to rotate as Tracked Links.
The rotator can only rotate Tracked Links and Page Links (which are the pages you build using the LeadsLeap Page Builder). It cannot rotate any other type of link.
To add a new rotator,
1) Click "Add a new rotator".
2) A new Rotator panel will be added as shown below.

If you want to add a Tracked Link, click "Add track links".
If you want to add a Page Link, click "Add page link".
3) You will see a list of Tracked Links (or Page Links) that you can add to this rotator.

Select the links you want to rotate (arrow 1) and choose the 'weight' for each link (arrow 2). The higher the weight, the more often the link will be shown.
NOTE: This rotator shows links using a 'weighted random' method. If you want something that shows links one after another in order, this isn't the right rotator for that.
4) Click submit (arrow 3).
The rotator is now ready for use. The rotator URL is as follow:

No. It is a rotator. It rotates links and tracks the traffic that it receives. It will not send you traffic. You'll have to send traffic to it.
1) Go to the rotator you want to modify, then click (arrow 1).

You will see all the links and pages that are being rotated in the rotator. If there is nothing listed, it means you haven't added any links or pages yet.

2) To add a link or page to the rotator, use the buttons denoted by arrow 2.
3) To delete a link or page from the rotator, locate the link or page, then click the x button (arrow 3).
4) To edit the weight, daily max limit, or other settings for a link or page, locate it and adjust the corresponding settings denoted by arrow 4.
Weight works in a relative sense.
For example, if you rotate two links, one with a weight of 5 and the other with a weight of 1, this means that for every six rotations, link 1 will roughly appear five times, and link 2 will roughly appear once.
We use the word "roughly" because the system doesn’t ensure an exact 5:1 split every six visits. Rotation is managed by an algorithm called Weighted Random, which will approximate the expected result over a large number of visits.
If you want something that shows links one after another in order or in the exact ratio, LeadsLeap rotator isn't the right rotator for that.
If you want to limit the amount of traffic sent to a particular link in the rotator, you can use 'Daily Max Hits' and/or 'Total Max Hits'.

Daily Max Hits
For example, if you set a link to receive 10 hits daily, the rotator will stop showing that link after it receives 10 hits. The stat resets at 00:00 server time.
Total Max Hits
If you set a link to receive a total of 100 hits, the rotator will stop showing that link once the limit is reached, unless you reset the stat or change the limit.
To pause a link, set its Total Max Hits to 0. This will effectively prevent it from being shown.
Important Note
Do not set a limit for all the links. At least one link should have no limit; otherwise, if all limits are reached, the rotator will have no link to show.
Think of this example:
George helps his team members promote their links. He needs a rotator that can send unique traffic to his own links. For non-unique traffic, he will distribute it among his team members.
If you have a similar need, here's what you can do:
Click 1, then click on the option that says 'Unique Traffic Only' (arrow 2).

Important Note
Do not activate unique traffic for all rotated links. Otherwise, if the traffic is not unique to all links, the visitor will see nothing.
To avoid this, the system automatically forbids all links from being set to unique.
Let’s say you rotate websiteA.com, websiteB.com, and websiteC.com, and promote the rotator on all three websites.
Members of websiteA.com might end up seeing the link that promotes websiteA — which is a waste of advertising effort.
To prevent this, you can exclude the Track Link that promotes websiteA from being shown on websiteA.
Here's how:
Click 1, then in the 'Exclude Traffic From' field (arrow 2), enter the domain name of the traffic source you want to exclude.

Limitation of this function
If the traffic source uses HTTPS (i.e., the URL starts with https), your rotator link must also use HTTPS. Otherwise, it won't detect the traffic source.
The reverse is okay — if the traffic source uses HTTP, your rotator link can use either HTTP or HTTPS.
Imagine you are promoting a program, say ‘Program A’, that is only available in the USA and Canada.
But when you promote the program in forums, traffic exchanges, etc., you may get traffic from different parts of the world.
Using 'Geo Targeting', you can send traffic from the USA and Canada to ‘Program A’ while sending traffic from other countries to another program, say Program B, that accepts international members.
Here's how to set it up using the above example...
1) First, we assume you've added Program A and B as track links and added the track links into a rotator.
2) Locate the rotator control panel and click (arrow 1) to show the links.

3) For the 'USA and Canada only' link, click the 'Edit' button next to 'Geo Target' (see arrow 2).

4) Select USA and Canada (see arrow 4 below), then click Save Changes (arrow 5).

5) For the link to show visitors from other countries, click 'Edit' as shown by arrow 3 in the previous screenshot.
6) Select 'Show to the rest' (see arrow 6 below), then click Save Changes.

There is no limit to how you want to target and rotate. You can have several links for the same country or one link targeting different countries. The system will detect the traffic source, rotate the links based on weightage, and present one of the matched links to the traffic.
Important Reminder
Remember to set a 'Show to the rest' link when using Geo Targeting. Otherwise, if someone from an untargeted country visits the rotator, the system will have no link to show.
No. Link rotation is not allowed in LeadsLeap ads.
Reasons below:
1) Since different websites are shown, the website content may not match the ad image and ad text.
2) It is not possible for us to check every rotated link. So we can't tell if there is a problem with the ad.
Link rotation is only allowed in very specific cases, such as rotating the same content with different affiliate IDs or different pages promoting the same product.
1) Click (arrow 1) to show the links.
2) Set 'Total Max Hits' to 0.

Unique traffic is defined as the number of distinct visitors within a 24-hour period.
1) Click (arrow 1) to show the links.
2) If there is no link in it, that's why your rotator shows an error. Add links so that the rotator has something to display.
3) If there are links, check the following settings and see if they make sense.

Often, the error is due to a conflict in the settings.
For example, you may have set a link to show only in a certain country, but there is no link for other countries.
Or you have set a Daily Max or Total Max for all the rotated links, and the maximum is reached.
Or you have set all the links to receive unique traffic.
Fundamentally, if you set any filter to the rotated link, you MUST have one link without a filter—a 'catch-all' link—so the rotator always has something to show.
1) Click (arrow 1) to show the links.
2) Check the following settings and apply logical reasoning.
You may have set the link to show in certain countries only.
Or you have set a Daily Max or Total Max for the link, and the maximum is reached. (Note: 0 is also a value—it means 0 traffic!)
Or you have set the link to receive unique traffic only.
'Tag' is a tool that helps you manage your links.
For example, if you have many links promoting abc.com, you can add a tag 'abc.com' to these links. Then, if you want to find all the links that promote abc.com, you can go to Filter By Tag and select abc.com. That will show all links tagged with abc.com.
Or you can add a tag 'health' to all the links that are in the health niche. Then, if you want to find all the links in health, just go to Filter By Tag and select health.
How to set up a tag?
1) Click the edit button to show the editor for the rotator that you are working with.
2) Look for an option called 'Tags' (see screenshot below)
3) Enter the tag name or select from existing tags.
If it is a tag you've added before in another link, you will see the tag name as a button as shown below. Simply click on the button to add the tag.
If it is a new tag, enter it into the input field.
To add multiple tags, separate each tag by a comma.
4) Save.
How to untag?
All the tags you've added to the link will be shown as an orange button (see example below).
To untag, click the orange button, then save.
How to filter by tag?
Look for the following dropdown selector on this page.
If you want to see all the rotators tagged with abc.com, click on the dropdown and select abc.com (you'll see it if such a tag has been added previously).
The Private Domain option allows you to show the track links and rotators using your own domain name.
What do I need?
1) You need your own domain name, new or existing.
2) You need a hosting server that hosts the domain.
There is no need to buy a new domain. Any domain will do. You just have to create a new folder in the domain for this purpose.
Your private domain link will look like this:
https://yourdomain.com/subdirectory/?cmad45hd
'subdirectory' is the new folder that you'll create in your server.
Can I use the same subdirectory for track links, rotators, and pages?
You can use the same subdirectory for track links and rotators, but you need a different subdirectory for pages.
For example, you can create a 'click' subdirectory for Link Trackers and Rotators, like this:
https://yourdomain.com/click/
And create a 'page' subdirectory for Pages, like this:
https://yourdomain.com/page/
How to set up a Private Domain?
1) Click the edit button to show the editor for the track link that you are working with.
2) Look for an option called 'Private Domain'.
3) Enter your domain name, followed by /, followed by the subdirectory (which is the new folder you are going to create in this domain).
For example, if your domain name is jamestheman.com and the subdirectory is recommends, then you'll enter
jamestheman.com/recommends
not https//jamestheman.com/recommends
not www.jamestheman.com/recommends
not jamestheman.com/recommends/
4) Set up the subdirectory in your server as per the instructions shown below. (More step-by-step instructions below.)
5) Save the changes.
How to set up the subdirectory on my server?
1) Click the index.php link shown below and download the file to your local drive. Remember where you save it.
2) Go to the cPanel of your server, click 'File Manager'.
3) Click the 'public_html' folder of the domain.
4) Click '+ Folder'
5) Enter the subdirectory name and click 'Create New Folder'.
The folder (or subdirectory) will be created.
6) Double-click on the newly created folder.
7) Click 'Upload'.
8) Upload the index.php file you downloaded in Step 1.
When done, click 'Reload'.
You will see the index.php file in the folder.
Setup is complete.
NOTE 1: You only have to do this ONCE per subdirectory. Once done, this subdirectory can be used as the private domain for any link and rotator.
NOTE 2: Once you set up a private domain, the system will automatically include it in the new link tracker or rotator you add in the future.
Can I use a different domain or different subdirectory for different links?
Yes. But before you do that, consider whether it is necessary.
It can get messy when you have too many domains or subdirectories to manage.
If I change the subdirectory, do I have to download another index.php file?
No. The index.php file that you downloaded from the track link or rotator manager can be used for any track link or rotator.
You can upload it to any subdirectory you want to set up.
Just make sure you do not mix up this index.php file with the index.php file downloaded from Page Manager.
Can I set up the private domain link at the root, i.e., mydomain/?fd3gf5s?
No. That would be a waste of your resources.
If you set it up at the root, you can't use the domain for something else. But if you set it up in a subdirectory, your main domain can be used for other purposes, such as a blog or a program.
Ad Bar is a horizontal bar that you can add to the top of your tracked link, page link and coop link.
It looks something like this:

It allows you to cross promote other offers while promoting the main offer.
You may ask, "Why bother using an Ad Bar?"
Imagine you have 20 track links promoting different programs all over the internet. One day, you have a special offer, and you want to reach all your traffic as soon as possible. One way is to change all your track links. Another way is to update the links in all your traffic sources. With ad bar, there is a third way. You can just add the promotion to an Ad Bar and display it in ALL your track links. In seconds, all your traffic will see the offer.
That's the convenience that Ad Bar can bring to you.
1) Click the "Add a new ad bar".
A new Ad Bar control panel will be added.
2) Fill up the URL (arrow 1), Ad Text (arrow 2) and whether you want to add animation to the ad bar (arrow 3)".

For 'Tags', you may ignore it for now.
To learn more about the 'Tag' feature, read > How Tag works?
3) Click (arrow 4) and then click 'Add this ad bar to more links' button (arrow 5).

4) Select the Track Links that you want to add the Ad Bar to.

5) Click the 'Save' button to save the selection.
Please note that each Tracked Link can only have one Ad Bar attached. Hence if you select links with existing Ad Bar, it will replace the existing Ad Bar. As you can see from the screenshot above, you can easily see which link has existing Ad Bar.
1) Ad bar allows you to cross-promote your offers.
For example, you may have a time-sensitive offer that you can to promote to all your traffic.
Instead of changing all your links, which may involve changing your ads too, you can simply create an Ad Bar and have it shown in ALL your Tracked Links.
This way, you can run a secondary promotion in addition to all the campaigns that you are currently running.
2) You can leverage on other people's content for your own promotion.
Let's say someone ask a question in the forum and you know an article (someone else's article by the way) that can answer the question, you can cloak that article using Tracked Link and then add your own Ad Bar to that link.
When people click the link, they not only get the answer to the question, but also see the offer in your Ad Bar.
'Tag' is a tool that helps you to manage your links.
For example, if you have many links promoting abc.com, you can add a tag 'abc.com' to these links. Then, if you want to find all the links that promote abc.com, you can go to Filter By Tag and select abc.com. That will show all links that are tagged with abc.com.
Or you can add a tag 'health' to all the links that are in the health niche. Then, if you want to find all the links in health, just go to Filter By Tag and select health.
How to set up a tag?
1) Click the edit button to show the editor for the link that you are working with.
2) Look for an option called 'Tags' (see screenshot below)
3) Enter the tag name or select from existing tags.
If it is a tag you've added before in another link, you will see the tag name as a button as shown below. Simply click on the button to add the tag.
If it is a new tag, enter it into the input field.
To add multiple tags, separate each tag by a comma.
4) Save.
How to untag?
All the tags you've added to a link will be shown as an orange button (see example below).
To untag, click the orange button, then save.
How to filter by tag?
Look for the following drop down selector on this page.
Say if you want to see all the rotators tagged with abc.com, click on the drop-down and select abc.com (you'll see it if there is really such a tag being added previously).
1) Click 'Add a new list'.
You will see a form like the screenshot below:

2) Enter a List Name for your own reference, then click 'Add Now'.
The List Name is for your own reference. Use something that you can easily relate to.
After clicking 'Add Now', a new List (like the screenshot below) will be created.

3) Click to set up the list. You will see this:

Everything under 'List Settings' must be filled up. It is compulsory. We'll do that in the next step.
4) Set up 'List Settings' (Compulsory).
Below are the fields to fill up:
List Name
- A name for your own reference. It should be filled up already.
Your Name
- Your name that your subscriber will see.
Your Email Address
- The email address your subscriber will see and reply-to. It must be an email that you have access to.
Email Verification Code
- After entering Your Email Address, click (arrow 1 in screenshot above) to send a verification code to the email address.
- Check your email. The verification code looks something like this: (arrow 4)

- Copy the code and paste into the 'Email Verification Code' field.
Your Postal Address
- The last field is 'Your Postal Address'.
- Enter your home address, office address or a PO Box address that can reach you.
- Please note that this is a legal requirement. The penalties include jail terms and fines.
5) Set up 'Advanced Settings' (Optional).
Everything under 'Advanced Settings' is optional. You can skip this section if you want.
Here are the options available:
Email Header
- Design the header of your email.
After-Optin Notice
- After the subscriber opt in, they will see a notice. You can customize certain part of this notice.
Show A Link After Verification
- When the subscriber verify their emails, they will come to an 'email verified' page. On that page, you can show a link.
Opt Out From These Lists After Verification
- When someone opts in to the list, you can set the system to automatically remove them from other specified lists.
Email me when someone opts in
- You can set the system to send you email notification when someone opts in.
6) Set up 'Global Email Signature' (Optional).
'Global Email Signature' allows you to set up a standard email signature that can automatically be inserted into all future emails to your subscribers.
A typical Email Signature looks like this:

To add a signature, click 'Open Editor' (arrow 5) to open the HTML Editor and add your email signature.

Then select where you want the email signature to be inserted in arrow 6.
In most cases, you should select all 3 options, i.e. Welcome email, Email series and Broadcasts.
If this is your first time setting up a list, ignore Email Signature first and move on to the next section.
You can come back and set it up again later.
7) Click 'Preview Email Design' (arrow 7) to see how your email will look like with the email signature.
8) Read the term of use (arrow 8). If you are agreeable, click the checkbox. Then click 'Save & Activate' (arrow 9).

That completes the basic setup.
9) Next we have to set up the Welcome Email.
What is Welcome Email?
When someone opts in to your list, he will receive a Welcome Email.
If you have an opt-in gift, this is where you add the download link.
It is also the place to introduce yourself, so that your subscribers know more about you.
Welcome Email is optional. If you do not set it up, no Welcome Email will be sent.
To set up the Welcome Email, click (arrow 10).

You should now see the following:

10) Click the edit icon (arrow 11) to edit the Welcome Email.
You will see an email editor similar to the one below:

A sample is automatically loaded. PLEASE DO NOT USE the template without changes because it simply doesn't make sense.
11) Change the email subject (arrow 12), the email body (arrow 13), especially the PRODUCT NAME and the download link, and the Preview Text (arrow 14).
12) Click the preview button (arrow 15) to preview your Welcome Email. Or even better, click the 'Send Test' button (arrow 16) to send a test email to yourself.
You want to make sure that your Welcome Email is perfect, because that's the first impression that your subscriber will have on you.
13) When done, click 'Save Changes' (arrow 17)
If you want to learn more about our email editor, you can read 'An introduction to our email editor'
You can test if your list work by opting in using your own email address. But please DO NOT opt in using different email address because that will trigger the security system and your IP will be blacklisted and blocked from future opt in.
You probably have experienced subscribing to a marketer's mailing list and received emails from him.
Do you think he sends you the email individually? No. He has a list management system that allows him to email to thousands with the click of a button.
Some brands you may have heard are Aweber, Getresponse and Mailchimp. You may know this service as an autoresponder, email responder, follow up system, email automation or list management system.
We call this service SendSteed. It is free to use for all members.
SendSteed.com is the domain that we use to provide the mailing service. It is a dedicated service for LeadsLeap members.
How it works?
When someone subscribes to the list that you've created here, he will automatically receive a Verification Email and Welcome Email.
Upon reading either the Verification Email or Welcome Email, his email will be considered verified.
You can set up a series of follow-up emails (we call it Email Series), and have those emails automatically sent out every day or every few days (you decide).
If you have a good offer or you want to inform them of your new blog post, you can send them an email, using the broadcasts function.
What is NOT SendSteed?
SendSteed is not a mailing system for you to email your followers in LeadsLeap.
If you want to contact your followers in LeadsLeap, please use Follower Message.
We understand that there are programs out there that share members' emails with you (and perhaps other members as well).
SendSteed, as well as LeadsLeap, is not such a program.
We do not share our members' emails with anyone.
Likewise, the emails you've collected through SendSteed are yours only. They are not shared with us or anyone else.
The answer is a definite 'Yes'.
But that doesn't mean you should build a list now.
Before you build a list, ask yourself these questions.
1) What niche should I build the list in?
2) What value can I give to the list?
(Think of 'Value' as something that people will be grateful for.)
3) What is my opt-in gift?
4) If there is no opt-in gift, how do I entice people to opt in?
5) Do I have one or a few 'ever-green' products to sell to the list? ('Ever-green' products are products that are likely to remain marketable for a long time.)
List building is relationship building. It's different from simply advertising an affiliate link, which is more like hit-and-run.
If you are not ready for that, your list building effort will be in vain.
To opt-in to your list, you need
1) an opt-in form
2) link your list to that form
The exact linking method depends on how your opt-in form is created.
How to create an opt-in form & how to link
1) Use LeadsLeap Page Builder
The Page Builder will create the entire web page, with a URL that you can use to promote and get leads.
How to link?
Refer to tutorial at Page Builder
2) Use LeadsLeap Form / Popup Creator
The Form / Popup Creator will create just the opt-in form. You can add the form to your blog, website, LeadsLeap Page or LeadsLeap Tracker.
It doesn't have a URL. The URL is the web page to which you add the form.
How to link?
Refer to tutorial at Form / Popup Creator
3) Use other third-party platform
You probably already have your preferred way to create an opt-in form.
In that case, all you need is to raw form code.
You can show the form code to the support of whatever platform you use. They should be able to teach you how to do the integration.
To get the raw form code, click (arrow 1).

The raw form code is denoted by arrow 2.
When a subscriber opts in to a SendSteed list, they are shown a default notice reminding them to verify their email. Here's what the notice looks like:

You have the flexibility to personalize the middle section of the notice.
By default, the middle section says 'Please check your inbox (or spam inbox) and click the verification link in it.'
You can modify this message to suit your needs.
For instance, if you’re offering a free ebook, you could update it to:
Please check your inbox (or spam inbox) and click the verification link in it. We will send you the free ebook once you've clicked the verification link.
Step-by-Step Guide to Customizing the After-Optin Notice
1) Access the Setup Form by clicking the set up button shown below
2) Scroll down the setup form to the 'Advanced Settings' section, and look for 'After-Optin Notice' (see screenshot below)

3) Make the changes
4) Click 'Preview Notice' (arrow 1) to preview the notice.
5) Save changes.
Before we start, please note that there are 2 kinds of redirect:
1) Redirect after opt-in (refer to Page Builder tutorial)
2) Redirect after verification
To redirect after verification, follow these steps:
1) Access the Setup Form by clicking the set up button shown below
2) Scroll down the setup form to the 'Advanced Settings' section, and look for 'Show A Link After Verification' (see screenshot below)

3) Click the demo (see arrow 1 above) to see how it work.
4) Enter the URL you want to show in arrow 2.
5) Save changes.
Possible Usage Scenario:
You have a prospect list and a buyer list. When someone purchases your product and opts in to your buyer list, you may want to remove them from your prospect list.
Below are the step by step to do that:
1) Access the Setup Form by clicking the set up button shown below
2) Scroll down the setup form to the 'Advanced Settings' section, and look for 'Opt Out From These Lists After Verification' (see screenshot below)
3) Select the lists you want the subscriber to opt out of.
When they opt into the new list, they will automatically be opted out of the selecte
4) Save changes.
1) Access the Setup Form by clicking the set up button shown below
2) Scroll down the setup form to the 'Advanced Settings' section, and look for 'Email me when someone opts in' (see screenshot below)

3) Select your preference.
If you do not want to receive any email notification, choose 'No'. It's a wise decision actually. Your subscribers' details are saved in your List Manager. There is no need to receive email notification actually.
If you want to receive an email notification ONLY WHEN the subscriber has verified his email, choose 'Yes, after opt-in verified'.
If you want to receive an email notification when someone opts in, regardless of whether they have verified their email, choose 'Yes, before opt-in verified'. Be careful when you select this. You can receive a lot of emails.
4) Save changes.
Go to your list and click the button shown below:

You will come across our Email Editor when you set up the Welcome Email, Verification Email, Email Series, Broadcast and other functions such as email template and signature.
The exact Editor may vary slightly depending on the needs, but generally, it looks like this:

Most of the functions in the Editor are quite standard.
But some functions are customized for SendSteed.
1. Preview
The 'one-eye' button is a preview button. It gives you a full preview of how your email will look like when received by your subscriber, including the email header and signature.
2. Send Test
Although the preview function (button 1) is good enough, there is still a possibility that the actual email may behave differently.
The 'Sent Test' button allows you to send a test email to yourself, so that you can see how the email looks like and whether everything works as intended.
3. PDF Gallery
LeadsLeap provides PDF hosting for Pro Members. If you have a pdf ebook to give away, you can use this hosting service.
The PDF Gallery is a quick way for you to upload PDF file and retrieve the download link for the PDF files you've uploaded.
4. Template Gallery
In the Template Gallery, You can find different kinds of templates that you can add to your email.
They are like building blocks. By combining different template blocks, you can create a professionally looking email.
If you are a Pro Member, you can even save an email as another template, so that you can use it in the future.
5. Image Gallery
LeadsLeap provides Image hosting for Pro Members.
The Image Gallery is a quick way for you to upload Image file and add an uploaded Image to your email.
6. Image URL Editor
This is the default image url editor, not a customized function from LeadsLeap.
If you are not a Pro Member (hence you can't use the Image Gallery), you can add an image to your email by entering the the image url using this image url editor.
To connect to any third party page builder or system, what you need is the HTML Form Code.
'HTML Form Code' is the basis of how opt in works. Regardless of what platform or system, it is the 'HTML Form Code' in the html source of the platform or system that makes collection of email possible.
This means if you can set the 'HTML Form Code', you can collect the email into your sendsteed list.
To get the raw HTML form code, please follow the instructions here > 'How to get the raw html form code of my list?'
1) Click (arrow 1).
2) The raw form code is denoted by arrow 2.
3) You can show the form code to the support of whatever platform you use. They should be able to teach you how to do the integration.
Please note that the code obtained the method above is the bare-bones html code with no design. By right, the design should be done using the third party page builder that you use. However, if your third party platform doesn't have a tool to design, you will have to design the form before getting the raw html form code. To do so, please go to Form/Popup Manager, create a HTML Inline Form (Under the Form Type, select Inline Form > HTML Form) and design it to your liking. Then you can get the raw html form code from the Form/Popup Manager. For detailed steps, refer to the tutorial in the Form/Popup Manager. Search for 'raw html form code'.
There may be a misunderstanding in what LeadsLeap and SendSteed are. In a nutshell, LeadsLeap is not a safelist, meaning you can't massmail other members. SendSteed is a list management system, or autoresponder tool, that is offered in LeadsLeap, so that you can build your own list, without payment expensive autoresponder services like Aweber or Getresponse.
You may have set up your SendSteed list. But your list is empty initially.
To check if your list is empty, see the subscriber count in the screenshot below:

If it says 0, it means there is no subscriber in the list.
You will have to 'build the list'.
To learn how to build a list, go to Dashboard, click Tutorial.

You will see a tutorial that says 'I want to build a list'. Read everything in it, and follow it.
My subscriber count is not 0. Now what?
If the subscriber count is not 0, then click on the button (shown below) and see if the subscribers are verified.
Only verified subscriber can receive your email series.
Verified subscribers are those who have opted in and clicked the verification link. It is important to understand that under the COI Standard, it is illegal to send emails to unverified subscribers.
If you cannot find your subscriber, it is because the email has been removed from your list due to the following reasons:
1) The person has unsubscribed.
2) The email is not verified. Hence it is deleted automatically after 30 days.
3) You deleted it.
4) The email address has bounced or failed multiple times. (Note that failed email may become active again if the email works in other lists in the system.)
If you receive an email saying someone has subscribed, but you cannot find that email in your list, most likely it is because the person has unsubscribed or the email bounced.
Inactive subscribers are those who have not engaged with any email for over 30 days.
They are still in your list.
To re-engage these subscribers, you can create a broadcast, set the Audience to target 'Inactive Subscribers' and give them an enticing promotion to encourage them to open your email.
In fact, you don’t necessarily need an irresistible offer. The primary goal is to get them to open the email, so a compelling subject line is crucial.
As long as they open your email, they will be marked as 'Active' again.
Please note that there is another type of subscriber called 'unverified' subscribers. These individuals have opted in but have not completed the verification process by clicking the verification link. Consequently, they have not fully opted in.
Unverified subscribers will be deleted after 30 days. According to the COI Standard from Spamhaus.org, it is illegal to email them, not even a reminder email asking them to verify.
First thing to do is don't worry. Our system allows up to 3 spam complaints in a month. The counter will reset every month.
Next, re-read the email that we sent to you regarding the complaint.
All the questions you may have and all the actions you need to take are given in the email.
If in the most unlucky situation, you get 3 spam complaints in a single month, contact us and we will reactivate your list as soon as we do some basic checking, which shouldn't take more than a day.
Please note that having your list banned does not prevent people from opting in. It only means you cannot send emails. Rest assured that while your account is under investigation, you are not losing any leads or advertising dollars.
Please also understand that we are not seeking to ban your list permanently. This action is intended to get your immediate attention so we can work together to resolve any underlying issues.
We apologize for any inconvenience this may cause. However, please understand that we do this to ensure our mail server maintains the highest delivery rate.
First, please note that having your list banned does not prevent people from opting in. It only means you cannot send emails. Rest assured that while your account is under investigation, you are not losing any leads or advertising dollars.
Please also understand that we are not seeking to ban your list permanently. This action is intended to get your immediate attention so we can work together to resolve any underlying issues.
We apologize for any inconvenience this may cause. However, please understand that we do this to ensure our mail server maintains the highest delivery rate.
Now, check your support ticket history. There should be a support ticket informing you that your list has been banned or suspended.
Please read the support ticket and follow the instructions provided. After you've fixed the issue, or if you need further clarification, reply to that support ticket directly. (Please DO NOT send us a direct email, as our inbox is flooded and your email may not be read.)
1) Click to open the list settings.
2) Scroll down to the field that says 'Your Postal Address' (see arrow below).

3) Make the change.
4) Click 'Save & Activate' (arrow 9).
Having a professionally designed email is half the battle won. It quickly differentiates your email from the rest.
In this guide, you'll learn how to add a header to your email.
There are 5 types of headers.
1) No header (Most emails have no header.)
2) Text header
3) Styled text header
4) Image logo
5) Banner-styled image
No Header
By default, there is no header.
If you have not set up any header before, there is nothing you need to do.
The instructions below is to teach you how to remove a header, if you have set up one before.
1) Access the Setup Form by clicking the set up button shown below
2) Scroll down the setup form to the 'Advanced Settings' section, and look for 'Email Header' (see screenshot below)

3) Delete everything in the 'Brand Name/Logo' field (arrow 3).
4) Click the color button (arrow 4) to open the color selector.
5) Click the X button at the top right corner (see screenshot below) to cancel any color.

6) Save changes.
Your email now has no header.
Text Header
Text Header looks like this:

1) Access the Setup Form by clicking the set up button shown below
2) Scroll down the setup form to the 'Advanced Settings' section, and look for 'Email Header' (see screenshot below)
3) Enter a brand name for your list (arrow 3).
Do not call it 'My MBOC List' or 'TE List'. You want to think of a name that will make your subscribers say 'I want to stay in this list!'. For example, 'My Traffic Secrets', 'MBOC Support Group' or simply your domain name.
4) Click the color button (arrow 4) to open the color selector.
5) Select a color for your Header. This will be the color for the Brand Name and the horizontal line underneath.
6) Click 'Preview Email Design' (arrow 1) to see how your email looks like. If you are satisfied, click 'Save & Activate' at the end of the setup form.
Styled Text Header
If you know CSS styling, you can enter a span tag into the Brand Name and add style to it.
This will give you more flexibility.
The instructions are essentially the same as that for 'Text Header', so I will not repeat here.
If you have no idea what CSS styling or span tag is, this option is not for you.
Image Logo
A Logo Header looks like this:

You should have the image logo ready. The image should be the exact size you want to be seen in the email. A good size is 200-300px in width.
If you need to create the logo, try online image tool like canva.com.
Here are the steps to add the logo:
1) Access the Setup Form by clicking the set up button shown below
2) Scroll down the setup form to the 'Advanced Settings' section, and look for 'Email Header' (see screenshot below)
3) Click 'Use Image' (arrow 2)
This will open your Image Gallery.
4) Upload your image logo into the Image Gallery using one of the two methods shown below:

5) Click the uploaded logo to select it (arrow 2a), then click 'Add' (arrow 2b).

6) Click the color button (arrow 4 in earlier screenshot) to open the color selector.
7) Select a color for the horizontal line under the logo. If you do not want any line, click X (see the screenshot below).

8) Click 'Preview Email Design' (arrow 1 in earlier screenshot) to see how your email looks like. If you are satisfied, click 'Save & Activate' at the end of the setup form.
Banner-Styled Image
A Banner-Styled Image Header looks like this:

You should have the image ready. The image width should be 600px to occupy the width of the email.
If you need to create the image, try online image tool like canva.com.
Here are the steps to add the image:
1) Access the Setup Form by clicking the set up button shown below
2) Scroll down the setup form to the 'Advanced Settings' section, and look for 'Email Header' (see screenshot below)
3) Click 'Use Image' (arrow 2)
This will open your Image Gallery.
4) Upload your image into the Image Gallery using one of the two methods shown below:
5) Click the uploaded image to select it (arrow 2a), then click 'Add' (arrow 2b).

6) Click the Color button (arrow 4 in earlier screenshot) to open the color selector.
7) Select the X button (see the screenshot below) to make the bottom hozontal line invisible.
8) Click 'Preview Email Design' (arrow 1 in earlier screenshot) to see how your email looks like. If you are satisfied, click 'Save & Activate' at the end of the setup form.
Setting up the Global Email Signature allows you to automatically insert the email signature into all your emails.
Possible Benefit: A Global Email Signature usually comes with an offer. You can update the offer as often as you want, without having to change all your emails.
Below is how an Email Signature can look like:

Below are the steps to create the email signature shown above.
1) Click (arrow 1) to show the list setup form.

2) Scroll down the setup form till you see the 'Email Signature' section.

3) Click 'Open Editor' (arrow 2).
You'll see a Signature Editor similar to the one below:

4) Click the 'Tmpl Gallery' button (arrow 3) to open Template Gallery.
The Template Gallery contains different templates that you can insert into your email like building blocks. You can even save your own templates so that you can easily insert them into an email if you want.In this illustration, we will use the signature template.
5) Click the template denoted by arrow 4, then click 'Ok' (arrow 5).

We'll have to side track a bit in Step 6-7 to show you how to upload your photo to the Image Gallery. Skip to Step 9 if you already have your photo in the Image Gallery.
6) Click 'Image Gallery' (arrow 6).

7) Upload your photo into the Image Gallery using one of the two methods shown below:
8) Click the 'Tmpl Gallery' button (arrow 3 in the earlier screenshot) to open Template Gallery again.
9) Follow the demo below to replace the placeholder image with your photo.

10) Follow the demo below to change the rest of the text and submit the change.

11) Select where you want the Signature to be shown (arrow 7)

12) Click 'Preview Email Design' (arrow 8) to see how your email looks like. If you are satisfied, click 'Save & Activate' (arrow 9).
Video cannot be added into an email. It is not allowed in any email services or clients such as Gmail, Hotmail, Outlook or Thunderbird.
What most marketers do is to place a video-looking image, including a play button. The image gives the impression that a video is ready to play. When users click on the image, they are redirected to the actual video hosted on a video site like YouTube, Vimeo, or a landing page with the embedded video.
1)Click (arrow 10).
You should now see the following:
2) Click the edit icon (arrow 11) to edit the Welcome Email.
You will see an email editor similar to the one below:
If your welcome email is empty, a sample will automatically loaded. PLEASE DO NOT USE the template without changes because it simply doesn't make sense.
3) Change the email subject (arrow 12), the email body (arrow 13), especially the PRODUCT NAME and the download link, and the Preview Text (arrow 14).
4) Click the preview button (arrow 15) to preview your Welcome Email. Or even better, click the 'Send Test' button (arrow 16) to send a test email to yourself.
You want to make sure that your Welcome Email is perfect, because that's the first impression that your subscriber will have on you.
5) When done, click 'Save Changes' (arrow 17)
If you want to learn more about our email editor, you can read 'An introduction to our email editor'
When you set up an email, you will come across a checkbox labeled 'Enable smart greeting' in the Subject and Body.

This option is useful when you have a mix of contacts with and without name. In other words, some of your contacts included their first name when they opt in while some didn't.
In such a case, you can't use the ~firstname~ placeholder, since not all subscribers have a first name.
The solution is smart greeting.
When you use smart greeting, subscribers with a name will be greeted in the email automatically. Those without a name will see your default email message.
For example...
For Subject
Say your email subject is I have got a good news for you!
If you enable smart greeting, Mary, for example, will see:
Mary, I have got a good news for you!
Those without a name will see:
I have got a good news for you!
For Email Body
Say your email body starts with Below is the download link for abc.
If you enable smart greeting, Mary, for example, will see:
Hi Mary,
Below is the download link for abc.
Those without a name will see:
Below is the download link for abc.
How to format smart greet?
Formating is not possible and not required in the Email Subject. But for the Email Body, when you activate Smart Greeting, a tag ~smartHi~ will be added into the Email Body.
You can style ~smartHi~ to your preference, with ONLY one limitation - DO NOT leave line spacing after ~smartHi~.
For example, if the start of your email is Below is the download link for abc., with the ~smartHi~, it should be simply
~smartHi~Below is the download link for abc.
, not
~smartHi~
Below is the download link for abc.
The logic for doing this is simple. If a subscriber has a name, the system will automatically add Hi name, followed by 2 line spacings. If a subscriber has no name, the system will start the email with whatever that comes after ~smartHi~. If you add line breaks after ~smartHi~, your email will have extra line spacings, making your email look unprofessional.
Email Apps like Gmail and AOL show a preview text in the email listing.
By default, email apps will simply show the beginning of your email message, which usually starts with greeting.
Below is an example of an email sent from SendSteed, without Preview Text being set up.

The preview text starts with your Brand Name, followed by Greeting and finally your Email Message.
As you can see, it is not attention grabbing.
If you set up the Preview Text, your email can look like this:

Your subscriber will then see the subject and a juicy preview that is decided by you.
How to set up Preview Text
In the Email Editor, you can see a field like the one below:

Enter the Preview Text that you want your subscriber to see.
There is no need to set up a custom field in advance.
Simply add a custom field into your opt-in form.
The system will automatically add it into your list under Custom Fields.
What is Tag?
First, please note that SendSteed Tag is different from the Tag system in Tracker and Page.
SendSteed Tags are short keywords you can add to your subscriber.
It allows you to send Broadcast to subscribers with or without certain tags.
Below are some possible scenarios:
Scenarios #1: You call a few contacts in your list. After calling, you add a tag "called" to the contacts. Then you can send a broadcast email to those you've called.
Scenarios #2: You add a tag to those who have received the last Email Episode. Then you can send a broadcast email to those who have completed the Email Series.
Scenarios #3: You add a tag to those who have open a broadcast. Then you can send another broadcast email to those who haven't opened the previous broadcast.
How to add Tags to a contact manually?
1) Go to List Manager and locate the contact you want to add.
2) Click the edit button next to the contact (arrow 1).

3) Enter the tag you want to add in (arrow 2).

- You can enter a short phrase, such as buyer, interested, called_12-4-2022, etc.
- You can use alphanumeric, dash and underscore.
- You can add multiple tags. Just separate them by line.
How to add Tags automatically?
When sending an Email Episode or Broadcast, you can set up the 'Tagging Options'.
'Tagging Options' allow you to add a Tag to the subscribers when a certain action is performed.
Referring to the screenshot below, you can add a tag when an email is sent (arrow 1), when the subscriber reads the email (arrow 2) or when he/she clicks a link in the email (arrow 3).

Read > What are 'Tagging Options'? How to set them up?
How to add Tags to contacts who have received/opened/clicked a broadcast or email episode?
You can bulk add a tag to people who have received, opened or clicked a particular broadcast you’ve sent.
Read > How to add Tags to contacts who have received/opened/clicked a broadcast or email series?
How To Send A Broadcast Based On Tags?
1) Set up a broadcast as usual.
2) Under the 'Audience' setting, you will see 2 options as follows:

3) Enter the tag(s) you want to target.
For multiple tags, just separate the tags by comma, like this:

Take the above illustration as an example, the broadcast will be sent to all active subscribers with either 'interested', 'follow_up' or 'called' as the tag.
Note: For multiple tags, the broadcast will be sent to all contacts with one or more matching tags.
What are 'Tagging Options'?
To know what are 'Tagging Options', you first have to understand how SendSteed Tag works.
Read > What is Tag? How to add Tags a subscriber? How to send a broadcast based on Tags.
'Tagging Options' allow you to add a Tag to the subscribers when a certain action is performed.
Referring to the screenshot below, you can add a tag when an email is sent (arrow 1), when the subscriber reads the email (arrow 2) or when he/she clicks a link in the email (arrow 3).
The purpose of tagging is to allow you to send a broadcast to subscribers with or without certain tags.
How to set it up?
Adding a tag When Email Sent or On Email Open is rather straightforward. Just enter the tag and save changes.
Adding a tag On Link Click requires explanations.
You can attach a Tag to only the first three links in your email, including the links in the Email Signature.
To find out which Tag is for which link, click the 'Show link URLs' button.

Note #1: The first 3 links include the links in the Email Signature. For broadcast, if multiple lists are selected, 'Show link URLs' only check the Email Signature of the first list. You will have to manually check and ensure that there are no conflicts in other lists. If you cannot be sure, DO NOT attach a Tag to the link in the Email Signature.
Note #2: Only 1 Tag allowed per link. Try to use as short a tag as possible. Allowed characters include a-z, 0-9, - and _.
Note #3: Each subscriber has a Tag limit of 500 characters. Avoid adding too many tags and using wordy tags. If the limit is reached, new Tag will be ignored without notification.
1) Go to Broadcasts or Email Series. If you have sent an email before, you will see statistics of Sent, Open and Click for the particular email (see arrow 1 below).
2) Say you want to add a tag to those who have opened the email, click on the Open stat.
3) Click 'Add Tag to these emails' (see arrow 2 below).

4) Enter a tag name (see arrow 3 below). In most cases, just use the suggestion given (see arrow 4 above).
5) Click 'Add Now'.
A tag will then be added to all the emails that have opened the email.
1) Go to the list you want to edit, click the tag icon shown in arrow 1 below
The system will automatically populate all existing tags in the list (see arrow 2).
2) Remove the tags you WANT TO KEEP.
3) Click the button depicted by arrow 3 to bulk delete the remaining tags in the input area.
Click the edit icon next to a subscriber. You'll see an option to 'Move This Subscriber To Another List'.
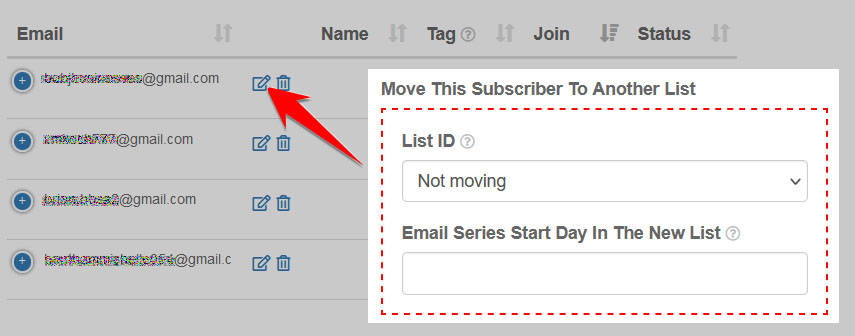
Enter the new List ID and the Email Series Start Day, then click Save Changes.
Different scenario #1
If you want to move ALL the subscribers from one list to another immediately, please contact support. Give us the From ListID, To ListID and the Email Series Start Day in the new list.
Different scenario #2
If you want to move subscribers from one list to another automatically AFTER they have completed certain Days of email series, please refer to the tutorial in Email Series. Enter keyword 'switch'.
To ensure high email delivery rate, Sendsteed strictly complies with the COI Standard.
You can learn more about COI Standard.
This means all emails must be double opt-in.
Because of that, email import is not possible.
If you have a list of contacts from other sources, you can send them to an opt in page and ask them to opt in.
You can explore tools like Bulk Email Sender to send out mass email invitation through gmail. But please note that you may risk being accused of spamming, which is the reason why we do not allow email import.
Having a list of email addresses doesn't mean you can send email to the list legally.
The guide below will help you understand 'list' better.
There are 5 common types of lists in the market.
1) Safelist
These are contacts who have opted in to a program and have agreed to let others email them.
You may get these contacts from the program because you are part of the system.
Regardless of how the agreement is written, safelist is legitimate only within the program itself.
Mass mailing to the list outside the program can constitute spam.
2) Shared list
These are contacts who have opt in to a program through your referral and have agreed to let YOU and the program owner email them.
Though you may have personally referred the contact, what the contact has joined is the program, not your list.
Similar to safelist, shared list is legitimate only within the program itself.
Mass mailing to the list outside the program can constitute spam.
3) Pseudo list
These are contacts who have opted in to a list (perhaps it's really your own list or through a list building program)
But that's all.
They are not informed whose or what list they have opted in to. All they know is they have subscribed to a form.
The legitimacy of such a list is questionable in the first place, not to mention mass mailing to the list.
4) Purchased list
These are email contacts that you have purchased from someone.
Some sellers provide their own mass-mailing service. Mass-mailing within the program may be legal, or rather the legality falls on the program owner, not you.
However, mass mailing to the list outside the program can constitute spam.
5) Your own list
These are contacts who have opted-in to your personal list, through a double opt-in process.
They know who you are and there is some kind of relationship between you and them.
This list is legitimate wherever you go.
Most list management systems allow such a list to be imported, so you are good to bring them from one list manager to another.
This is the kind of list that you want to build.
It is also the kind of list you will have when you use SendSteed to build a list.
How to 'clean' the first 4 types of list?
If you have the first 4 types of list, use the program where you get the list from to email the list.
Send them to your own opt-in page and invite them to opt-in to your own list.
Click (arrow 1) to show the subscribers in your list.
1) Click (arrow 1) to show the subscribers in your list.

2) Click 'CSV' or 'Excel' button (arrow 2).
You can download your subscribers' details in CSV or Excel format.
You send mass mail to your lists at Broadcasts.
There is a dedicated page to set up email series at Email Series.
The tutorial on Email Series is on that page.
For your convenience, you can also edit the Email Series for each list by clicking (see arrow below).

The editing interface is the same as that on Email Series. Please refer to the tutorial on Email Series to learn more.

1) Click (arrow 1) to show the subscribers.
2) Locate the subscriber you want to edit, then click the edit button (arrow 2)
3) Change the 'Last Email Series Day' (arrow 3), then click 'Save Changes'.

Please note that the 'Last Email Series Day' is the day of the last Email Episode sent, not the day of the next episode.
For example, if you want a subscriber to receive Day 4 in the next email, you will have to enter 3.
The subscriber emails in your SendSteed list show Suspicious IP because they are opted in from repeated IP address.
This warning is for your own reference. If you have advertised to bring in subscribers, with this warning, you'll know that the seller has been opting in different emails himself! You should stop advertising with the seller.
If you are the one opting in using different emails, please stop doing so. Your IP may be blacklisted if you continue to do that. If you are trying to test the list, please test using only one email address. If you must test using multiple emails, please contact support.
For the existing suspicious IP in your list now, if your list is not suspended, you may leave them in your account or delete them. But it's best to delete them to prevent your list from being suspended.
We do not provide API. To connect to third-party plugin or app, you can go to your list, click 1 and get the form code in arrow 2.

Show the form code to the support of the third-party plugin or app you plan to use. They will tell you what to do.
Alternatively, if you are trying to add an opt in form to your self-hosted Wordpress blog or your own website, you may consider using our Form/Popup Creator.
A placeholder is a temporary code that will be replaced by the actual wording when the email is sent.
For example, ~firstname~ is the placeholder for the subscriber's name.
In your email, you can say "Honestly ~firstname~, this is not what I will do..."
When you send out the email, your subscriber will see the above sentence with their name.
This means a subscriber with the name of John will see "Honestly John, this is not what I will do..."
SendSteed is free forever.
There is no limit to how many subscribers you can have.
We started SendSteed to help members who can't afford expensive list management services. Charging it will defeat our objective.
What's the catch?
You may call them catch, but we call them allocation of resources.
1) Although you can have unlimited subscribers, the mailing rate is limited. For Free Members, it is limited to 100 emails per hour. For Pro Members, there is no limit. But the actual mailing rate depends on the capability of our mailing servers and the requirement to throttle email sending at 1 email per second. It is the standard practice in the industry to prevent mail servers from being banned.
2) If your subscribers are not active in the system for more than 30 days, i.e. they do not read any email from SendSteed, they will become inactive.
You can only send them 1 email (if you are a Free Member) or 4 emails (if you are a Pro Member) in a month.
If they are not active for more than 6 months, their email will fail.
But if they become active in SendSteed system again, perhaps they subscribe to another list in SendSteed, they will become active in your list again.
This practice will ensure that we cater our resources to real people who read emails.
3) Free Members can send up to 10 broadcasts every 30 days. There is no broadcast limit for Pro Members.
4) Free Members cannot send Email Series.
By allocating the resources carefully, we believe we can make SendSteed free for all members forever.
Email cleaning is a tedious task that all list owners have to do regularly.
At SendSteed, we do the task for you, so you don't have to do it.
1) Contacts that do not read any email for more than 30 days (system-wide, not just your email) will become inactive.
You can still send emails to inactive contacts.
2) Contacts that are inactive for more than 6 months will receive a special treatment.
On your next broadcast, the status of these contacts will change to fail, but they will still receive your email.
If they read your email, the status will change to active again.
If they do not open your email, the status will remain fail.
But if they become active in SendSteed system again, perhaps they subscribe to another list in SendSteed, they will become active in your list again.
3) Contacts that are inactive for more than 9 months will be deleted.
This practice will ensure that we cater our resources to real people who read emails.
Free Members can have up to 10 campaigns. No limit for Pro Members.
There is no limit to how many subscribers you can have in a list.
Unfortunately, there's no action you can take for those who are already on your list.
According to Spamhaus.org (see screenshot below), email senders can only send the verification email (or permission pass) once.

If you have a high number of unverified opt-ins, instead of focusing on how to get them to verify, you should be thinking about how to ensure that new opt-ins verify.
This shift in the mindset is important.
Another important change in the mindset is to understand that achieving a high verification rate is possible.
LeadsLeap membership operates on a double opt-in system. Every member needs to verify. No reminder email is sent.
Yet, our verification rate is over 90%.
How is that possible?
Because only verified members can access the system.
So, what's the secret?
The secret is to require them to verify. If they don't, they can't get what they want.
Applying the same secret to your list-building campaign, all you have to make sure is there is a 'bait' in your opt in offer. Make it clear that they can only receive it after verifying, and then deliver the bait in the welcome email.
That's all there is to it!
If they don't bit, it means one of the followings:
1) Your bait is not attractive enough.
2) They are not serious.
3) They are paid to opt-in but not paid to verify.
4) They are spam opt-ins.
A Note About Single Opt-In
SendSteed only offers double opt-in. There are other autoresponders that offer single opt-in, meaning there's no need for email verification.
You might be thinking, "Why not use single opt-in? Then the need for verification becomes a non-issue."
In case you have this thought, here's the answer.
Firstly, it's crucial to understand that double opt-in is a requirement under the COI standard.
Those who do not comply with the COI standard will risk being blacklisted.
You might then ask why some autoresponders offer single opt-in?
The answer is because their competitors do so. It is more profitable for them to do the same.
But you have to understand that they do it at your risk, not theirs.
If Spamhaus blacklists them, they will just ban your entire list and ask Spamhaus to re-evaluate.
It's important to note that Spamhaus will not disclose the recipient email addresses; they will only provide the email subject. So the autoresponder company cannot just ban one email. It will have to ban the entire list that sent the email subject.
This means your entire list will be banned.
If you are not convinced that double opt-in is necessary, think about this...
Do those autoresponder companies that offer single opt-in use double opt-in for their own lists/members?
Surely they do.
If single opt-in is that good and can grow their own list faster, why don't they use single opt-in themselves?
Truth is, they understand that their own list must be 100% clean. If there is just one spam trap email in it, their entire list is doomed.
They won't risk that. But they let you risk it, because they want to make money from you, until your list is banned, which may or may not happen.
If you are still not convinced, imagine using single opt-in and someone subscribes to your list using the email address of the US President (just to make a point). Then you start sending daily emails to the President. While nothing may happen to you personally, the server sending those emails could certainly face serious issues.
The short answer is no.
If you want to know why, continue readin...
Firstly, it's crucial to understand that double opt-in is a requirement under the COI standard.
Those who do not comply with the COI standard will risk being blacklisted.
You might then ask why some autoresponders offer single opt-in?
The answer is because their competitors do so. It is more profitable for them to do the same.
But you have to understand that they do it at your risk, not theirs.
If Spamhaus blacklists them, they will just ban your entire list and ask Spamhaus to re-evaluate.
It's important to note that Spamhaus will not disclose the recipient email addresses; they will only provide the email subject. So the autoresponder company cannot just ban one email. It will have to ban the entire list that sent the email subject.
This means your entire list will be banned.
If you are not convinced that double opt-in is necessary, think about this...
Do those autoresponder companies that offer single opt-in use double opt-in for their own lists/members?
Surely they do.
If single opt-in is that good and can grow their own list faster, why don't they use single opt-in themselves?
Truth is, they understand that their own list must be 100% clean. If there is just one spam trap email in it, their entire list is doom.
They won't risk that. But they let you risk it, because they want to make money from you, until your list is banned, which may or may not happen.
If you are still not convinced, imagine using single opt-in and someone subscribes to your list using the email address of the US President (just to make a point). Then you start sending daily emails to the President. While nothing may happen to you personally, the server sending those emails could certainly face serious issues.
How to get high high verification rate?
The key lies in targeting the right audience and offering a compelling lead magnet.
In LeadsLeap membership, our email verification rate is more than 90%. How do we achieve this? It's quite simple.
Firstly, we offer a compelling lead magnet—in our case, the LeadsLeap membership. Access to membership tools requires email verification.
Secondly, upon opting in, we prompt users to verify their email as the next step. We avoid distracting offers or links. Their sole focus is on verification.
That's essentially the secret to achieving a high verification rate.
The logic is very simple. If you have something that they want, and they can only get it after they verify their email, what do you think they will do? Yes, they will make sure that they verify their email by hook and by crook.
The key is to offer something that they want.
First, you should have the List created at List Manager.
To set up an Email Series for a List you've created, please follow the steps below:
1) Click 'Add new' (see arrow below).

You'll see an Email Editor similar to the one below:

2) Enter the day you want the email to be sent (arrow 1).
In this example, we'll enter 1.
Tip: Try to set up the email series in order, i.e. if your email series is sent on Day 1, 3 and 5, start with Day 1, then Day 3 and so on.
If you start with Day 5 for example, the system will automatically create 4 skipped emails for Day 1 to 4. You can change it later, but that's extra work for you.
3) Under 'Action' (arrow 2), select 'Send email', because you want to send an email on that day.
4) Enter the email subject (arrow 3).
5) Enter the email body (arrow 4).
6) Enter the Preview Text (arrow 5 below).
Read > What is Preview Text? How to set it up?

7) Show Email Signature In This Email?

Note: Remember that when you set up the list in the List Manager, you had the option to set up a Global Email Signature and apply it to all Email Series and Broadcasts.
The option here allows you to ignore the Global Email Signature, giving you more flexibility in deciding whether you want to show the email signature.
If you want this email to follow the Global Signature, select 'Follow Global Signature'. If you do not want to show any email signature in this email, select 'Do Not Show'.
8) Tagging Options
'Tagging Options' are advanced functions that allow you to add a Tag to the subscribers when a certain action is performed.
Skip it if you are new to SendSteed.
To learn more, read > What are 'Tagging Options'? How to set them up?
9) Switch List Options
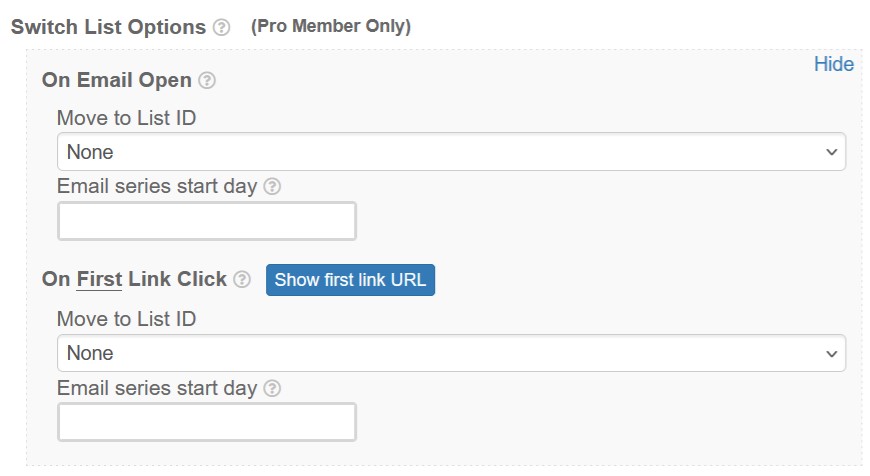
'Switch List Options' are advanced functions that allow you to move the subscribers to another list when a certain action is performed.
Skip it if you are new to SendSteed.
To learn more, read > How to switch/move a subscriber to another list when they open an email or click a link?
10) Click 'Save and Activate' (arrow 6).
11) Click 'Save Changes' (arrow 7).
That completes Day 1 of your email series.
Next, let's say you want to set up Day 3, just click 'Add new' again.
Straight away enter 3 in the 'Day' field (arrow 1 in the earlier screenshot).
Other steps are the same.
When you save, the system will automatically create a skipped Day 2 and save Day 3 at the same time.

You can continue to add more days to your email series using the same method.
Email series is also known as automated follow-up emails.
It is a series of preset emails that will be sent to your subscribers automatically on the X day after they join your list.
For example, you can create a 5-part eCourse to teach your subscribers about something.
You can set the course to be sent on day 1, 3, 5, 7 and 9.
Everyone who opts in to your list will receive the eCourse on the stipulated days from the day they join.
If you want to rearrange the 'day' of an email episode, just change the 'day' of that episode.
For example, if you want to insert another Day 3, pushing the existing Day 3 and the subsequent episodes forward by one day, simply add another email and set it to Day 3. The system will push all the remaining episodes forward by one day.
Similarly, if you delete an episode, the system will automatically move all remaining episodes forward by one day.
Or if you change the 'day' of an email from 4 to 2, the system will automatically insert day 4 into day 2, change day 2 to day 3 and day 3 to day 4.
Basically you just have to make the change to one episode. The system will automatically rearrange the remaining episodes.
Day 0 doesn't exist.
Think about this.
Assuming a person opts in at 8am.
At 8am the next day, he will receive Day 1 email.
When do you want the Day 0 email to be sent?
At 9am the same day? Or exactly at 8am on the same day?
Rightfully Day 0 should be sent at 8am on the same day, which is the time at which he signed up.
Isn't that supposed to be the Welcome Email?
In other words, if you want to send an email on Day 0, just set it up in the Welcome Email.
You can set up the Welcome Email on List Manager.
1) If the email that you want to edit is a 'Skipped Episode', i.e. there is no email on that day, you will have to click 'Show skipped episodes' (arrow 1) to show the edit button.

2) Look for the day you want to edit.
3) Click (arrow 2) edit.
This will open the Email Editor. You can then edit the email accordingly.
1) Look for the episode you want to duplicate.
2) Click to duplicate it.

Let's say you want to stop an email series starting from Day 3, you can Save Day 3 episode as Draft. All other email episodes after Day 3 will be paused automatically.
To unpause, just 'Save and Activate' Day 3 again.
To pause the entire email series, Save Day 1 as Draft.
The 'Find and Replace' function (arrow 1) is a useful tool especially when you have a lot of emails in a series.

Say you have been promoting an affiliate link in different email episodes but the affiliate program stops.
The 'Find and Replace' function allows you to quickly identify all the episodes with the affiliate link, and even replace them all at once.
These are the steps to do it.
Let's say you want to find http://abc.com?r=123
1) Click 'Find and Replace' (arrow 1 in screenshot above) to open the search form similar to the one below.

2) Enter http://abc.com?r=123 in the Find what field and click 'Find All' (arrow 2).
The system will list down all the emails with http://abc.com?r=123, with the search term in bold. (arrow 3).
You can then click the edit button (arrow 4) and change the url.
How to find and replace HTML code
Let's say you have been using the same HTML code for the hyperlink. For example,
<a href="http://abc.com?r=123">abc.com</a>
You can use the 'Find and Replace' function to replace the HTML code with another code.
Here's how to do it.
1) Enter <a href="http://abc.com?r=123">abc.com</a> in the Find what field (arrow 5).

2) Enter <a href="http://xyz.com?r=789">xyz.com</a> in the Replace with field (arrow 6).
3) Click 'Find All' (arrow 7) to make sure that it is the correct search phrase, because we are going to replace all of them!
4) Check the Matches (arrow 8). The phrases in bold are the ones that will be replaced. Make sure they are correct.
5) Click 'Replace All' (arrow 9) to replace.
The HTML code has now been replaced.
5) To confirm, click the edit button (arrow 10) of any affected episode and check.

The hyperlink to abc.com is now replaced by xyz.com (arrow 11).
Share Code is a unique function in LeadsLeap that allows members to share their work with other members.
Members can share their Page design, Popup design and in this case, their Email Series.
For example, you may want to share your Email Series with your team members, so that they can duplicate your success.
How To Get The Share Code Of An Email Series?
1) Go to the Email Series that you want to share.
2) Click 'Share Code' (arrow 1).

3) Select if you want to share the Welcome Email (arrow 2).

4) (Optional) Set up Share Code Replacer (arrow 3).
Read > What is Share Code Replacer? How to set it up?
5) (Optional) Test the Share Code (arrow 4).
Read > What is Share Code Test Account? How to access it?
6) Copy the Share Code (arrow 5) and share it with your team.
Read > How to import a Share Code?
First of all, please understand that Email Share Code imports the Email Series into a List. For the import to be possible, you need to have the List created and set up. If you haven't already done so, please go to List Manager follow the tutorial "How to set up a list? (Step by Step)".
After you have the List set up, please follow the steps below to import the Email Share Code:
1) Go to the list that you want to import into.
2) Click 'Import' (arrow 1).

You'll see a form similar to the screenshot below.

3) Enter the Share Code (arrow 2).
4) Select whether you want to add on to or replace existing episodes (arrow 3).
If your Email Series is currently empty, there is no difference in the two options. Just choose anyone.
5) Select whether you want to import the Welcome Email (a.k.a the Day 0 email) (arrow 4).
Note that Welcome Email is subject to availability. If no Welcome Email is imported, it can be because no Welcome Email has been set, or the Share Code owner has not granted the access to the Welcome Email.
5) Click 'Import Now' (arrow 5)
If you see a form that ask you to fill in your affiliate link or other data, please follow the instruction accordingly.
Otherwise, the entire Email Series and Welcome Email will be added into your list.
"I do not have a Share Code. Where do I get it?"
You can't get a Share Code. It is given to you.
Someone must be willing to share their work with you. If nobody has given you a Share Code, then you cannot import any Email Series.
Share Code Replacer allows you to set up a replacer form for the recipients of your Share Code to replace your ListID, URL or other info with theirs.
For example, let's say in your Email Series, there is a link to your affiliate link, https://someprogram.com/?r=myusername. You can create a form like the example shown below to instruct your lead to replace it with their affiliate link.
NOTE: Replacer is NOT a placeholder. For placeholder function, please refer to What is a placeholder?
On that note, let's continue to see how Replacer works...
Imagine you can create a form like this:

When the recipients of your Share Code fill up the form, their data will automatically replace your current values.
That's it. No need to do further customization. No need to create any shortcode. No need to set up any special template.
Their imported email series is immediately ready to use.
Please note that the Replacer simply replaces everything that matches and it is case sensitive. If you set the replacer to replace the word apple, and the recipient enters orange, the replacer will replace all the 'apple' found with 'orange', but it will not replace Apple, since it is case sensitive.
How to set up the Share Code replacer?
1) Click the button shown below.

2) Click 'Add a new replacer'.
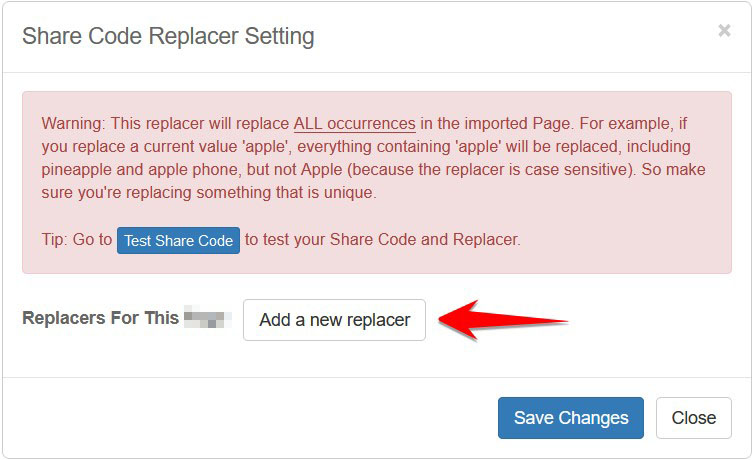
3) Set up the replacer following the instructions below.
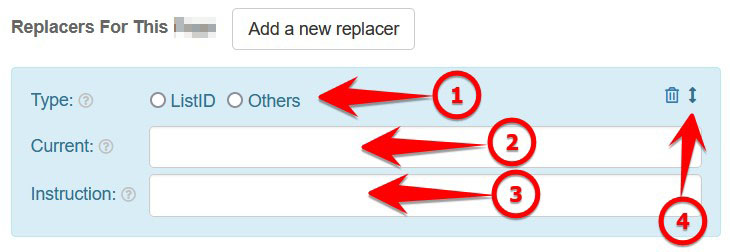
For 'Type' (arrow 1), select ListID if you're replacing a ListID, because ListID requires special database processing. Otherwise, select Others.
For 'Current' (arrow 2), enter your current value. This value will be replaced with the data that the recipient enters.
For example, to replace the link https://somedomain.com/?r=yourusername, you will enter https://somedomain.com/?r=yourusername as the current value.
For 'Instruction' (arrow 3), enter the instruction to the recipients, such as 'Enter your affiliate link here' or anything you want them to enter.
That's it.
You can add unlimited number of replacers.
To sort the order of the replacers, use the drag icon (see arrow 4 above).
Share Code Test Account is a dummy account that allows you to test your Share Code and Replacer.
You can go to your Test Account, import your Share Code and see how your Share Code and Replacer work in the experience of the recipient.
You can also use it to create screenshot or video instructions for your recipients.
You can easily delete or reset the items in the Test Account with a button, so that you can import and test again.

How to access the Share Code Test Account?
1) Click the get Share Code button

2) Under the Share Code, click 'Test Share Code' to access the Test Account.
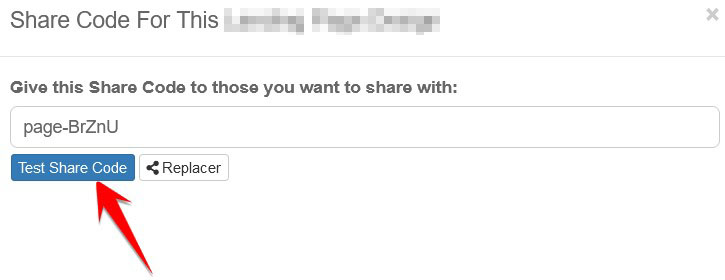
To change the last sent Email Episode of a subscriber, you have to do it at List Manager, not on this page.
1) Go to List Manager, then look for the list the subscriber is in.
2) Click (arrow 1) to show the subscribers.
3) Locate the subscriber you want to edit, then click the edit button (arrow 2)
4) Change the 'Last Email Series Day' (arrow 3), then click 'Save Changes'.
Please note that the 'Last Email Series Day' is the day of the last Email Episode sent, not the day of the next episode.
For example, if you want a subscriber to receive Day 4 in the next email, you will have to enter 3.
It is not possible to change the email series send time globally for two key reasons:
1) Logical Consistency
The logic of the email series is to automatically send email after 1 day (24 hours), 2 day (48 hours) etc from the subscriber's signup time.
For example, if John subscribes at 10 PM today, his Day 1 email will be sent at 10 PM tomorrow, and subsequent emails will follow the same schedule.
If we were to set a global send time (e.g., 11 PM for everyone), John would receive his Day 1 email at 11 PM (1 hour after he subscribed), instead of 24 hours later. This would disrupt the timing logic and create inconsistencies.
2) Best Time for Engagement
Subscribers are most likely to engage with emails at the time they signed up. This is because their signup time typically reflects when they are active and not sleeping, unless it was an exception, such as a late-night browsing session.
By keeping the email series tied to the signup time, we optimize for engagement and relevancy.
Having said that, if a subscriber feels their email series timing is inconvenient, we can make a manual adjustment. Simply provide their email address and the preferred time (in UTC), and we'll update it for them.
I hope this explanation clarifies our approach. Feel free to reach out if you have further questions!
Loop back is a function that allows you to recycle your email series.
For example...
Let's say you've created a 5-part eCourse for your opt-in subscribers. Subsequently, you have prepared a series of follow-up emails.
Your email series may look like this:
Day 1: Part 1 of your 5-part ecourse
Day 2: Part 2 of your 5-part ecourse
Day 3: Part 3 of your 5-part ecourse
Day 4: Part 4 of your 5-part ecourse
Day 5: Part 5 of your 5-part ecourse
Day 6: Follow up email 1
Day 10: Follow up email 2
Day 15: Follow up email 3
Day 20: Follow up email 4
Day 25: Follow up email 5
Day 30: Follow up email 6
Day 35: Follow up email 7
Day 40: Follow up email 8
If you do not want to continue writing more follow up emails, you can 'recycle' the old episodes.
Using the example above, you can do this:
Day 1: Part 1 of your 5-part ecourse
Day 2: Part 2 of your 5-part ecourse
Day 3: Part 3 of your 5-part ecourse
Day 4: Part 4 of your 5-part ecourse
Day 5: Part 5 of your 5-part ecourse
Day 6: Follow up email 1
Day 10: Follow up email 2
Day 15: Follow up email 3
Day 20: Follow up email 4
Day 25: Follow up email 5
Day 30: Follow up email 6
Day 35: Follow up email 7
Day 40: Follow up email 8
Day 45: (Loop back to Day 6)
On Day 45, the subscriber will automatically receive Day 6 email, then Day 10, then Day 15, until Day 40, then back to Day 6 again, infinitely.
How To Use It?
Using the example above, we want Day 45 to loop back to Day 6.
First, we have to add a new episode for Day 45.
1) Click 'Add New' to add a new episode.
An Email Editor will be shown.

2) Enter 45 in the 'Day' field (arrow 1).
3) Select 'Loop back' for Action (arrow 2)
4) Enter 6 for the Loop Back Day (arrow 3).
That's it.
Now, what if you want to skip certain days in the loop back?
In other words, you do not want to re-send certain episodes.
A practical example is you've sent a free gift. You do not want to resend the free gift.
How To Skip Certain Days In Loop Back?
Using the illustration above in which we loop Day 45 back to Day 6, let's see how to skip Day 15 in the Loop Back.
1) Open the Email Editor for Day 15.
2) Click the 'Skip loop back' option next to the Day label.

3) Click 'Save Changes'.
Done. Day 15 will now be skipped in the loop back.
Putting it all together, the above illustration basically loops the email episode on Day 45 back to Day 6, then to Day 10. On Day 15, the email is skipped. Subsequently Day 20 to Day 40 emails are sent. Finally on Day 45, the email loops back to Day 6 again and the process repeats perceptually.
A Word Of Caution
Exercise common sense when you use this function.
Surely you are not going to loop back a 5-part ecourse because it will be weird to keep on receiving part 1 to 5 again and again.
It is also not a good idea to loop back in a small loop. For example, you only have 3 follow-up emails and you keep on recycling the 3 emails.
If you have enough follow-up emails, loop back will look natural. Subscribers will feel that you are constantly in touch with them.
But if you abuse this function, subscribers will be irritated and they may report your list as spam. Excessive spam will cause your service to be suspended.
The setting for email signature is done on List Manager, not on this page.
Go to List Manager and follow the tutorial on 'How to add email signature'
When you set up an email, you will come across a checkbox labeled 'Enable smart greeting' in the Subject and Body.
This option is useful when you have a mix of contacts with and without name. In other words, some of your contacts included their first name when they opt in while some didn't.
In such a case, you can't use the ~firstname~ placeholder, since not all subscribers have a first name.
The solution is smart greeting.
When you use smart greeting, subscribers with a name will be greeted in the email automatically. Those without a name will see your default email message.
For example...
For Subject
Say your email subject is I have got a good news for you!
If you enable smart greeting, Mary, for example, will see:
Mary, I have got a good news for you!
Those without a name will see:
I have got a good news for you!
For Email Body
Say your email body starts with Below is the download link for abc.
If you enable smart greeting, Mary, for example, will see:
Hi Mary,
Below is the download link for abc.
Those without a name will see:
Below is the download link for abc.
How to format smart greet?
Formating is not possible and not required in the Email Subject. But for the Email Body, when you activate Smart Greeting, a tag ~smartHi~ will be added into the Email Body.
You can style ~smartHi~ to your preference, with ONLY one limitation - DO NOT leave line spacing after ~smartHi~.
For example, if the start of your email is Below is the download link for abc., with the ~smartHi~, it should be simply
~smartHi~Below is the download link for abc.
, not
~smartHi~
Below is the download link for abc.
The logic for doing this is simple. If a subscriber has a name, the system will automatically add Hi name, followed by 2 line spacings. If a subscriber has no name, the system will start the email with whatever that comes after ~smartHi~. If you add line breaks after ~smartHi~, your email will have extra line spacings, making your email look unprofessional.
The correct way to add a header to the email episodes is by setting up the header in the List Setup at List Manager.
Go to List Manager, click the Tutorial and follow the instruction in 'How to add a header to my email'.
Once that header is set up, it will appear in ALL the email episodes in THAT list.
This is because you have set up a header for the List at List Manager.
At the same time, you add another header in the email episode.
Hence both headers are shown.
To fix it, delete the header you've added in the email episode.
Email Apps like Gmail and AOL show a preview text in the email listing.
By default, email apps will simply show the beginning of your email message, which usually starts with greeting.
Below is an example of an email sent from SendSteed, without Preview Text being set up.
The preview text starts with your Brand Name, followed by Greeting and finally your Email Message.
As you can see, it is not attention grabbing.
If you set up the Preview Text, your email can look like this:
Your subscriber will then see the subject and a juicy preview that is decided by you.
How to set up Preview Text
In the Email Editor, you can see a field like the one below:
Enter the Preview Text that you want your subscriber to see.
If you have a Broadcast with good conversion, you can add it into your Email Series for automatic following-up.
You can do that easily from the Email Episode Editor.
When adding/editing an Email Episode, you'll see a 'Use email from broadcast' button next to the Subject (see arrow 1 below).

1) Click on that button to show all the recent Broadcasts in your account.
The system will load the broadcasts, together with the Open and Click rate (see the screenshot below).

2) Select the broadcast you want to use.
That's it.
The system will automatically add the email subject, body and preview message of the selected broadcast into the episode.
A placeholder is a temporary code that will be replaced by the actual wording when the email is sent.
For example, ~firstname~ is the placeholder for the subscriber's name.
In your email, you can say "Honestly ~firstname~, this is not what I will do..."
When you send out the email, your subscriber will see the above sentence with their name.
This means a subscriber with the name of John will see "Honestly John, this is not what I will do..."
The 'Day 1' is not the 'Day 1' from the time they join. It is the 'Day 1' from the time they start receiving your email series.
Assuming they have not received any email episode, if you add an email series, they will all start receiving the episodes from Day 1.
But if you have an old email series and some have received before, and you delete it and want to start a new one, then that will be a bit tricky. You will have to go to each contact, click the edit button and set the Last Email Series Day to 0. Or just drop us a ticket. We will reset it for you.
Let's say you have 2 Lists.
List A has 18 days of emails in its Email Series; List B has 100 days of emails in its Email Series .
After your subscribers in List A have completed 18 days of emails, on the 19th day, you want to move the subscribers to List B, and start them on Day 3 of the 100-day Email Series in List B.
Here's how to do it...
1) Add a new Email Episode for Day 19
2) Under the Action option, select 'Switch list'.
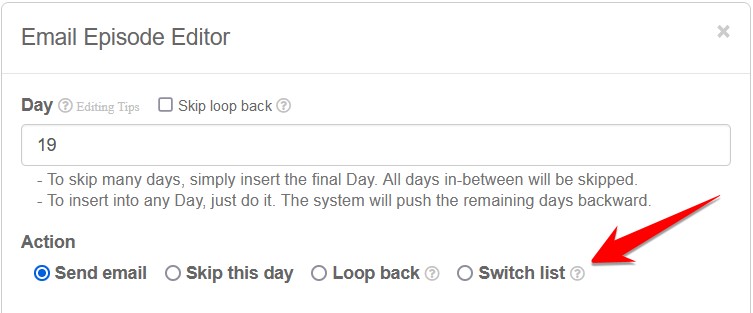
3) You'll see the form below:
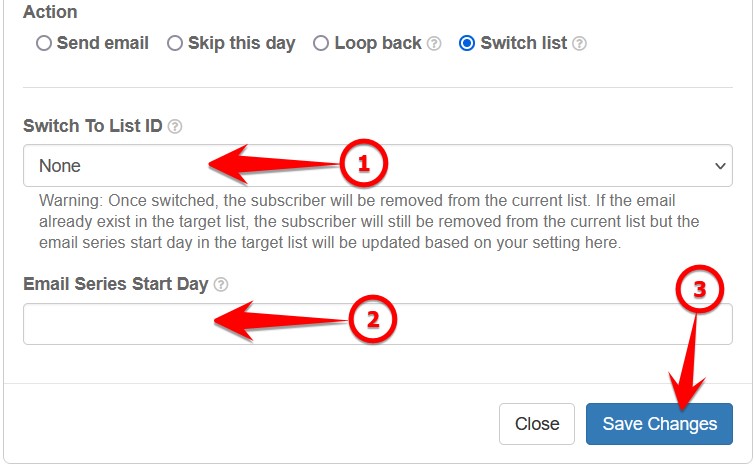
In arrow 1, select the List to switch to.
In arrow 2, enter 3 (because in the above example, we want to start the subscribers on Day 3 of the Email Series in the new List).
Click Save Changes.
That's all.
On day 19, the subscriber will be moved to List B and receive Day 3 of the Email Series in List B, followed by Day 4 the next day and on and on.
Possible Q&A
After the switch, will the Subscriber exist in both list?
No. The Subscriber will be deleted from the old list and will only exist in the new list.
What if the Subscriber already exists in the new list?
The Subscriber will still be deleted from the old list. The email series day of the subscriber in the new list will remain unchanged.
Can I switch list through a link clicked by the subscriber?
Yes, please read > How to switch/move a subscriber to another list when they open an email or click a link?
Can I switch list manually?
Yes. This option is already available. It is not a new function.
Click the edit icon next to a subscriber. You'll see an option to 'Move This Subscriber To Another List'.
Will Share Code import the switch list setting?
Yes, but the 'switch to' List will be the List ID you have set. It will not work in other people's account.
In the absence of a valid List, the email series will just stop at the previous day.
The receiver of your Share Code will have to update the List ID manually. You can simplify the process by setting up a Replacer.
When you set up an email, be it Email Episode or Email Broadcast, you will see this option:
If you want to move the subscriber to another list when they open the email, under 'On Email Open', select the List ID and enter the Start Day of the email series in the new list.
If you want to move the subscriber to another list when they click a link, under 'On First Link Click', select the List ID and enter the Start Day of the email series in the new list.
Important Note For 'On First Link Click'
Note #1: It only works for the first link in the email.
Note #2: The link can go to any URL as usual. As long as they click it, they will move to another list and also go to the designated website at the same time.
Important Note For 'Email series start day'
For 'On Email Open', the 'Email series start day' must be more than 1. This means the welcome email cannot be sent out. (The reason is that the subscriber may feel spammed if they receive another email after opening one.)
For 'On First Link Click', the 'Email series start day' can be 0. If set to 0, the subscriber will switch to the new list and at the same time receive the welcome email of the new list. (If you do that, it's best to bring the subscriber to a page that informs them that they have received a welcome email.)
Possible Usage Scenarios:
Scenario #1: Consolidating Active Subscribers
If you want to gather your most engaged subscribers into a new list, simply send an email to your existing list(s). Those who open the email will be moved to a new list where they can receive a fresh Email Series.
Scenario #2: Building a Specialized List
Want to create a niche segment from your current list? Send an email with a targeted link. Subscribers who click the link will automatically be moved to a new list tailored to their interests.
Difference between Switch List and Tagging Option
In the email setup, you will see another function call Tagging Option, which lets you add a tag to subscribers when they open an email or click a link.
The main consideration is whether you want subscribers to go through a new Email Series.
The main consideration is whether you want subscribers to go through a new Email Series.
While the Switch List Option is similar to the Tagging Option, it serves a different purpose.
If you only want to segment subscribers, you should use the Tagging Option. This allows you to send email broadcasts based on a specific tag.
Use the Switch List Option only when you want subscribers to start receiving a completely new Email Series.
What is Tag?
First, please note that SendSteed Tag is different from the Tag system in Tracker and Page.
SendSteed Tags are short keywords you can add to your subscriber.
It allows you to send Broadcast to subscribers with or without certain tags.
Below are some possible scenarios:
Scenarios #1: You call a few contacts in your list. After calling, you add a tag "called" to the contacts. Then you can send a broadcast email to those you've called.
Scenarios #2: You add a tag to those who have received the last Email Episode. Then you can send a broadcast email to those who have completed the Email Series.
Scenarios #3: You add a tag to those who have open a broadcast. Then you can send another broadcast email to those who haven't opened the previous broadcast.
How to add Tags to a contact manually?
1) Go to List Manager and locate the contact you want to add.
2) Click the edit button next to the contact (arrow 1).
3) Enter the tag you want to add in (arrow 2).
- You can enter a short phrase, such as buyer, interested, called_12-4-2022, etc.
- You can use alphanumeric, dash and underscore.
- You can add multiple tags. Just separate them by line.
How to add Tags automatically?
When sending an Email Episode or Broadcast, you can set up the 'Tagging Options'.
'Tagging Options' allow you to add a Tag to the subscribers when a certain action is performed.
Referring to the screenshot below, you can add a tag when an email is sent (arrow 1), when the subscriber reads the email (arrow 2) or when he/she clicks a link in the email (arrow 3).
Read > What are 'Tagging Options'? How to set them up?
How to add Tags to contacts who have received/opened/clicked a broadcast or email episode?
You can bulk add a tag to people who have received, opened or clicked a particular broadcast you’ve sent.
Read > How to add Tags to contacts who have received/opened/clicked a broadcast or email series?
How To Send A Broadcast Based On Tags?
1) Set up a broadcast as usual.
2) Under the 'Audience' setting, you will see 2 options as follows:
3) Enter the tag(s) you want to target.
For multiple tags, just separate the tags by comma, like this:
Take the above illustration as an example, the broadcast will be sent to all active subscribers with either 'interested', 'follow_up' or 'called' as the tag.
Note: For multiple tags, the broadcast will be sent to all contacts with one or more matching tags.
What are 'Tagging Options'?
To know what are 'Tagging Options', you first have to understand how SendSteed Tag works.
Read > What is Tag? How to add Tags a subscriber? How to send a broadcast based on Tags.
'Tagging Options' allow you to add a Tag to the subscribers when a certain action is performed.
Referring to the screenshot below, you can add a tag when an email is sent (arrow 1), when the subscriber reads the email (arrow 2) or when he/she clicks a link in the email (arrow 3).
The purpose of tagging is to allow you to send a broadcast to subscribers with or without certain tags.
How to set it up?
Adding a tag When Email Sent or On Email Open is rather straightforward. Just enter the tag and save changes.
Adding a tag On Link Click requires explanations.
You can attach a Tag to only the first three links in your email, including the links in the Email Signature.
To find out which Tag is for which link, click the 'Show link URLs' button.
Note #1: The first 3 links include the links in the Email Signature. For broadcast, if multiple lists are selected, 'Show link URLs' only check the Email Signature of the first list. You will have to manually check and ensure that there are no conflicts in other lists. If you cannot be sure, DO NOT attach a Tag to the link in the Email Signature.
Note #2: Only 1 Tag allowed per link. Try to use as short a tag as possible. Allowed characters include a-z, 0-9, - and _.
Note #3: Each subscriber has a Tag limit of 500 characters. Avoid adding too many tags and using wordy tags. If the limit is reached, new Tag will be ignored without notification.
1) Go to Broadcasts or Email Series. If you have sent an email before, you will see statistics of Sent, Open and Click for the particular email (see arrow 1 below).
2) Say you want to add a tag to those who have opened the email, click on the Open stat.
3) Click 'Add Tag to these emails' (see arrow 2 below).
4) Enter a tag name (see arrow 3 below). In most cases, just use the suggestion given (see arrow 4 above).
5) Click 'Add Now'.
A tag will then be added to all the emails that have opened the email.
You will come across our Email Editor when you set up the Welcome Email, Verification Email, Email Series, Broadcast and other functions such as email template and signature.
The exact Editor may vary slightly depending on the needs, but generally, it looks like this:
Most of the functions in the Editor are quite standard.
But some functions are customized for SendSteed.
1. Preview
The 'one-eye' button is a preview button. It gives you a full preview of how your email will look like when received by your subscriber, including the email header and signature.
2. Send Test
Although the preview function (button 1) is good enough, there is still a possibility that the actual email may behave differently.
The 'Sent Test' button allows you to send a test email to yourself, so that you can see how the email looks like and whether everything works as intended.
3. PDF Gallery
LeadsLeap provides PDF hosting for Pro Members. If you have a pdf ebook to give away, you can use this hosting service.
The PDF Gallery is a quick way for you to upload PDF file and retrieve the download link for the PDF files you've uploaded.
4. Template Gallery
In the Template Gallery, You can find different kinds of templates that you can add to your email.
They are like building blocks. By combining different template blocks, you can create a professionally looking email.
If you are a Pro Member, you can even save an email as another template, so that you can use it in the future.
5. Image Gallery
LeadsLeap provides Image hosting for Pro Members.
The Image Gallery is a quick way for you to upload Image file and add an uploaded Image to your email.
6. Image URL Editor
This is the default image url editor, not a customized function from LeadsLeap.
If you are not a Pro Member (hence you can't use the Image Gallery), you can add an image to your email by entering the the image url using this image url editor.
This Broadcast function allows you to mass email the subscribers in your SendSteed list.
You can also track the open and click rate.
1) Click 'Add a new broadcast'.
You'll see a Broadcast Editor similar to the screenshot below:

2) Enter the email Subject (arrow 1).
You can enter up to 4 subjects for rotation and track which one has a higher open rate.
To add another subject, click + (arrow 2).
3) Prepare the email body (arrow 3).
Read > An introduction to our email editor to learn how to use our email editor.
Read > How to use 'smart greeting'? to learn how to use smart greeting.
4) Set up the Preview Text (arrow 4 below)
Read > What is Preview Text? How to set it up? to learn more.

5) Show Email Signature In This Email?
Note: Remember that when you set up the list in the List Manager, you had the option to set up a Global Email Signature and apply it to all Email Series and Broadcasts.
The option here allows you to ignore the Global Email Signature, giving you more flexibility in deciding whether you want to show the email signature.
If you want this email to follow the Global Signature, select 'Follow Global Signature'. If you do not want to show any email signature in this email, select 'Do Not Show'.
6) Select the lists that you want to broadcast to.

Please note that the lists shown above include the number of subscribers in each list (see the explanation in the screenshot below).

This information is important. You need it in the Audience setting.
7) Set up the Broadcast Time
Please note that the Broadcast Time is based on the time zone you have set in Account page.
Below is a screenshot from your Account page, where you set up your preferred time zone.

Make sure your time zone is set up correctly, otherwise you'll be wondering why the broadcast isn't sending at the correct time.
8) Select the Audience you want to send to.

The number of subscribers in each audience, for each list is shown in the List selection in Step 6.
Be sure not to send a broadcast to an audience with no subscriber.
9) Tagging Options
'Tagging Options' are advanced functions that allow you to add a Tag to the subscribers when a certain action is performed.
Skip it if you are new to SendSteed.
To learn more, read > What are 'Tagging Options'? How to set them up?
10) Switch List Options
'Switch List Options' are advanced functions that allow you to move the subscribers to another list when a certain action is performed.
Skip it if you are new to SendSteed.
To learn more, read > How to switch/move a subscriber to another list when they open an email or click a link?
11) If you are ready to schedule the broadcast, click Save and Activate, otherwise, click Save As Draft (arrow 10).

12) Click Save Changes (arrow 11).
The set up is complete.
1) Locate that broadcast you want to resend.
2) Click to duplicate that broadcast.

3) Set up the new broadcast as usual and send it.
1) Locate that broadcast you want to edit.
2) Click to edit that broadcast.

Please note that you cannot edit a broadcast that has already been sent. It is simply meaningless to do that.
Moreover, we need to keep the original broadcast in case of any abuse report.
If your intention is to resend the broadcast, duplicate the broadcast and send the duplicated broadcast.
Read > How to resend a Broadcast?
If you have a Broadcast with good conversion, you can add it into your Email Series for automatic following-up.
To do that, go to Email Series, and add an Email Episode as per normal.
You will see a button 'Use email from broadcast' in the Email Series Editor.
For detailed instruction, please refer to the tutorial on Email Series.
The Broadcast Time is based on the time zone you have set in Account page.
Chances are your time zone is set up wrongly, hence the broadcast time is messed up.
No. This broadcast function is to send email broadcast to your SendSteed lists, not your followers in LeadsLeap.
Yes, not only yes but our system will automatically filter duplicated emails in different lists.
This means if a person is on your different lists, and you send a broadcast to those lists at once, that person will only receive one email, instead of receiving the same email multiple times.
Free Member can send up to 10 broadcasts every 30 days (note: it is 30 trailing days, not every month).
Pro Member has no broadcast limit.
There is a special limit for broadcasting to Inactive Subscribers. Inactive Subscribers are subscribers who have not read any email in our system, including your email and other people's email in our system, for more than 30 days. Such subscribers may have already abandoned their email address or they are simply too busy to read emails. Our approach to these subscribers is to limit our emails to them. Pro Member can send up to 10 broadcasts to them every month, whereas Free Member can send 1 broadcast to them every month. We strongly suggest that you prepare a good offer to Inactive Subscribers, such as a good free gift. Once they take action or simply open your email, they will be in the Active Member list again.
Free Member can send up to 10 broadcasts every 30 days.
30 days are 30 trailing days, not by calendar month.
You have sent 10 broadcasts in the past 30 days, hence the error message.
There is no limit to the number of emails you can broadcast to, but there is a speed limit.
Free Members are limited to a sending speed of 100 emails per hour.
Pro Members are not limited, but the actual sending speed depends on the capacity of our mail server.
No. It's all done automatically.
All hyperlinks in you email will automatically be tracked by SendSteed.com. There is no need to do any link conversion, as what other list systems require you to do.
The setting for email signature is done on List Manager, not on this page.
Go to List Manager and follow the tutorial on 'How to add email signature'
When you set up an email, you will come across a checkbox labeled 'Enable smart greeting' in the Subject and Body.
This option is useful when you have a mix of contacts with and without name. In other words, some of your contacts included their first name when they opt in while some didn't.
In such a case, you can't use the ~firstname~ placeholder, since not all subscribers have a first name.
The solution is smart greeting.
When you use smart greeting, subscribers with a name will be greeted in the email automatically. Those without a name will see your default email message.
For example...
For Subject
Say your email subject is I have got a good news for you!
If you enable smart greeting, Mary, for example, will see:
Mary, I have got a good news for you!
Those without a name will see:
I have got a good news for you!
For Email Body
Say your email body starts with Below is the download link for abc.
If you enable smart greeting, Mary, for example, will see:
Hi Mary,
Below is the download link for abc.
Those without a name will see:
Below is the download link for abc.
How to format smart greet?
Formating is not possible and not required in the Email Subject. But for the Email Body, when you activate Smart Greeting, a tag ~smartHi~ will be added into the Email Body.
You can style ~smartHi~ to your preference, with ONLY one limitation - DO NOT leave line spacing after ~smartHi~.
For example, if the start of your email is Below is the download link for abc., with the ~smartHi~, it should be simply
~smartHi~Below is the download link for abc.
, not
~smartHi~
Below is the download link for abc.
The logic for doing this is simple. If a subscriber has a name, the system will automatically add Hi name, followed by 2 line spacings. If a subscriber has no name, the system will start the email with whatever that comes after ~smartHi~. If you add line breaks after ~smartHi~, your email will have extra line spacings, making your email look unprofessional.
The correct way to add a header to a broadcast email is by setting up the header in the List Setup at List Manager.
Go to List Manager, click the Tutorial and follow the instruction in 'How to add a header to my email'.
Once that header is set up, it will appear in ALL the broadcast email you send to THAT list.
When you set up an email, be it Email Episode or Email Broadcast, you will see this option:
If you want to move the subscriber to another list when they open the email, under 'On Email Open', select the List ID and enter the Start Day of the email series in the new list.
If you want to move the subscriber to another list when they click a link, under 'On First Link Click', select the List ID and enter the Start Day of the email series in the new list.
Important Note For 'On First Link Click'
Note #1: It only works for the first link in the email.
Note #2: The link can go to any URL as usual. As long as they click it, they will move to another list and also go to the designated website at the same time.
Important Note For 'Email series start day'
For 'On Email Open', the 'Email series start day' must be more than 1. This means the welcome email cannot be sent out. (The reason is that the subscriber may feel spammed if they receive another email after opening one.)
For 'On First Link Click', the 'Email series start day' can be 0. If set to 0, the subscriber will switch to the new list and at the same time receive the welcome email of the new list. (If you do that, it's best to bring the subscriber to a page that informs them that they have received a welcome email.)
Possible Usage Scenarios:
Scenario #1: Consolidating Active Subscribers
If you want to gather your most engaged subscribers into a new list, simply send an email to your existing list(s). Those who open the email will be moved to a new list where they can receive a fresh Email Series.
Scenario #2: Building a Specialized List
Want to create a niche segment from your current list? Send an email with a targeted link. Subscribers who click the link will automatically be moved to a new list tailored to their interests.
Difference between Switch List and Tagging Option
In the email setup, you will see another function call Tagging Option, which lets you add a tag to subscribers when they open an email or click a link.
The main consideration is whether you want subscribers to go through a new Email Series.
The main consideration is whether you want subscribers to go through a new Email Series.
While the Switch List Option is similar to the Tagging Option, it serves a different purpose.
If you only want to segment subscribers, you should use the Tagging Option. This allows you to send email broadcasts based on a specific tag.
Use the Switch List Option only when you want subscribers to start receiving a completely new Email Series.
What is Tag?
First, please note that SendSteed Tag is different from the Tag system in Tracker and Page.
SendSteed Tags are short keywords you can add to your subscriber.
It allows you to send Broadcast to subscribers with or without certain tags.
Below are some possible scenarios:
Scenarios #1: You call a few contacts in your list. After calling, you add a tag "called" to the contacts. Then you can send a broadcast email to those you've called.
Scenarios #2: You add a tag to those who have received the last Email Episode. Then you can send a broadcast email to those who have completed the Email Series.
Scenarios #3: You add a tag to those who have open a broadcast. Then you can send another broadcast email to those who haven't opened the previous broadcast.
How to add Tags to a contact manually?
1) Go to List Manager and locate the contact you want to add.
2) Click the edit button next to the contact (arrow 1).
3) Enter the tag you want to add in (arrow 2).
- You can enter a short phrase, such as buyer, interested, called_12-4-2022, etc.
- You can use alphanumeric, dash and underscore.
- You can add multiple tags. Just separate them by line.
How to add Tags automatically?
When sending an Email Episode or Broadcast, you can set up the 'Tagging Options'.
'Tagging Options' allow you to add a Tag to the subscribers when a certain action is performed.
Referring to the screenshot below, you can add a tag when an email is sent (arrow 1), when the subscriber reads the email (arrow 2) or when he/she clicks a link in the email (arrow 3).
Read > What are 'Tagging Options'? How to set them up?
How to add Tags to contacts who have received/opened/clicked a broadcast or email episode?
You can bulk add a tag to people who have received, opened or clicked a particular broadcast you’ve sent.
Read > How to add Tags to contacts who have received/opened/clicked a broadcast or email series?
How To Send A Broadcast Based On Tags?
1) Set up a broadcast as usual.
2) Under the 'Audience' setting, you will see 2 options as follows:
3) Enter the tag(s) you want to target.
For multiple tags, just separate the tags by comma, like this:
Take the above illustration as an example, the broadcast will be sent to all active subscribers with either 'interested', 'follow_up' or 'called' as the tag.
Note: For multiple tags, the broadcast will be sent to all contacts with one or more matching tags.
What are 'Tagging Options'?
To know what are 'Tagging Options', you first have to understand how SendSteed Tag works.
Read > What is Tag? How to add Tags a subscriber? How to send a broadcast based on Tags.
'Tagging Options' allow you to add a Tag to the subscribers when a certain action is performed.
Referring to the screenshot below, you can add a tag when an email is sent (arrow 1), when the subscriber reads the email (arrow 2) or when he/she clicks a link in the email (arrow 3).
The purpose of tagging is to allow you to send a broadcast to subscribers with or without certain tags.
How to set it up?
Adding a tag When Email Sent or On Email Open is rather straightforward. Just enter the tag and save changes.
Adding a tag On Link Click requires explanations.
You can attach a Tag to only the first three links in your email, including the links in the Email Signature.
To find out which Tag is for which link, click the 'Show link URLs' button.
Note #1: The first 3 links include the links in the Email Signature. For broadcast, if multiple lists are selected, 'Show link URLs' only check the Email Signature of the first list. You will have to manually check and ensure that there are no conflicts in other lists. If you cannot be sure, DO NOT attach a Tag to the link in the Email Signature.
Note #2: Only 1 Tag allowed per link. Try to use as short a tag as possible. Allowed characters include a-z, 0-9, - and _.
Note #3: Each subscriber has a Tag limit of 500 characters. Avoid adding too many tags and using wordy tags. If the limit is reached, new Tag will be ignored without notification.
1) Go to Broadcasts or Email Series. If you have sent an email before, you will see statistics of Sent, Open and Click for the particular email (see arrow 1 below).
2) Say you want to add a tag to those who have opened the email, click on the Open stat.
3) Click 'Add Tag to these emails' (see arrow 2 below).
4) Enter a tag name (see arrow 3 below). In most cases, just use the suggestion given (see arrow 4 above).
5) Click 'Add Now'.
A tag will then be added to all the emails that have opened the email.
1) Add a tag to the contacts you do not want to send to. (Follow the guide below)
Read > How to add Tags to contacts who have received/opened/clicked a broadcast or email series?
2) Set up a new broadcast and select the option Active, without Tags under Audience.
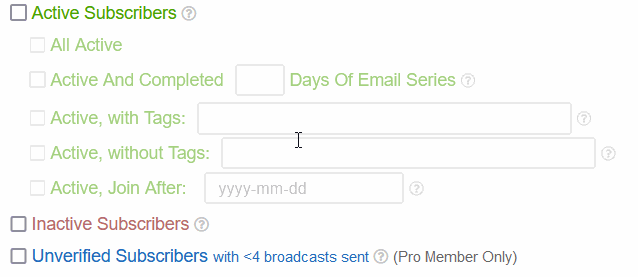
The new broadcast will now send emails to people without the tag.
This is because you have set up a header for the List at List Manager.
At the same time, you add another header in the broadcast email.
Hence both headers are shown.
To fix it, delete the header you've added in the broadcast email.
Email Apps like Gmail and AOL show a preview text in the email listing.
By default, email apps will simply show the beginning of your email message, which usually starts with greeting.
Below is an example of an email sent from SendSteed, without Preview Text being set up.
The preview text starts with your Brand Name, followed by Greeting and finally your Email Message.
As you can see, it is not attention grabbing.
If you set up the Preview Text, your email can look like this:
Your subscriber will then see the subject and a juicy preview that is decided by you.
How to set up Preview Text
In the Email Editor, you can see a field like the one below:
Enter the Preview Text that you want your subscriber to see.
A placeholder is a temporary code that will be replaced by the actual wording when the email is sent.
For example, ~firstname~ is the placeholder for the subscriber's name.
In your email, you can say "Honestly ~firstname~, this is not what I will do..."
When you send out the email, your subscriber will see the above sentence with their name.
This means a subscriber with the name of John will see "Honestly John, this is not what I will do..."
You will come across our Email Editor when you set up the Welcome Email, Verification Email, Email Series, Broadcast and other functions such as email template and signature.
The exact Editor may vary slightly depending on the needs, but generally, it looks like this:
Most of the functions in the Editor are quite standard.
But some functions are customized for SendSteed.
1. Preview
The 'one-eye' button is a preview button. It gives you a full preview of how your email will look like when received by your subscriber, including the email header and signature.
2. Send Test
Although the preview function (button 1) is good enough, there is still a possibility that the actual email may behave differently.
The 'Sent Test' button allows you to send a test email to yourself, so that you can see how the email looks like and whether everything works as intended.
3. PDF Gallery
LeadsLeap provides PDF hosting for Pro Members. If you have a pdf ebook to give away, you can use this hosting service.
The PDF Gallery is a quick way for you to upload PDF file and retrieve the download link for the PDF files you've uploaded.
4. Template Gallery
In the Template Gallery, You can find different kinds of templates that you can add to your email.
They are like building blocks. By combining different template blocks, you can create a professionally looking email.
If you are a Pro Member, you can even save an email as another template, so that you can use it in the future.
5. Image Gallery
LeadsLeap provides Image hosting for Pro Members.
The Image Gallery is a quick way for you to upload Image file and add an uploaded Image to your email.
6. Image URL Editor
This is the default image url editor, not a customized function from LeadsLeap.
If you are not a Pro Member (hence you can't use the Image Gallery), you can add an image to your email by entering the the image url using this image url editor.
In an effort to maintain the quality of emails sent from our system, the system automatically check for emails with poor formating.
Common poor formating include:
1) The email only has 1 or 2 sentences.
2) The email has no line break.
3) The email has html codes that are not allowed in an email, such as video, input form, submit button etc.
Tip: Preview the email and ensure it looks professional. Remember, a poorly formatted email can affect not just our reputation but yours too.
If you have a blog, Blog To Broadcast automatically creates a broadcast based on your new blog post whenever you publish a new post.
In other words, it can automatically inform your Active subscribers about your new blog post.
First, you need to get ready the RSS Feed URL from your blog.
For Wordpress, it looks something like this:
https://yourblog.com/feed
For Blogspot, it looks something like this:
https://username.blogspot.com/feeds/posts/default/?alt=rss
When the RSS Feed URL ready, follow the steps below:
1) Click 'Add a new blog RSS feed' button.
Add a new blog RSS feed
You'll see an Editor similar to the screenshot below:

2) Enter the RSS Feed URL you've prepared earlier (arrow 1)
The Broadcast Subject (arrow 2) and Body (arrow 3) are already automatically filled up for you.
You can change them if you want. But before you make any change, click on the Preview button (arrow 4) to see how the Email will look like, so that you have an idea of how the placeholders,such as ~b_title~, work.
If you do not want to risk messing up the template, just use the default template. But take note of the following:
Note > If you have enabled Email Signature in Broadcast, you have to remove the Signature in this template.
3) Select the list that you want to send to (arrow 5 below).

4) Select whether you want the created broadcast to be sent out automatically (arrow 6).
If it is sent out automatically, it will be sent out at the next hour after the broadcast is created.
If you are new to the system, it is better to select 'Just create, don't send', so that you can check the broadcast before sending. Change it to automatic sending only when you are familiar with the system.
5) Select 'Activate' (arrow 7).
6) Click 'Save Changes' (arrow 8)
This system works for Wordpress, Weebly and Blogspot.
The system starts checking for new post at the 30th minute of every hour.
Say if you publish a blog post at 1:20pm, your post will be picked up by the system between 1:30pm and 1:50pm and broadcasted to your preselected list automatically at 2pm.
But if you publish a blog post at 1:40pm, you will have missed the 30th minute cut off. The system will pick up your article between 2:30pm and 2:50pm and broadcast it at 3pm.
If you do not want to wait for the auto detection, you can run it manually. (Read the next guide.)
Yes. If you do not want to wait for the system to detect your new blog post, you can run it manually.
Once you publish a new blog, you can come to this page and click to run the Feed manually.

The system will grab your latest blog post and create a broadcast out of it.
Then you can go to broadcasts and send it, or it will be sent automatically at the next hour if you have set it to send automatically.
After you have set up the RSS feed and email template, you can run the Feed manually by clicking .
The system will process your latest blog post and create a broadcast.
You can test send the broadcast to yourself and see how it is formatted.
Note: Remember to save that broadcast as Draft if you've set it to autosend, otherwise it will be sent to your list.
Blog To Broadcast can only be set to send to Active subscribers. This is because there is a sending limit to Inactive subscribers.
If you want to send to Inactive subscribers, you can do so easily by duplicating the broadcast already created for Active subscribers.
If you have a Youtube channel, Youtube To Broadcast automatically creates a broadcast based on your latest Youtube video whenever you publish a new video.
In other words, it can automatically inform your Active subscribers about your new Youtube video.
First, you need to get ready your Youtube channel ID.
Then follow the steps below:
1) Click 'Add a new Youtube RSS feed' button.
You'll see an Editor similar to the screenshot below:

2) Part of the Youtube RSS Feed URL is already pre-entered. You just have to enter your Youtube channel ID after "channel_id=" (arrow 1)
The Broadcast Subject (arrow 2) and Body (arrow 3) are already automatically filled up for you.
You can change them if you want. But before you make any change, click on the Preview button (arrow 4) to see how the Email will look like, so that you have an idea of how the placeholders,such as ~v_title~, work.
If you do not want to risk messing up the template, just use the default template. But take note of the following:
Note > If you have enabled Email Signature in Broadcast, you have to remove the Signature in this template.
3) Select the list that you want to send to (arrow 5 below).
4) Select whether you want the created broadcast to be sent out automatically (arrow 6).
If it is sent out automatically, it will be sent out at the next hour after the broadcast is created.
If you are new to the system, it is better to select 'Just create, don't send', so that you can check the broadcast before sending. Change it to automatic sending only when you are familiar with the system.
5) Select 'Activate' (arrow 7).
6) Click 'Save Changes' (arrow 8)
The system starts checking for new video at the 30th minute of every hour.
Say if you post a video at 1:20pm, your video will be picked up by the system between 1:30pm and 1:50pm and broadcasted to your preselected list automatically at 2pm.
But if you post a video at 1:40pm, you will have missed the 30th minute cut off. The system will pick up your article between 2:30pm and 2:50pm and broadcast it at 3pm.
If you do not want to wait for the auto detection, you can run it manually. (Read the next guide.)
Yes. If you do not want to wait for the system to detect your new video, you can run it manually.
Once you post a new video, you can come to this page and click to run the Feed manually.

The system will grab your latest video and create a broadcast out of it.
Then you can go to broadcasts and send it, or it will be sent automatically at the next hour if you have set it to send automatically.
After you have set up the RSS feed and email template, you can run the Feed manually by clicking .
The system will process your latest video and create a broadcast.
You can test send the broadcast to yourself and see how it is formatted.
Note: Remember to save that broadcast as Draft if you've set it to autosend, otherwise it will be sent to your list.
Youtube To Broadcast can only be set to send to Active subscribers. This is because there is a sending limit to Inactive subscribers.
If you want to send to Inactive subscribers, you can do so easily by duplicating the broadcast already created for Active subscribers.
Unfortunately there is no way to identify if a video is Short or not from the RSS feed.
But there is a workaround.
Most Youtubers will not write a full description for a Short video.
So, if you do not want your Short video to be broadcasted, simply leave the description blank.
If you have to add hashtags, just make sure the total length is less than 50 characters.
Our system will skip videos with description less than 50 characters.
1) Click 'Add a new page campaign'.
You will see a popup form similar to the screenshot below:

2) Enter a Page Name (arrow 1) for your personal reference.
3) Click 'Add Now' (arrow 2).
A Page control panel similar to the screenshot below will be added.

Notice that every Page comes with a URL (arrow 3).
It is the URL that you'll use if you want to promote the web page.
4) Click ' Add a new design to start' or the '+' button (arrow 4) to add a Design into the Page.

If you have a page Share Code (you will know it if you have one), you can enter the code into the Share Code field (arrow 5).
Otherwise, click 'Add A Blank Design' (arrow 6) to start anew.
A Page can have many Page Designs. Active Designs will be rotated when the page url is loaded. Inactive Designs are for designs that are in progress.
5) In this guide, we will start with a new page design. So click 'Add A Blank Design' (arrow 6).
A Design control panel will be added into the Page (arrow 7).

6) Click 'Launch Editor' to open our proprietary Page Builder (arrow 8).
The Page Builder is the only editor for the Page Design. Whatever you want to do for a Page Design is done via the Page Builder, including:
- linking the page to a SendSteed List,
- setting up redirect after opt-in,
- designing the page,
- adding opt-in form and fields, etc.
After clicking 'Launch Editor', the Page Builder will open in a new tab (see screenshot below).

7) Select the type of page you want to build (arrow 9).
For example, if you are building an opt-in page, i.e. a page with opt-in form, select Opt-in page (the first option denoted by arrow 9). Some members select Download Page and then wonder why there is no opt-in form in the template.
When you are more familiar with the Page Builder, you can start with any type and any template, and then change it into whatever you can imagine. But for a start, it is better to stay with the standard template.
8) Select a template that is closest to what you want to build (arrow 10 above).
The selected template will now be loaded into the Page Editor.
Note: In this guide, we will build an opt-in page, i.e. a page with an opt-in form. If you select the template denoted by arrow 10 in the screenshot above, you will see something similar to the screenshot below:

9) Click on '2. List' to link the Page to a List (arrow 11).
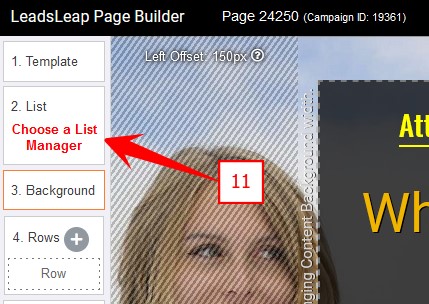
After clicking '2. List', you will see 3 options similar to the screenshot below.
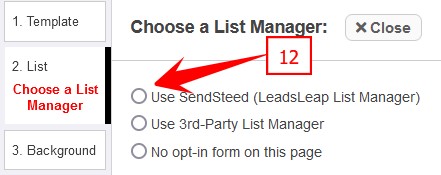
- If you are building list using SendSteed, select the first option.
- If you are building list using another List Manager, select the second option.
- If you are not building a list, i.e. there is NO OPT-IN FORM on this page, select the third option.
10) In this guide, we will link the Page to a SendSteed List. Select Use SendSteed (LeadsLeap List Manager) (arrow 12).
A set up form will appear on the right (see screenshot below).
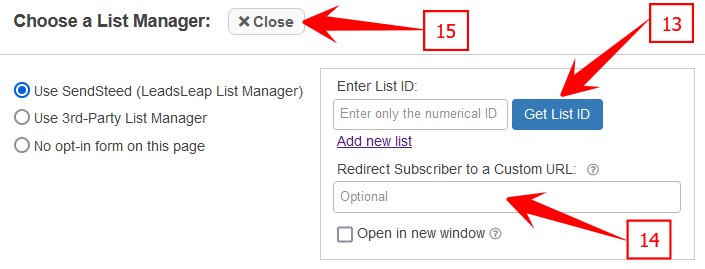
11) Click 'Get List ID' (arrow 13) to show all the SendSteed Lists you have, then select the SendSteed List that you want to connect to this Page.
If you have not set up any SendSteed List, you should set up the List at List Manager before proceeding.
Once the List is linked, all the emails collected from this Page will go into the List you've selected.
That's how you link SendSteed List to Page.
12) If you want to redirect the subscriber to another URL after opting in, you can enter the URL in the next field (arrow 14). In this guide, we will not do that. So we will just leave it empty.
13) When done, click 'Close' (arrow 15 above).
If you have linked a SendSteed List to the Page, you should see the List ID (arrow 16).

If you do not see the List ID, that means you have not linked any SendSteed List to the Page. Go back to Step 9.
14) Design the Page.
Page design is a big topic on its own. In this guide, we will go through some basic editing.
We will do so by splitting step 14 into sub-steps.
14a) Click Background (arrow 17) to show the setting for Page and Content background.

The settings are shown on the right. (See screenshot below.)

The top setting is for the Page Background. Setting for the Page Background is mainly the background image. You can change the image url (arrow 20), delete the image, use a color instead, or use color gradient.
The bottom setting is for the Content Background. Content Background is where your main design is. Imagine your Content as a box that is at the center of the page by default. In this template, the Content is the area denoted by arrow 18. You can change the width of the Content, the top and bottom offset and the left and right offset from the center (arrow 19). You can also change the background color of the Content.
Notice that in this template, the Content is Left Offset by 150px (arrow 19). This is done on purpose because we choose a background image with the main focus on the left. If you change the background to something else that doesn't have left focus, you can change the Left Offset to zero (arrow 19).
Next, let's see how to change the background image.
14b) Click the Image URL field (arrow 20) to open the image gallery, select the image you want to replace and click anywhere outside the URL field to close the gallery.
See the animated screenshot below for the demo.

14c) Change the Content Left Offset from 150 to 100 (arrow 19 in the previous screenshot).
Notice how the entire Content move more towards the center?
If both the Left Offset and Right Offset are set to 0, the Content will be at the center.
You can also try changing the Top/Bottom Offset and see what will happen visually to the Content.
14d) Click a text on the page and change it (see the demo below).

14e) Click each of the buttons under 'Add New Element' (arrow 21) and experience how you can add different new elements to the page.

You can delete them after adding. Step 14e is just to get you familiarize with adding new element.
14f) Click Save (arrow 22).
Page design is now complete. You may close the Page Builder window and go back to the Page Manager, i.e. this page that you are reading now.
15) Back to this Page Manager, i.e. this page that you are reading now, click Inactive (arrow 23) to change the status to Active.

Please remember that all newly added Pages are inactive by default. It has to be so to prevent new empty Pages from being shown when the URL is loaded.
16) Do a final check to make sure that the Page status is Active (arrow 24) and the Page is linked to the intended List (arrow 25).

17) Visit the web page by clicking the Campaign URL (arrow 26 above). You can try to opt in to the form on the page. After you have opted-in, you should be able to see your opt-in email in List Manager, by clicking (arrow 27).

You can use it to create almost any kind of web page, including opt in page, review page, thank you page, product dedownload page, etc.
Fundamentally, any web page that you can think of is made up of text, links, video and/or opt in form. It's just a matter of wording and design.
With our Page Builder, you can create almost any web page you can imagine.
A few members commented in our blog that it is the easiest page builder they have used. They may be right.
The generated page is hosted on our dedicated domain. You do not need to host it.
The web page generated also comes with full tracking capability, similar to our link tracker. You can track the surfing duration of visitors and determine whether you are getting real visitors.
1) Locate the Page you want to edit
2) Click 'Launch Editor' (arrow 8) to edit the Page Design.
To edit an Element, click on the element. The editor for that element will open on the right. (See the demo below.)
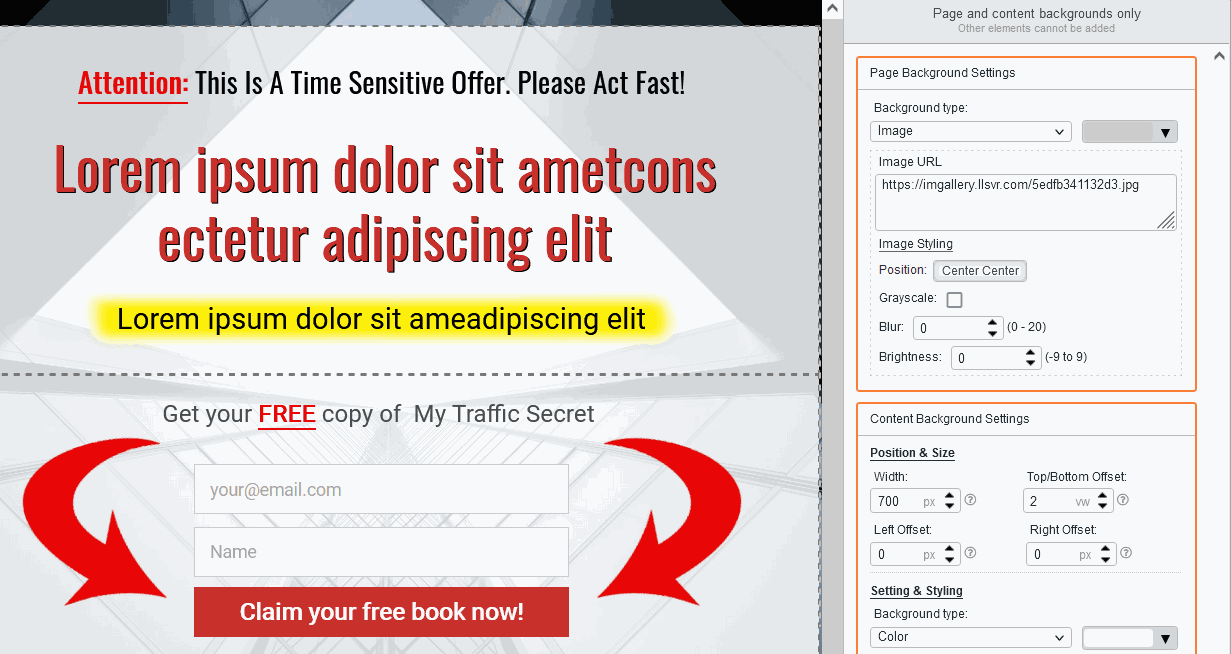
For more understanding of how to use the Page Builder, please refer to the tutorial below.
If you have not created a page, please read > How to create a page? for the full answer.
If you want to link a page to a 3rd party list like Aweber, Getresponse, Mailchimp or SendShark, please read > How to link a page to a third party autoresponders like Aweber, Getresponse, Mailchimp or SendShark?
To learn how to link a page to SendSteed list, here are the step by step:
1) Click 'Launch Editor' (arrow 8) to launch the Page Builder.
2) Click on '2. List' to show list options (arrow 11).
3) Select Use SendSteed (LeadsLeap List Manager) (arrow 12).
A set up form will appear on the right (see screenshot below).
4) Click 'Get List ID' (arrow 13) to show all the SendSteed Lists you have, then select the SendSteed List that you want to connect to this Page.
5) If you have a thank you page or you want to redirect subscribers to another url after subscribing, enter the URL in arrow 14.
6) Click 'Close' (arrow 15 above).
7) Save changes.
Before learning how to, please note that your LeadsLeap account comes with an autoresponder service called SendSteed. However, if you prefer other autoresponders, please read on...
--------------------------------
Before you start, you need to get the HTML FORM CODE from your autoresponder provider. If it is not available in your account, you will have to contact the support.
For Getresponse, the instruction to get the HTML FORM CODE is here.
For Aweber, the instruction to use your own HTML FORM CODE is here.
For SendShark or any other autoresponders not mentioned in this tutorial, please contact the support team of your autoresponder (e.g., SendShark). They are the only ones who can provide you with the necessary information.
When you have the form code ready, proceed with the following instructions.
--------------------------------
For complete instructions on how to build an opt-in page, please read > How to build a page? before following the instruction below.
If you already know how to build a page and only want to link your autoresponder to your page, please do the following:
1) Click 'Launch Editor' (arrow 8) to launch the Page Builder.
2) Click on '2. List' to show list options (arrow 11).
3) Select Use 3rd-Party List Manager (arrow 12).

4) Click 'Import Form Details' (arrow 13).
A form similar to the screenshot below will be shown.

5) Go to your 3rd party list manager and copy the HTML Form Code.
The form code should start with <form ...> and end with </form>..
Below is a sample form code taken from Aweber site.

6) Copy the form code, starting from <form ...> until </form>, ignoring all other codes before and after, then paste it into the textarea above (arrow 14).
7) Click 'Import this form' (arrow 15).
8) Match the input names (if asked to).
After you import the code, you may be asked to match the input name. (In most cases, our system will auto match the input name, but in some unique cases, you will have to do the match manually, by following the guide below.)
Some technical background - Basically different list managers use different 'Input Name'. You will have to match it with the name of the input fields in your Page, or create new input field if you collect some extra data.
Take the Aweber code for example, there are 3 input fields and hence 3 input names: name, email and custom Color.

name and email is the same as our input names for first name and email, hence it is already matched. But custom Color doesn't exist in the Page. Hence the system will prompt you for further action (arrow 16).
If you need the 'custom Color' input field, you can choose the first option 'Create a new input field'. If you do not need the input, choose 'Ignore this input field' (arrow 17).
Some list managers use input names like da_name and da_email. In this case, you will have to match da_name to input field 'name', and da_email to input field 'email'. You will be prompt if you need to do that match. It's not hard once you understand the methodology.
9) Form import completes
After you have done the input field matching (or you won't even be asked to do the matching because it's done automatically), the form will automatically be merged into your Page. The system will alert 'Form import completes'. You will see the form settings be filled automatically (arrow 18 below).

WarriorPlus Salespage Disclaimer code typically looks like this:
<script type="text/javascript" src="https://warriorplus.com/o2/disclaimer/rprnpn" defer></script><div class="wplus_spdisclaimer"></div>
It consists of a javascript external link (<script>...</script>) and a HTML code (<div>...</div>).
Here are the steps to add the codes.
1) Go to the page manager of the page that you want to add to, then click arrow 1 below, enter
<script type="text/javascript" src="https://warriorplus.com/o2/disclaimer/rprnpn" defer></script>
into arrow 2, click Save (arrow 3).

2) Go to the Page Builder of the page and add a Video/Custom Code element.

3) Enter
<div class="wplus_spdisclaimer"></div>
in the Custom Html Code input field.
You should now see the disclaimer in the page design.
4) Save the changes and you're done. Note that you can now position and resize the disclaimer by modifying the newly added element.
1) Locate the Page and look at the List setting. (See arrow 1)

2) If it says 'SendSteed ListID XXXX',
it means the page is linked to a SendSteed List. To access the emails, go to List Manager, locate the List and click (see arrow 2).

3) If the setting says 'Third party list manager',
it means you have linked the page to your own autoresponder system. Please go to that autoresponder to access the emails.
4) If the setting says 'Nil',
it means you have not linked the Page with any list manager. Opt-in form on that page is not working. To link a list manager to the page, follow one of these 2 guides:
Read > How to link a page to SendSteed list?
Read > How to link a page to a 3rd party list like Aweber or Mailchimp?
No limit for Pro Members.
Free Members can have up to 10 page designs.
Please note that there is a limit of 10 page designs. If you are a Free Member, some of your pages might contain multiple designs. For example, if one of your pages has 3 different designs, it will count as 3 page designs toward your limit.
If you receive an email / support ticket that says 'Bulk traffic detected', please stay calm.
The email is auto generated.
Read the email or support ticket again. Everything you need to know and every action you need to take is in there.
In most cases, you just need to check the traffic stats. If you are getting genuine traffic, then just ignore the alert. If you are getting bot traffic, then stop the traffic source.
There is no need to contact us.
1) Duplicate the Active page (arrow 1).

2) Edit the duplicated page (arrow 2).

3) When the editing is complete, change the Status of the duplicated page (arrow 3) to 'Active' and the original 'Active' page to 'Inactive'.
4) Visit the page url (arrow 4). If everything is okay, delete the old page (arrow 5).
Pages made using our Page Builder are mobile friendly by default, in the sense that the Page will automatially resize to fit small mobile screens.
However, that would mean that the font size may appear small in a mobile browser.
There are a few tricks to make your Page look nice in both PC and mobile device.
1) Use smaller Content width.
600-700px are good Content width for a Page. If you are currently using a Design with Content width more than 700px, you may want to consider reducing it.
2) Use bigger font size.
As much as possible, use bigger font sizes in your design. They will appear okay in PC yet not too small in mobile devices.
3) Use 2 or 3 column row (advanced method)
This is a little advanced. If you are a beginner, just read for knowledge.
When you use 2 or 3 column row in your page Design, the columns will collapse when viewed in mobile devices. This will make your content look bigger.
For more information, read our blog > How To Make Landing Pages Mobile Responsive?
4) Add a separate Mobile Only design to your Page
If tricks 1, 2 and 3 cannot meet your needs, the last resort is to add a separate Design to your Page and set it to Mobile.
See the sample set up below:
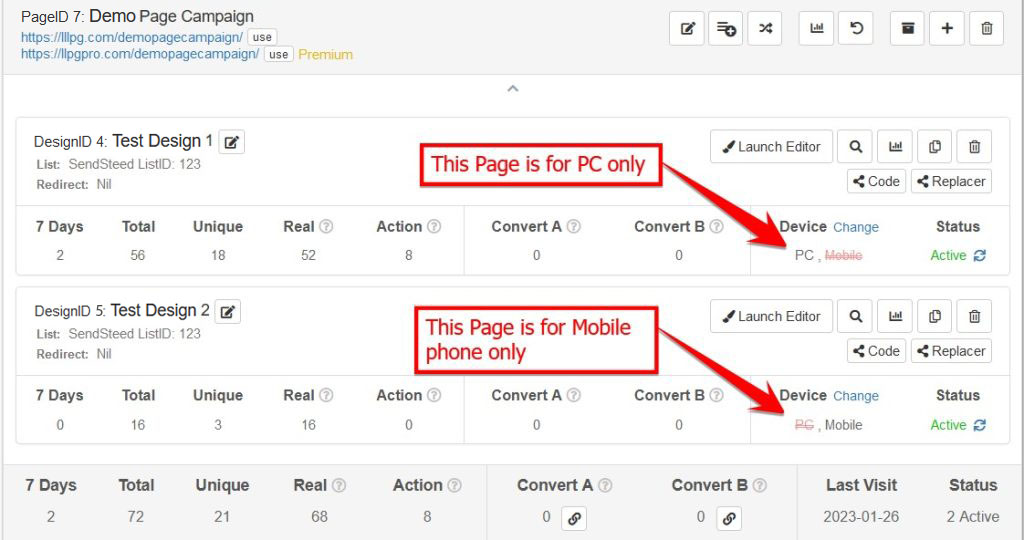
Referring to the sample above, there are 2 Designs in one Page - one Design for PC only and another Design for Mobile only.
When someone visits the URL of your Page, if the visitor uses a PC or tablet, the 'PC' version will be shown. If the visitor uses a mobile phone, the 'mobile' version will be shown.
In other words, the SAME URL can now show a different design to visitors using different devices, so that the best design can be shown.
How to Set Up A Mobile Only Design?
Assuming you already have a Page with a Design in it, now duplicate the Design to the SAME Page.

For the original Design, set the 'Device' to 'PC'.
For the newly created Design, you set the 'Device' to 'Mobile'.
See the example below.
In the newly created Design, click 'Launch Editor'.

In the Page Builder, click 3.Background (in the left panel) and under 'Content Background Settings' (on the right panel), change the Width to 400px.

Last step is a little tedious. Rearrange all the elements in the Design to match the new content width.
When that is done, you'll have a Page that will show one Design in PC and another similar Design in Mobile Devices.
We define Bulk Traffic as continuous traffic that hits a link more than 1 time a second, more than 20 times a minute, more than 1250 times an hour, or more than 20,000 traffic a day.
Practically, if you are getting real human traffic, the chance of you hitting our bulk traffic limit is low.
We ban bulk traffic because many trackers in the industry have zero tolerance for bulk traffic. If we allow bulk traffic, we are risking our server from being banned as a bulk traffic source too.
Share Code is a unique function in LeadsLeap that allows members to share their work with other members.
Members can share their Page design, Popup design and Email Series.
For example, you may want to share your Page design with your team members, so that they can duplicate your success.
How To Get The Share Code Of A Page?
1) Locate the Page that you want to share.
2) Click 'Share Code' (arrow 1).

3) (Optional) Set up Share Code Replacer (arrow 2).

Read > What is Share Code Replacer? How to set it up?
4) (Optional) Test the Share Code (arrow 3).
Read > What is Share Code Test Account? How to access it?
5) Copy the Share Code (arrow 4).
6) Give the Share Code to those you want to share.
Read > How to import a Share Code?
1) Locate the Page that you want to import the Design into.
If your intention is to add the Design into a new Page, click 'Add a new Page'.

2) Click '+' (arrow 1) in the Page control panel.

You'll see a form similar to the screenshot below.

3) Enter the Share Code (arrow 2) and click Import Now.
If you see a form that ask you to fill in your SendSteed ListID, affiliate link or other data, please follow the instruction accordingly.
Otherwise, the shared Design will be added to the Page.
4) Click Launch Editor (arrow 3) to open the Page Builder for the Design you've added.

5) Make the necessary customization. For example, you may want to link the page to your own SendSteed List, or change the links in the page to your own affiliate links.
Share Code Replacer allows you to set up a replacer form for the recipients of your Share Code to replace your ListID, URL or other info with theirs.
For example, let's say in your Page, there is a link to your affiliate link, https://someprogram.com/?r=myusername. You can create a form like the example shown below to instruct your lead to replace it with their affiliate link.
When the recipients of your Share Code fill up the form, their data will automatically replace your current values.
That's it. No need to do further customization. No need to create any shortcode. No need to set up any special template.
Their imported page is immediately ready to use.
Please note that the Replacer simply replaces everything that matches and it is case sensitive. If you set the replacer to replace the word apple, and the recipient enters orange, the replacer will replace all the 'apple' found with 'orange', but it will not replace Apple, since it is case sensitive.
How to set up the Share Code replacer?
1) Click the button shown below.
2) Click 'Add a new replacer'.
3) Set up the replacer following the instructions below.
For 'Type' (arrow 1), select ListID if you're replacing a ListID, because ListID requires special database processing. Otherwise, select Others.
For 'Current' (arrow 2), enter your current value. This value will be replaced with the data that the recipient enters.
For example, to replace the link https://somedomain.com/?r=yourusername, you will enter https://somedomain.com/?r=yourusername as the current value.
For 'Instruction' (arrow 3), enter the instruction to the recipients, such as 'Enter your affiliate link here' or anything you want them to enter.
That's it.
You can add unlimited number of replacers.
To sort the order of the replacers, use the drag icon (see arrow 4 above).
IMPORTANT NOTE: Replacer in a Page is ONLY for the Page share code. It cannot be used in a Funnel share code. If you set up a Replacer in a Page, that Replacer will NOT work in a Funnel. If you have set up a Replacer in a Page, and then have the Page added into a Funnel, you will have to set up the same Replacer for the Funnel share code again.
Share Code Test Account is a dummy account that allows you to test your Share Code and Replacer.
You can go to your Test Account, import your Share Code and see how your Share Code and Replacer work in the experience of the recipient.
You can also use it to create screenshot or video instructions for your recipients.
You can easily delete or reset the items in the Test Account with a button, so that you can import and test again.
How to access the Share Code Test Account?
1) Click the get Share Code button
2) Under the Share Code, click 'Test Share Code' to access the Test Account.
There are 2 kinds of rotations. You need to know which kind of rotation you want to achieve.
1) Rotate different page designs in the SAME Page URL.
Add multiple Designs into a Page.
- Designs with 'Active' status will be rotated automatically.
2) Rotate different Page URLs.
You have to use our Rotator tool.
By default, our system attempts to track referral domains to provide you with detailed insights. However, there are situations where referral tracking may not be possible. For example, traffic from emails and direct URL access do not carry referral information. Additionally, some websites and visitors' browsers may have security settings that prevent our system from tracking referral domains.
Because of that, if you know where you promote the link, you are highly recommended to use our 'source' tracking function.
Meaning to say, you specify the traffic source in your Page Link.
The way to do it is very very simple.
You simply add the traffic source on the fly.
This means you do not have to set up the source beforehand.
Let's say you advertise a track link, https://lllpg.com/123456/, in abc.com.
At the time of posting the link, you simply add /abc/ to the end of the link, such that the link becomes https://lllpg.com/123456/abc/.
When this link receives traffic, the system will identify the traffic source as abc.
Or if you post the link in an email ad, you can use https://lllpg.com/123456/xyz-list/.
When this link receives traffic, the system will identify the traffic source as xyz-list.
When you check the traffic stats (by clicking arrow 1 below),
![]()
you can use 'Filter By Source' (arrow 2 above) to view the traffic stats of a particular Source.
It is not necessary to add Google, Facebook or Pinterest tracking code to your Page, since our Page already has its own tracking capability.
But if you have a need to do it, you may do so.
Click arrow 1, enter the code into arrow 2, click Save (arrow 3).
2 things to note:
1) This function is only available to Pro Members.
2) If the codes are not the standard code from Google, Facebook or Pinterest, they will be deleted. This is a precautionary measure against malware.
There are 3 possibilities.
1) You've deleted it by accident.
Solution: Contact our support and see if we still have the back up.
2) The page is not in the first 50 data.
To speed up loading, only the latest 50 pages are loaded initially.
Solution: Scroll down to the bottom and click the button that says 'Click here to load the rest'.
3) The page is archived.
If you have archived pages, you will see the number of archived pages next to 'Filter By Tag / Funnel'. Take the screenshot below as an example, it shows (2 Archived).

Click on 'Filter By Tag / Funnel' dropdown and select All Archived to show archived pages.
To archive / de-archive a page, click the icon below:

Unique traffic is defined as the number of distinct visitors within a 24-hour period.
To archive / de-archive a page, click the icon below:
To see all the archived pages, click on 'Filter By Tag / Funnel' dropdown and select All Archived.
There are 2 possible reasons:
1) There is no Design in the Page.
Read > How to build a page?
2) The Design in the Page is not Active.
Read > How to activate a Design?
1) Locate the Design you want to activate
2) Click Inactive (see arrow below) to change the status to Active.
Due to the use of unique building blocks, it is not possible to import external HTML pages into the LeadsLeap Page Builder. Only pages created using our Page Builder can be imported into our Page Manager through the use of a Share Code.
If you have an external HTML page design that you wish to use, you will need to rebuild it using our Page Builder. This should be easy, especially when you already have a design to follow.
For exporting, you can save any web page as an HTML file using a laptop web browser. It is a basic browser function. Simply load the page in any laptop web browser, right-click, and choose 'Save as'. However, please note that although you can generate a page that looks similar, it may not function correctly. For example, opt-in forms may not work.
Read > How to build a page? for the full answer.
Below is the short answer.
1) Click 'Launch Editor' (arrow 8) to launch the Page Builder.
2) Click on '2. List' to show list options (arrow 11).
3) Select Use SendSteed (LeadsLeap List Manager) (arrow 12).
A set up form will appear on the right (see screenshot below).
4) Enter the URL you want the subscriber to be redirected to (arrow 14).
5) Save the work.
Please note that if you use a 3rd party list manager instead of SendSteed, redirect is done by the 3rd party list manager. You'll have to ask them how to do the redirect.
Conversion tracking doesn't happen automatically. You need to add a special code (we call it pixel code) into the correct page before it can work.
Let's say you have 3 web pages X, Y and Z.
If someone visits Page X, and then goes to Page Y, you consider that as a conversion. (Let's call it Convert A).
If the same person goes to Page Z, you consider that as another conversion. (Let's call it Convert B).
You must be clear what your Page X, Y and Z are. That's the first step before you set up conversion tracking.
How set up conversion tracking?
Using the example of Page X, Y, Z and Convert A and B, these are the steps to set up conversion tracking.
1) If Page X is a 3rd party url, track Page X using our Link Tracker. If Page X is a Page built using our Page Builder, then just proceed to the next step.
2) On the Link Tracker or Page (whichever it is), click (arrow 1) to get the pixel code for Convert A.
3) Paste the pixel code into the html code of Page Y, anywhere before the </body> tag, If Page Y is a Page built using our Page Builder, paste the pixel code following the steps shown below:

Convert A set up is done.
4) Do the same for Convert B. Click (arrow 2) to get the pixel code for Convert B. Paste it into the html code of Page Z.
Convert B set up is done. If there is no Convert B, ignore Step 4.
What if I do not have access to the html code of Page Y and Z?
Scenario 1
If Page Y or Z is our Page (i.e. a Page you've built using our Page Builder), you can insert the pixel code into the Page by following the steps shown below:
Scenario 2
If you have access to the html code of Page X, you can track Page Y using our Tracker, then change the navigation link (on Page X) from the url of Page Y to the url of the Track Link that tracks Page Y.
This means instead of going from Page X to Page Y, visitors now go from Page X to the Track Link that tracks Page Y.
When that is done, you can add the pixel code into the Track Link that tracks Page Y by clicking on the tracker setting, similar to the Page example shown above.
Scenario 3
If Scenario 1 and 2 do not apply, and you have no access to the html of Page Y and Z, then conversion tracking is not possible.
'Tag' is a tool that helps you to manage your links.
For example, if you have many links promoting abc.com, you can add a tag 'abc.com' to these links. Then, if you want to find all the links that promote abc.com, you can go to Filter By Tag and select abc.com. That will show all links that are tagged with abc.com.
Or you can add a tag 'health' to all the links that are in the health niche. Then, if you want to find all the links in health, just go to Filter By Tag and select health.
NOTE: Tag is different from Archive. When you add a Tag, you are not archiving the page. To archive a link, you have to click the archive button (see arrow below).
How to set up a tag?
1) Click the edit button to show the editor for the Page that you are working with.

2) Look for an option called 'Tags' (see screenshot below)
3) Enter the tag name or select from existing tags.
If it is a tag you've added before in another link, you will see the tag name as a button as shown below. Simply click on the button to add the tag.
If it is a new tag, enter it into the input field.
To add multiple tags, separate each tag by a comma.
4) Save.
How to untag?
All the tags you've added to a Page will be shown as an orange button (see example below).
To untag, click the orange button, then save.
How to filter by tag?
Look for the following drop down selector on this page.
Say if you want to see all the Pages tagged with abc.com, click on the drop-down and select abc.com (you'll see it if there is really such a tag being added previously).
First, you have to create the Ad Bar at Ad Bars.
Assuming you already have the Ad Bar created, you can then follow the following steps:
1) Click the edit button to show the editor for the Page that you are working with.
2) Look for an option called 'Insert Ad Bar'

3) Select the Ad Bar you want to show in the Page (and the Bar Color if you want).
4) Click 'Save'.
First, you have to create the popup using the Form / Popup Creator found at Form/Popup Manager.
Assuming you already have the popup created, you can then follow the following steps:
1) Click the edit button to show the editor for the Page that you are working with.
2) Look for an option called 'Insert Popup'

3) Select the popup you want to show in the Page (arrow 1).
4) Click 'Save' (arrow 2).
Once saved, the popup will be shown on the Page according to the activation settings, such as on Exit.
If the Popup is triggered manually onClick, i.e. visitors need to click a button to show the Popup, then you'll need to do an additional step - You will have to add a button to the page design and set the Button Type to 'initiate popup campaign'. Detailed steps below:
5a) Click 'Launch Editor' (arrow 8) to edit the page.
5b) Click the Row that you want to add the button into.

5c) Click the Add Button Element icon (see arrow below) to insert a button element.

5d) Click Button Type and select 'initiate popup campaign'.

That's it. Once you set the button to initiate a popup campaign, when visitors click the button, the popup you've linked earlier will be shown.
If you are thinking of redirecting or forwarding or masking your website to LL Page, perhaps the solution you are looking for is our Private Domain option.
Private Domain option allows you to show the Page in your own domain name.
What I need?
1) You need your own domain name, new or old.
2) You need a hosting server that hosts the domain.
There is no need to buy a new domain. Any domain will do. You just have to create a new folder in the domain for this purpose.
Your private domain link will look like this:
https://yourdomain.com/subdirectory/?cmad45hd
'subdirectory' is the new folder that you'll create in your server.
Can I use the same subdirectory for track link, rotator and page?
You can use the same subdirectory for track link and rotator. But you need a different subdirectory for page.
For example, you can create a 'click' subdirectory for Link Trackers and Rotators, like this:
https://yourdomain.com/click/
And create a 'page' subdirectory for Pages, like this:
https://yourdomain.com/page/
How to set up a Private Domain?
1) Click the edit button to show the editor for the page that you are working with.
2) Look for an option called 'Private Domain'.
3) Enter your domain name, followed by /, followed by the subdirectory (which is the new folder you are going to create in this domain).
For example, if your domain name is jamestheman.com and the subdirectory is recommends, then you'll enter
jamestheman.com/recommends
not https//jamestheman.com/recommends
not www.jamestheman.com/recommends
not jamestheman.com/recommends/
4) After you have entered a valid domain name as per Step 3, you will see a set of instructions being shown. (See screenshot below.)
Set up the subdirectory in your server as per the instructions. (More in Step 6 below.)
5) Save the changes.
Instructions to set up the subdirectory in my server
6) Click the index.php link shown below and download the file to your local drive. Remember where you save it.
Note: If you cannot see the link, that's because you didn't complete Step 3.
7) Go to the Cpanel of your server, click 'File Manager'.
8) Click the 'public_html' folder of the domain.
9) Click '+ Folder'
10) Enter the subdirectory name and click 'Create New Folder'.
The folder (or subdirectory) will be created.
11) Double-click on the newly created folder.
12) Click 'Upload'.
13) Upload the index.php file you've downloaded in Step 1.
(WARNING: When uploading, if you are asked whether to replace the existing index.php file, it means SOMETHING IS WRONG. You may have uploaded the file to the wrong folder. DO NOT proceed or your original index.php file will be gone forever.)
When done, click 'Reload'.
You will see the index.php file in the folder.
Setup is completed.
NOTE 1: You only have to do this ONCE per subdirectory. Once done, this subdirectory can be used as the private domain for any Page.
NOTE 2: Once you set up a private domain, the system will automatically include it in the new Page you add in the future.
Can I use a different domain or different subdirectory for different Pages?
Yes. But before you do that, think if it is necessary.
It can get messy when you have too many domains or subdirectories to manage.
If I change the subdirectory, do I have to download another index.php file?
No. The index.php file that you have downloaded from page manager can be used for any page.
You can upload it to any subdirectory you want to set up.
Just make sure you do not mix up this index.php file with the index.php file downloaded from Page Manager.
Can I set up the private domain link at the root, i.e. mydomain/?fd3gf5s?
No. It is a waste of your resources if you do that.
If you set it up at the root, you can't use the domain for something else. But if you set it up in a subdirectory, your main domain can be put to better use, such as a blog or a program.
A Page Design is made up of 4 components:
1) Page Background
2) Content Background
3) Rows
4) Elements (text, image, etc)

Every Page Design can only have 1 Page Background and 1 Content Background. But it can have many Rows. Each Row can have many Elements.
1) Page Background
This is the background of the page. You can decide whether it is a plain color, an image or a video.
2) Content Background
This is the main content area 'in front' of the Page Background. You can set its width, background color/image and position. Please note that all the designs should be inside the Content Background. In mobile mode, only things inside the Content Background can be seen.
3) Rows
You can further divide the Content Background into Rows. Every Row can have its own background color/image. You can have as many Rows as you like. In fact, it is a good idea to use many Rows. The importance of Rows is that the position of the Elements is relative to the Rows they are in. If you have a long page design, having many short Rows will make it easier for you to insert new elements in the future, without having to re-arrange all the existing elements.
4) Elements
Understand that Page Background, Content Background and Rows only form the framework of the page. The 'meats' of the page are known as the Elements. They are the text, image, links, videos opt-in form that make a page meaningful.
How To Edit ...
1) To edit Page Backgrounds, see screenshot below.

2) To edit Content Background, see screenshot below.

Read > The Importance Of Content Background Setting
3) To edit Row Background, see screenshot below.

Read > The Importance Of Rows
4) To edit an Element, click on the element. The editor for that element will open on the right. (See the demo below.)

How To Add ...
1) To add a new Row, click (1) below, then select the type of Rows you want to add.

Read > Explain the different row types
2) To add a new Element, click the row that you want to add the element into (see arrow 1 below), then click on the Element type to add (arrow 2).

Read > Explain the different Element types
Other Editing Options ...
1) To change an Element from one Row to another Row, simply drag and drop. (See demo below.)

2) To see all the Elements in a row, click on the Row (see screenshot below).

3) To move several elements at the same time, CLICK the 'lock' of the first element you want to move and DRAG across multiple locks to group them. Then drag and move all the grouped elements. (See the demo below). Use the same method to ungroup.
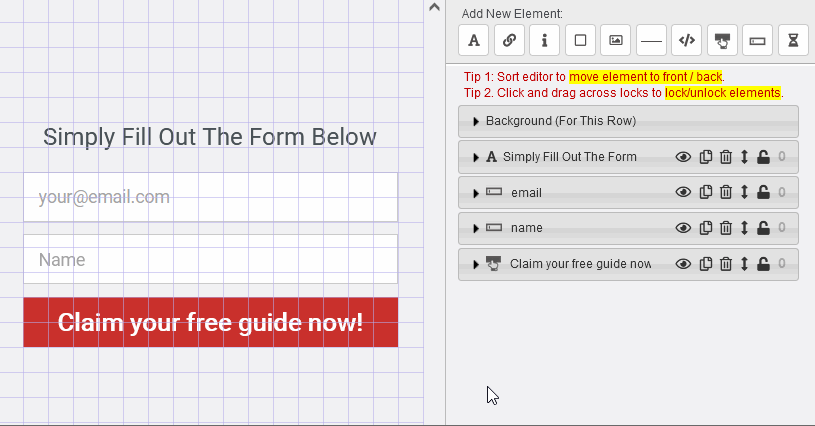
If the elements are not together, you can click individual 'lock' to group/ungroup the element.
4) Element editing buttons are explained below:
| - Hide/unhide the element. | |
| - Duplicate the element, so that you don't have to style a similar element all over again. | |
| - Sort the stack order of the html elements. To bring an element in front of another element, sort its editor lower than the editor of the other element, vice versa. | |
| - Delete the element. | |
| - Lock several elements together so that you can move them at the same time. You can set up to 9 different lock groups. |
How Do I ...
| Know which editor is for which html element | Simply mouseover the editor. The corresponding element will be highlighted. |
| Open an element editor | 1) Click on the element editor itself, or 2) Click on the element. |
| Move an element in front of / behind another element | Sort the editor of the element. To bring an element in front of another element, sort its editor lower than the editor of the other element, vice versa. |
| Move an element |
1) Simply Drag and move the element, or 2) Change the Top Offset and Left Offset parameters in the element editor, or 3) Click on the element and mouseover it, then use the up/down/left/right buttons on the keyboard to move. (The mouse MUST be over the element all the time while moving.) |
| Group move elements | Lock the elements together by clicking the button. Then move any of the elements using method
1 or 3 above. The other elements in the same group will move at the same time.
(Note: Changing the Top Offset and Left Offset parameters will only affect the position of that element, even if it is group locked.) |
| Cancel a group move | Unlock the element by clicking the button before moving it. |
| Resize an element | 1) Change the Width and Height parameters in the element editor, or 2) Resize the element by dragging the corners. |
| Group resize elements | Not possible. |
| Adjust color transparency | In the color palette, scroll the transparency bar. |
1) It defines the area of the page that is visible when viewed in mobile devices.
When the page is viewed in mobile devices, the page will be resized to fit the content width. This means elements that are outside of the Content Width will be out of view.
To show the importance of Content Width, the Page Builder highlights the border of the Content with dotted lines and explicitly indicate that 'Elements beyond this line may be hidden.'. (See screenshot below.)

2) It can be used to create different background effect
Below are the various background options for the Content.

3) It determines the position of the content relative to the left or right, top and bottom.
Content is centered by default, unless a Left or Right Offset is set. (See the differences below.)

You can also set the Top/Bottom Offset of the Content (See the differences below.)

Important Tip
If you plan to design a new page without using our template, it is important that you set the Width of the Content before you start designing.
This is because the position of all the elements is relative to the Content Width.
If you were to change the width of the content AFTER you have designed the page, you will have to re-arrange the elements all over again.
How to edit Content?
1) Click 'Background' (arrow 1).
The Content Background Settings is the second setting on the right (arrow 2).
2) To edit the Width and various Offsets, refer to arrow 3.
1) Row is the container for Elements.
Elements are added into a particular Row.
Elements are Row specific in the sense that their positions are relative to the Row they are in.
You can move an Element from one Row to another by simply drag and drop. (See demo below.)
To view the editor of all the Elements in a Row, click on the Row (see screenshot below).
2) Use different Rows for ease of re-arrangement.
If your page design is long, it is a good idea to split it into several rows.
Imagine you have a long page with only 1 Row. To add an element somewhere in the middle of your page, you will have to move all the elements down to make space for the new element. But if you have split the page into different rows, you just have to adjust the elements in that particular row.
3) Some rows have special functions.
For example, a 2-column row allows 2 columns in a row, and the columns will collapse into 2 rows when viewed in a mobile device. (See the example below.)
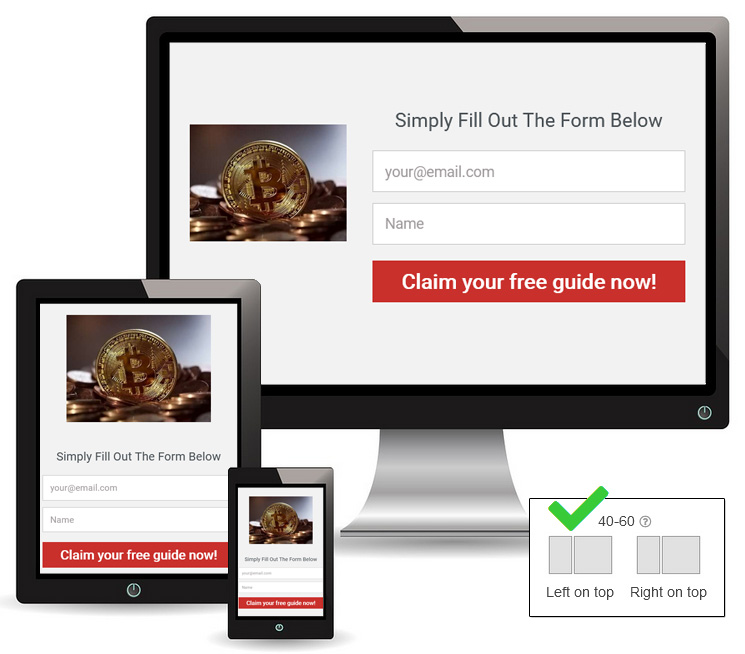
4) Row allows full-width design
A typical web page design is made up of a Page Background with a fix-width content in the middle (see example below).

By setting the Row to full width, we can create full-width design like these:

How to edit Row background?
1) Click on the Row you want to edit (arrow 1)
The background editor for that Row is the first editor on the right (arrow 2).
2) Change the background color (arrow 3).
3) Set the row background to full width (arrow 4).
Note: Setting the row background to full width only affect the background of the Row. The Elements in the Row should still be INSIDE the Content Width, otherwise they will not be visible in Mobile Devices. Read > The Importance Of Content Background Setting to learn more.
When you add a new Row (arrow 1), you will see an option to choose the Row Type.
1-Column Row
This is the most common row usage.
It is typically used for headlines and simple top-to-bottom design.
2-Column Row
This row has 2 columns that are collapsible when viewed in mobile devices.
You can choose the Left/Right column ratio and whether the Left or Right column will be on top.
For example, if you choose a 40-60 column ratio with Left on top, you can have a page design like this:
If you prefer the image on the right, yet still want it to be on top when collapsed, you can choose Right on top.
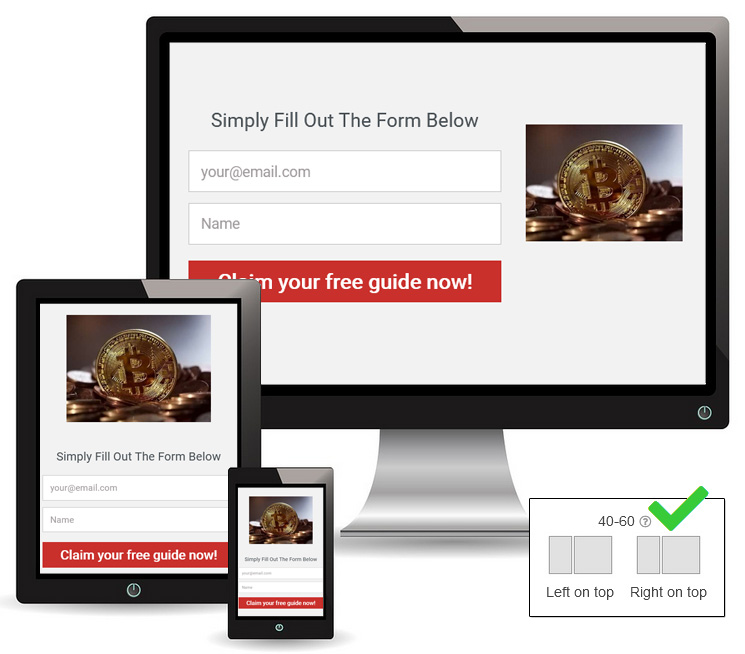
3-Column Row
This row has 3 columns that are collapsible when viewed in mobile devices.
Typically, the Column width should be at least 900px if you want to use 3-column row, otherwise the font size will be too big when viewed in mobile devices.
Dedicated Row For Ad Widget
Add this row if you want to add LeadsLeap Ad Widget to your Page.
| - Add a new Text element to your design. | |
| - Add a new Hyperlink element to your design. | |
| - Add a new Shape or Icon element to your design. | |
| - Add a new Background element to your design. You can style the background with color, gradient or image. | |
| - Add a new Image element to your design. | |
| - Add a Video or Custom Code, including social network plugins, iframe, hidden element etc. | |
| - Add a new Line element to your design. | |
| - Add a Button element. You can set the function of this button to submit the form, to close the widget, or to navigate to another website. | |
| - Add a new Input field so that you can collect more data from the subscriber. | |
| - Add a Countdown timer to your page or make the page a One Time Offer. |
To add a new Element, click the row that you want to add the element into (see arrow 1 below), then click on the Element type to add (arrow 2).
Read > Explain the different Element types
After adding the element, you will have to set up the element in its respective editor. The editor for that element will open on the right. (See the demo below.)
For example, if you want a button to go to a URL, you can set the 'On Click' option and the 'Go to' URL in the editor. Providing step-by-step instructions for every setting would make this tutorial unnecessarily long. Instead, take some time to explore the options in the element editor. They’re straightforward, and you’ll quickly see what each setting does and how to adjust them to fit your needs.
CLICK the 'lock' of the first element you want to move and DRAG across multiple locks to group/ungroup them. (see the demo below)
If the elements are not together, you can click individual 'lock' to group/ungroup the element.
Go to the Page Builder of the page, click the option shown below:

When you share your page with others using Share Code, you can lock one or more Rows so that they cannot be edited.
To lock a row:
- Mouse over the Row button
- Click the lock icon shown below
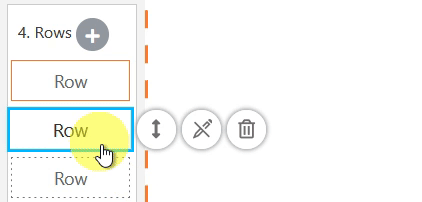
Click it again to unlock.
Once locked:
- Shared users cannot edit those rows
- All other rows remain fully editable
- No additional setup is required
This is especially useful for protecting headers, footers, disclaimers, or branded sections.
1) Check that all the Elements are completely inside their respective Row. (Tip: If you see an Element with negative Left Offset or Top Offset, most likely it is in the wrong Row.)
2) If you use 2-column or 3-column row, make sure that no Element in any column extend into another column.
3) Check that all your elements are within the Column width.
4) Check the Column's Left, Right and Top/Bottom Offset. Do they make sense?
The way the page builder works is that, when viewed in a mobile or smaller screen, it will shrink the entire page such that every element is positioned the same relative to each other. This is the only way to preserve your page design.
If you feel that the font size is too small in mobile devices, here are the possible solutions.
1) Create a different page design for mobile only.
To set up a mobile only page, add 2 Page Designs to your Page
For one Design, set the 'Device' to 'PC' (see arrow 1).
For the other Design, set the 'Device' to 'Mobile' (see arrow 2).

Using the above screenshot as an illustration, if the visitor uses a PC or tablet, the Test Page 1 will be shown. If the visitor uses a mobile phone, the Test Page 2 will be shown.
Tip: For the Design that is for Mobile only, use a page width of 400px.
2) If you do not want to create 2 Page Designs, another way is to use a 2-column or 3-column design.

Note that the screenshot above is taken from the Page Builder. The addition of 2-column or 3-column row is also done in the Page Builder. It is not a setting in this Page Manager. If you are new to Page Builder, you may have to familialise yourself with the Page Builder first.
3) Use a narrower page width with bigger font size
You can use a page width of 600-700px, and a font size of 60-70px for headline and 24-28 for content texts. This way, your font will look good in both PC and mobile devices.
If you use any opt-in template, the Email and Name fields are already added. You only need to add a Last Name input field, if you need that field.
The Name field is already the First Name field. So there is no need to add a First Name field. However, you may want to change the 'Input Placeholder' to First Name. (NOTE: DO NOT change the Input Name in the setting.)

To add the Last Name input field, go to 'Add New Element' and click this:

By default, the input field being added will be a Last Name input field.
If you are not using our template and you are creating a page from scratch, then go to 'Add New Element' and click this:
By default, the system will first add an Email field, then a Name field, which is the First Name, and then the Last Name field.
Please note that programmatically, the Input Name setting for First Name must be 'name' and the Input Name setting for Last Name must be 'lastname', as illustrated below.

Input Name setting is the setting that identifies the purpose of an input field. Changing the Input Name to anything else will break the opt in form.
The order in which the text cursor moves down the input fields is determined by the order of the input element in the editor.
In the example below, if the visitor click on the tab key or button, the text cursor will move from email field to name field, then to the submit button.

To change the order, just move the position of the input element using the move icon shown below.

1) In the Page Builder, click on the Row that you want to add the countdown into (arrow 1)
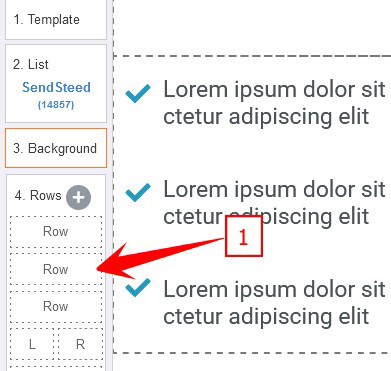
2) Click the button denoted by arrow 2 to add a countdown timer.

3) Set up the options (arrow 3).

Almost every element can be animated.
Simply click on the element you want to animate.
The animation setting is at the bottom. (See the animated screenshot below.)


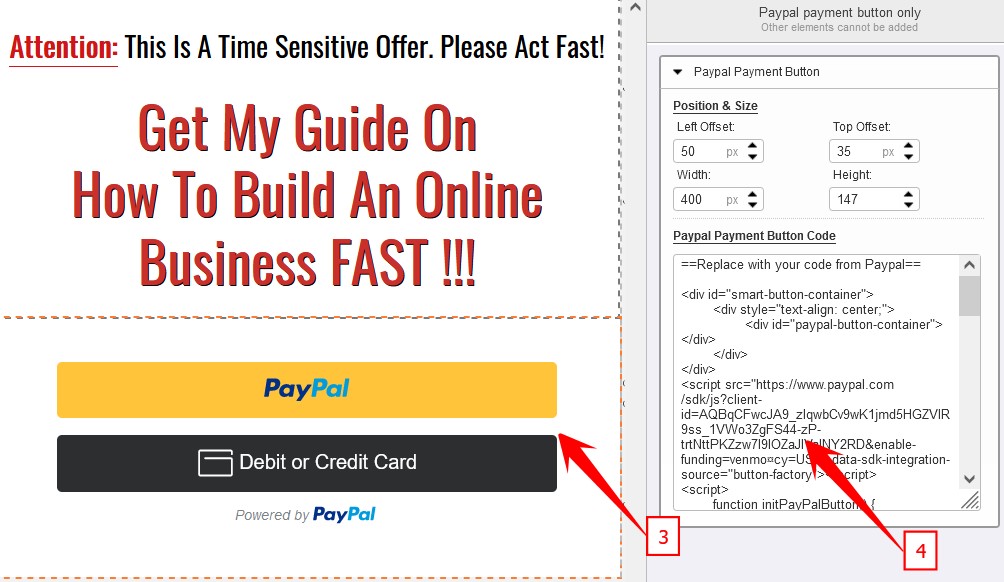


1) Click on '2. List' to show list options (arrow 11).
2) Select Use SendSteed (LeadsLeap List Manager) (arrow 12).
A set up form will appear on the right (see screenshot below).
3) Enter the Thank You URL or whatever URL you want the subscriber to be redirected to (arrow 14).
4) Save the work.
Please note that if you use a 3rd party list manager instead of SendSteed, redirect is done by the 3rd party list manager. You'll have to ask them how to do the redirect.
LeadsLeap Ad Widget is a javascript code, hence it cannot be simply added as an element.
A special row is needed to cater to the Ad Widget.
1) Click (arrow 1) to add a new row.

2) Select 'Dedicated Row For Ad Widget' (arrow 2)

A new row with an Ad Widget will be added.
2 things to take note:
- no other elements can be added into this row.
- the Ad Widget cannot be moved into other rows.
First, the video must either be hosted by Youtube, Vimeo or in your own server in the format of MP4. We do not provide video hosting.
With that, please follow the steps below:
1) In the Page Builder, click on the Row that you want to add the video into (arrow 1)

2) Click the button denoted by arrow 2 to add a Video / Custom Code element.
3) Depending on where your video is hosted, click Youtube, Vimeo or MP4 link to insert a template.

4) Replace the highlighted parameter/URL (see the highlights below) with your video parameter/URL.

For Youtube and Vimeo, you just have to replace the URL slug. For MP4, you have to replace the entire video URL.
For example, let's say your youtube video link is
https://youtu.be/abcd1234?si=mymOvJQ9oiFeYwBd
You simply have to copy 'abcd1234' and replace it with the URL slug highlighted above, everything else in the link is redundant.
For Vimeo, let's say your Vimeo link is
https://vimeo.com/123456789/a433b37463?share=copy
You simply have to copy '123456789' and replace it with the URL slug highlighted above, everything else in the link is redundant.
5) Change the 'autoplay' 'loop' 'mute' variables in the code accordingly. By default, we activate autoplay, loop and mute. To turn any variable off, just delete the varable (for mp4) or set it to 0 (for Youtube and Vimeo).
NOTE: If you want the video to autoplay, mute must be on. Otherwise most browsers will block the autoplay.
Instead of adding a video to a page, you can also consider showing a video ONLY WHEN an image/button/icon is clicked.
Read > How to show a popup video when image/button/icon is clicked?
First, the video must either be hosted by Youtube, Vimeo or in your own server in the format of MP4. We do not provide video hosting.
With that, please follow the steps below:
1) Add an image (or button or icon) element.

Tip: The image you add should look like a video (see arrow 1 below). This will encourage the visitors to click and watch.
2) In the Image Editor, click the 'On Click' selector (arrow 2).
3) Select 'show a video' (arrow 3).
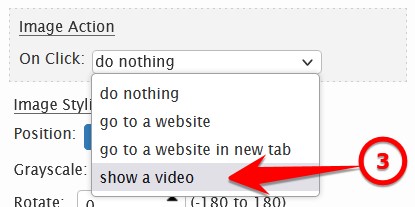
4) Assuming your video is a Youtube video, click the 'Youtube' button (arrow 4) to insert a sample Youtube code.
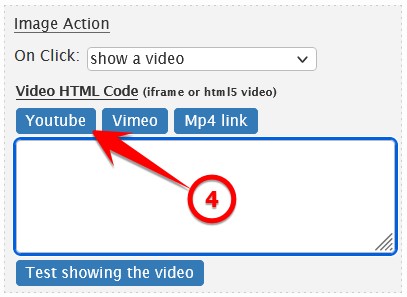
5) Replace the sample ID with your Youtube video ID.
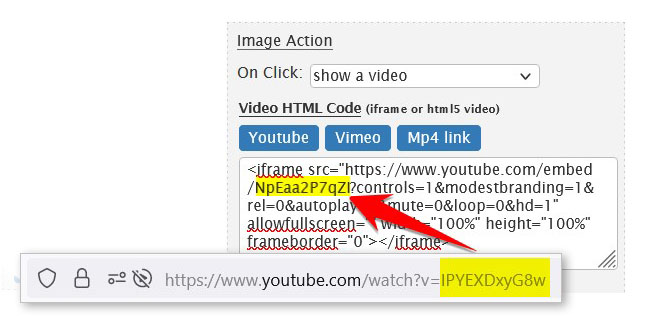
If you do not know how to get your Youtube video ID, ask Google. (Answer below.)
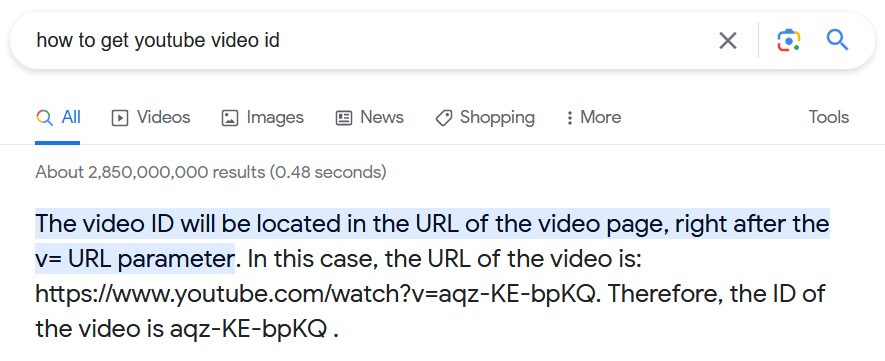
6) Click 'Save' when done.

First, please understand that there are 2 types of background that you can add video to.
1) Page Background
2) Row Background
What is the difference?
Page Background is the background of the entire page. If you add a video to the Page Background, your page will look like this:
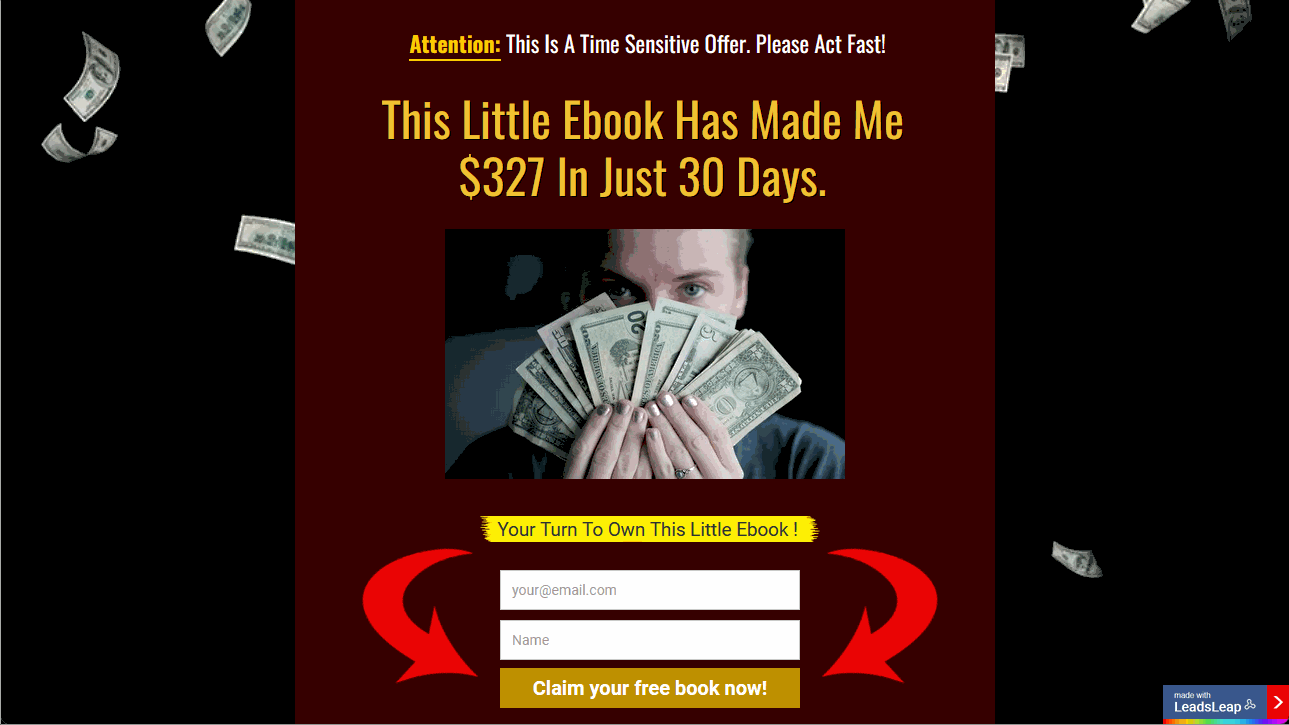
Row Background is the background for a specific row. The row can be full width or limited to the content width. If you add a video to the background of a full-width row, you can achieve an effect like this:
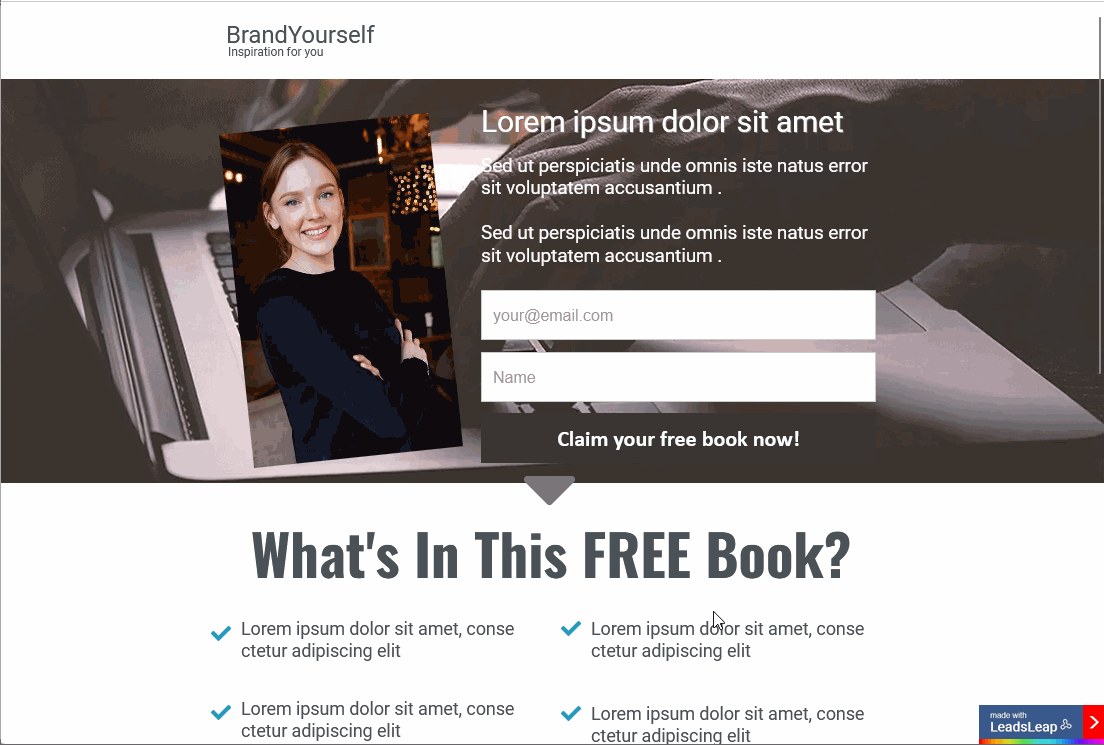
How To Add Video To Page Background?
1) Click '3. Background' to access the Page Background Setting.
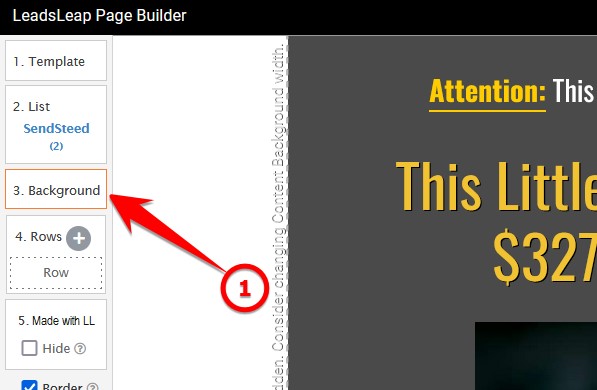
2) In the Page Background Setting, select Image/Video.
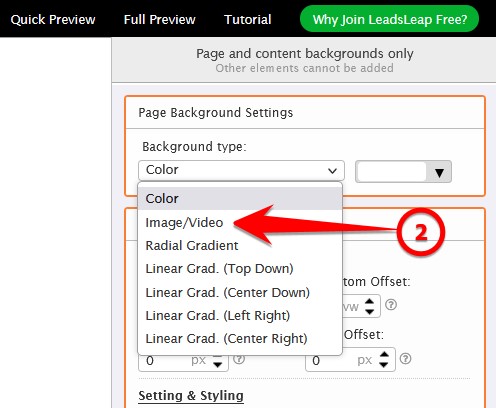
3) Click the Image/Video URL input to open the Image Gallery, then click 'Video Background' tab. Select the video that you want to add. (See the demo below.)
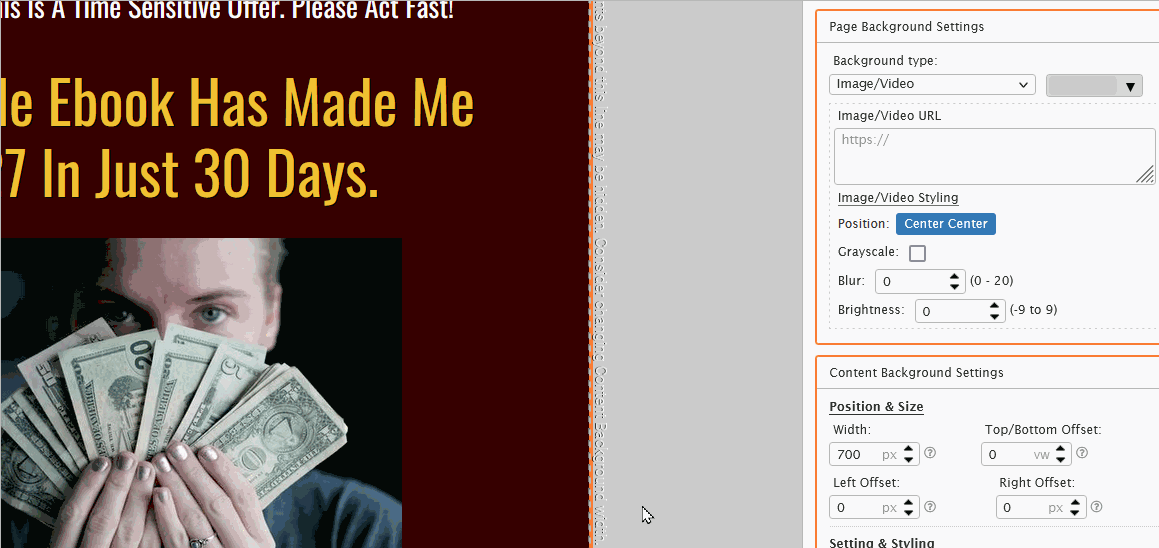
That's it!
How To Add Video To Row Background?
The steps are essentially the same, except you have to click the 'Row' instead of '3. Background'.
1) Click the 'Row' that you want to edit.
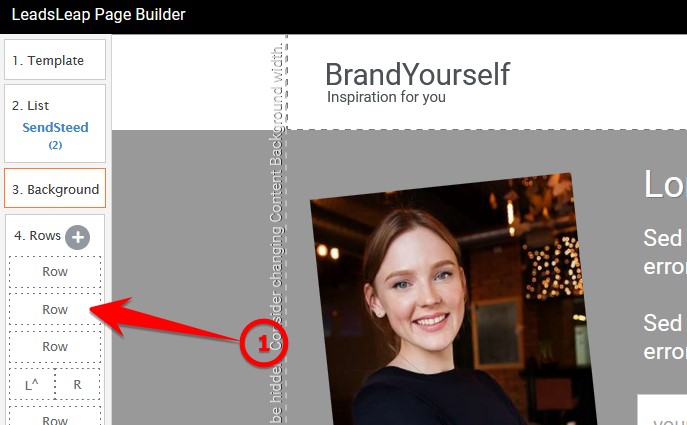
2) In the setting that says 'Background (For This Row)', select Image/Video.
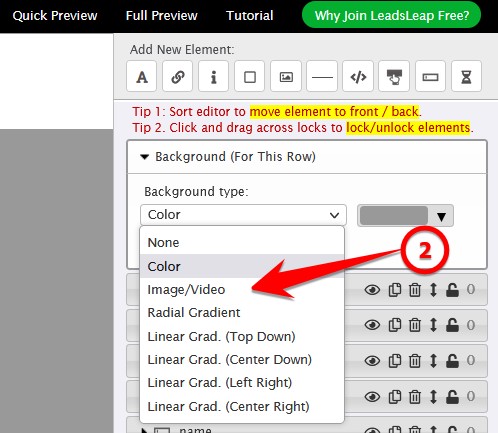
3) Click the Image/Video URL input to open the Image Gallery, then click 'Video Background' tab. Select the video that you want to add. (See the demo below.)
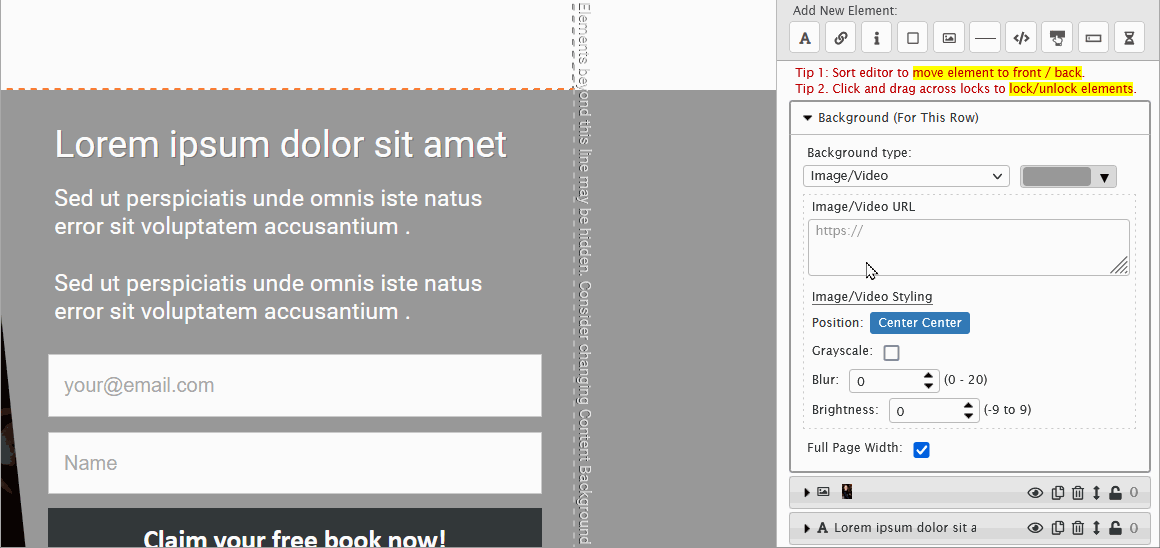
How To Style The Video
Most of the time, you are not going to use the video as-is.
Commonly, you may use the grayscale version, blur the video, lighten it, or darken it.
You may do so using Image/Video Styling. (See the demo below.)
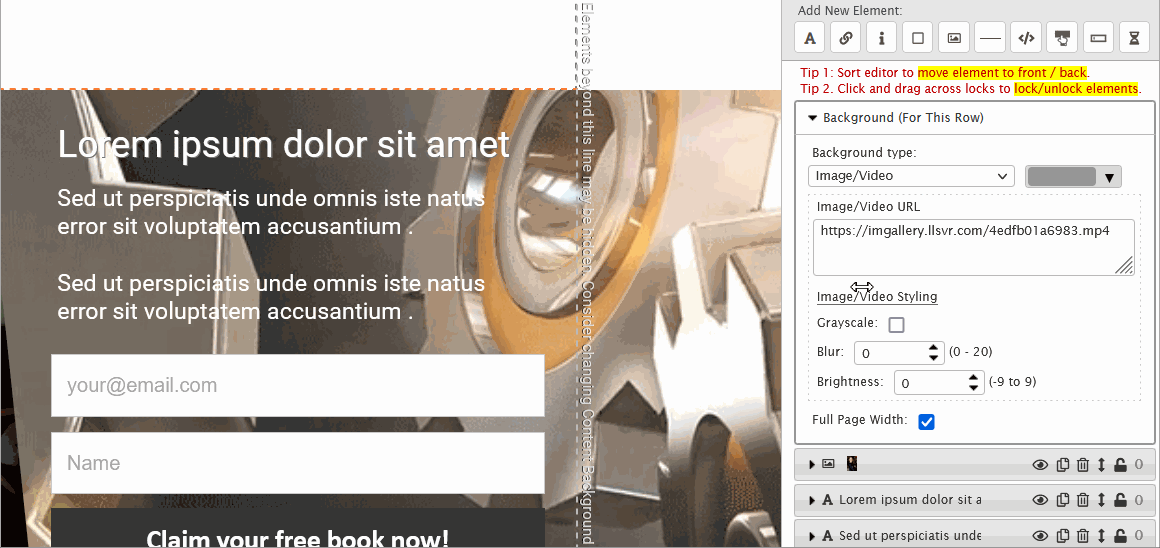
Can I use my own video?
You can use your own video, as long as it is in MP4 format, and you have to host it yourself. We do not provide video hosting.
But please be careful not to use a large video as it will increase the page loading time.
Can I use Youtube or Vimeo video as background?
You cannot use Youtube or Vimeo link directly for the background video. The video link must be in MP4.
You can save a form, header, footer or certain Row design using the function called 'Set'.
Important Definition
A Set is basically a group of Elements inside a Row/Column. When you 'Save as Set', you are basically saving all the Elements inside a Row/Column. In other words, you are saving the design of the Row/Column.
How it work?
Let's say you want to save the following opt-in form design for future use.
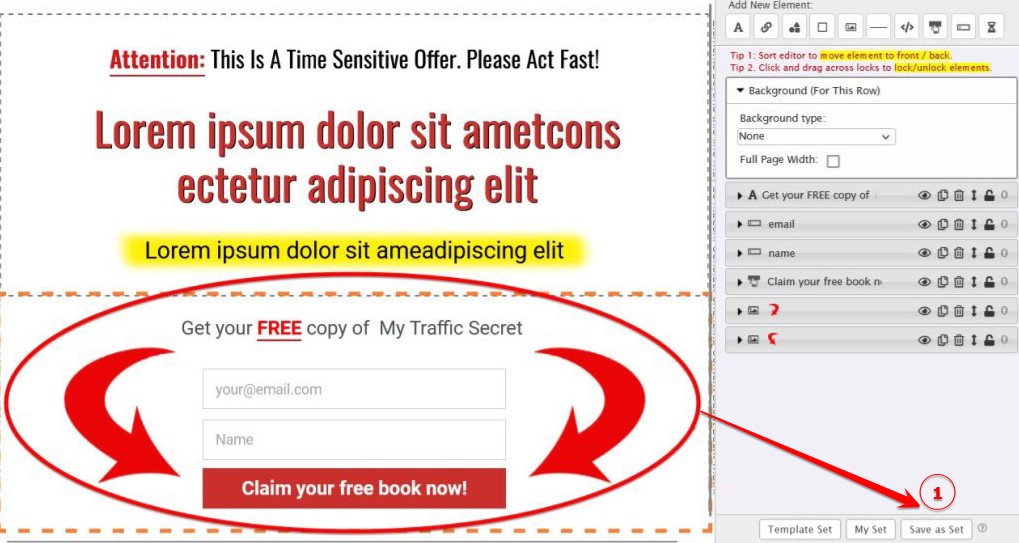
Follow these steps to save:
1) Click anywhere in the row/column that you want to save. The row/column to be saved will be highlighted.
2) Click the 'Save as Set' button (arrow 1).
3) Enter a name for the set and save.
That's all.
All the Elements in the row/column, in other words, the design in the row/column will be saved.
To insert your saved Set, click the 'My Set' button.
All your saved Sets will be listed.

You can preview the Set (see arrow above) and then click the 'tick' icon to insert the Set to the current Row in your page.
Template Set
Template set is a collection of template sets that are ready made for you.
When you click the 'Template Set' button, you will see that the Sets are divided into 4 categories:
- Headline
- Bullet
- Form
- Testimonial
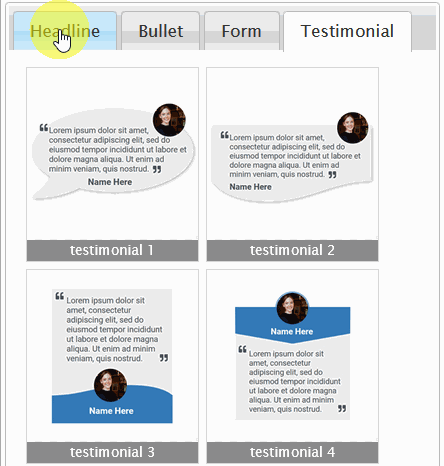
These categories cover the commonly used components in page design. For example, if you need to add a bullet list to your page, you can quickly navigate to the Bullet templates and choose a design you like.
You can even customize it and save it as your own Set for future use.
Important Reminders
1) When you save a Set, EVERYTHING in the row/column will be saved. Make sure that you clean up the row/column before saving.
2) Group all the elements together, preferably in a layer that you seldom use, such as 9. This will make future moving of an inserted Set easy.
If you are new to grouping, below is an illustration of how to group and change the group layer.
The Save as Set function will save everything in a row/column.
To save only a few selected Elements in the row, you will have to either delete the unused Elements or create a new row/column, then move the needed Elements into the new row/column (group them before you make the move, so that you can group move them).
It's a little troublesome but you only have to do it once, then you can reuse the design again and again.
If you have no experience with our Page Manager, it's advisable to skip the Funnel Manager. (As you become more experienced in creating Pages, you can create funnel first, followed by Pages. But if you're a beginner, it's better to start with Page Manager.)
Assuming you're already familiar with Page Manager and you have a few Pages promoting a product, below is how to set up a funnel...
Let's assume you have 3 Pages
- an opt-in page,
- a thank you page,
- a product delivery page.
To organize these pages in a funnel, you will take the following steps:
1) Click , follow the instruction to create a new funnel.
2) Click 'Add a new page flow' (arrow 1).

A Page Flow is simply a connector that links to a Page in the Page Manager. As the name suggests, it facilitates the planning of the flow of your Pages.
After a page flow has been added, you will see something similar to the screenshot below:

3) Click (arrow 2) to link the Page Flow to the Opt-in Page.
4) Enter 'Optin Page' as the Purpose (arrow 3).
Note: Entering a Purpose is for your own reference. It has no effect on the actual purpose of the Page or how it links to other Pages. For example, to redirect subscribers from Optin Page to Thank You Page, you'll have to set up the redirect in the Optin Page using Page Builder. Simply defining the Purpose as Optin Page or Thank You Page will not magically link the two Pages together.
5) Repeat step 2 to 4 for the Thank You Page and Product Download Page.
You now have a funnel with 3 page flows as shown below:

How to view the funnel in Page Manager
A useful function in the Funnel Manager is that you can access a funnel in the Page Manager.
Using the above example, click (arrow 4 above).
The Page Manager will open in a new window, showing all the pages in this funnel, arranged in the same order as the Page Flow in the funnel.
(Compare the screenshot below with that above.)

Notice how the Pages are arranged in the same order as the Page Flows in the funnel.
Also, you can see that the Purpose is shown in each Page (arrow 5, 6 and 7).
Through this access, you can easily add or edit the Pages as you wish, in the perspective of the funnel.
NOTE: You can also achieve the same Funnel view directly in the Page Manager by clicking 'Filter By Tag' (arrow 8) and select the funnel name from the drop down list.
Let's start with what the Funnel Manager cannot do.
1) It cannot create Pages. That's done at Page Manager
2) It cannot edit Pages. That's done at Page Manager
3) It cannot automatically link one Page to another Page. If you want Page A to link to Page B, it has to be done using the Page Builder, which is accessed through the Page Manager.
Why other Funnel Managers can do these but LeadsLeap can't?
Because their definition of Funnel Manager is actually Page Manager.
Our definition of Funnel Manager is a system to manage the flow of different Pages.
In truth, most members do not need to use Funnel Manager. Funnel Manager is for advanced members who create many Pages.
For example, to promote Product A, you may have created
- an opt-in page,
- a thank you page,
- a product delivery page.
using the Page Manager.
To promote Product B, you create 3 other Pages. Same goes for Product C, Product D and on and on.
You may end up with tens or hundreds of Pages in your Page Manager. It's not easy to tell which Page is for which Product.
With Funnel Manager, you can create a funnel called 'Product A Funnel' and place all the Pages related to Product A into this funnel.
You also can create a 'Product B Funnel', 'Product C Funnel' etc.
Now you can manage the Pages via this Funnel Manager.
That is the reason why Funnel Manager is created.
What else can Funnel Manager do?
1) You can use Funnel Manager to strategize your marketing plan.
2) You can share your entire funnel, i.e. all the associated landing pages and popups, with your team members or list subscribers, using what we called 'Share Code', so that they can duplicate your marketing plan.
Simply click and drag (see demo below)

Note: Sorting the Page Flow is just for your own reference. It has not effect on the actual Page linking. For example, to redirect subscribers from Optin Page to Thank You Page, you'll have to set up the redirect in the Optin Page using Page Builder.
Below is a demo of how you can change the background color of a Page Flow.

Changing the background color allows you to further distinguish the purpose of a Page.
For example, if you have a Page at which a visitor has 2 button options. By clicking Button A, the visitor will be lead to a specific flow of different Pages (let's call it Flow A). But if the visitor clicks on Button B, he will be lead to another flow (let's call it Flow B).
In this case, you can set the color of Flow A to green and the color Flow B to red.
To edit a Page, you need to use the Page Builder, which can only be accessed from the Page Manager
There is an easy way to access the Page Manager from Funnel Manager.
- Click (button 1) in the Page Flows of the Page you want to edit.
- This will bring you to the Page Manager, showing ONLY the Pages in this funnel, sorted in the same order as the Page Flow.
- You can then locate the Page you want to edit and click 'Launch Editor' to open the Page Builder of the Page.
Showing the full traffic stats in the Funnel Manager will make the interface very cluttered.
If you want to view the full traffic stats, you have to use the Page Manager.
There is an easy way to access the Page Manager from Funnel Manager.
- Click (button 1) in the Page Flows of the Page you want to edit.
- This will bring you to the Page Manager, showing ONLY the Pages in this funnel, sorted in the same order as the Page Flow.
- You can then access the full traffic stats by clicking .
Share Code is a unique function in LeadsLeap that allows members to share their work with other members.
When you share a Funnel, all the Pages in this funnel and all the Ad Bars and Popup/Form associate to the Pages will be shared.
Internal linking among the Pages, Ad Bar and Popup Form will be updated with the newly created Pages in the recipient's account.
You can also set up Share Code Replacers that allow the recipients to replace your SendSteed ListID, URL or other data with their data.
It is a powerful system that allows you to duplicate your entire Funnel in another person's account.
How To Get The Share Code Of A Funnel?
1) Locate the Funnel that you want to share.
2) Click 'Share Code' (arrow 1).

3) (Optional) Set up Share Code Replacer (arrow 2).

Read > What is Share Code Replacer? How to set it up?
4) (Optional) Test the Share Code (arrow 3).
Read > What is Share Code Test Account? How to access it?
5) Copy the Share Code (arrow 4).
6) Give the Share Code to those you want to share.
Read > How to import a Share Code?
1) Click create a new Funnel if you do not have one.
2) Click '+' (arrow 1) in the Funnel control panel.

You'll see a form similar to the screenshot below.

3) Enter the Share Code (arrow 2) and click Import Now.
If you see a form that ask you to fill in your SendSteed ListID, affiliate link or other data, please follow the instruction accordingly.
Otherwise, the shared Pages, Ad Bar (if any) and Popup Form (if any) will be added to the Funnel.
Share Code Replacer allows you to set up a replacer form for the recipients of your Share Code to replace your ListID, URL or other info with theirs.
For example, let's say in your Page or Form, there is a link to your affiliate link, https://somedomain.com/?r=yourusername. You can create a form like the example shown below to instruct your lead to replace it with their affiliate link.
When the recipients of your Share Code fill up the form, their data will automatically replace your current values.
That's it. No need to do further customization. No need to create any shortcode. No need to set up any special template.
Their imported funnel is immediately ready to use.
Please note that the Replacer simply replaces everything that matches and it is case sensitive. If you set the replacer to replace the word apple, and the recipient enters orange, the replacer will replace all the 'apple' found with 'orange', but it will not replace Apple, since it is case sensitive.
How to set up the Share Code replacer?
1) Click the button shown below.
2) Click 'Add a new replacer'.
3) Set up the replacer following the instructions below.
For 'Type' (arrow 1), select ListID if you're replacing a ListID, because ListID requires special database processing. Otherwise, select Others.
For 'Current' (arrow 2), enter your current value. This value will be replaced with the data that the recipient enters.
For example, to replace the link https://somedomain.com/?r=yourusername, you will enter https://somedomain.com/?r=yourusername as the current value.
For 'Instruction' (arrow 3), enter the instruction to the recipients, such as 'Enter your affiliate link here' or anything you want them to enter.
That's it.
You can add unlimited number of replacers.
To sort the order of the replacers, use the drag icon (see arrow 4 above).
IMPORTANT NOTE: Replacer in a Funnel is ONLY for the Funnel share code. If you set up a Replacer in a Page, that Replacer will NOT work in Funnel. If you have set up a Replacer in a Page, and then have the Page added into a Funnel, you will have to set up the same Replacer for the Funnel share code again.
Share Code Test Account is a dummy account that allows you to test your Share Code and Replacer.
You can go to your Test Account, import your Share Code and see how your Share Code and Replacer work in the experience of the recipient.
You can also use it to create screenshot or video instructions for your recipients.
You can easily delete or reset the items in the Test Account with a button, so that you can import and test again.
How to access the Share Code Test Account?
1) Click the get Share Code button
2) Under the Share Code, click 'Test Share Code' to access the Test Account.
1) Click , follow the instruction to create a new form.
A Form campaign control panel, similar to the screenshot below, will be added.

2) Click 'Add a new form Variant to start' or the '+' button (arrow 1 above).
You will see an option similar to the screenshot below:

If you have a Form Variant Share Code (you will know it if you have one), you can enter the code into the Share Code field (arrow 2).
Otherwise, click 'Add A New Form Variant' (arrow 3) to start anew.
3) In this guide, we will start with a new Form Variant. So click 'Add A New Form Variant' (arrow 3).
A Variant control panel will be added into the Form campaign (arrow 4).

4) Click 'Launch Editor' (arrow 5) to open our proprietary Form Creator.
The Form Creator is the only editor for the Form. Whatever you want to do for a Form is done via the Form Creator, including:
- linking the Form to a SendSteed List,
- setting up redirect after opt-in,
- designing the Form,
- adding input fields, etc.
After clicking 'Launch Editor', the Form Creator will open in a new tab (see screenshot below).

5) Select the form type you want to build.
There are 2 main form types
Popup Form (arrow 6)
- Form appears over the content of your website.
- There are 4 types of popups: Lightbox, Screenfill, Slidebar and Cornerblock.
- Popup Forms are all Javascript based. This means your website must support Javascript.
Inline Form (arrow 7)
- Form is within the content of your website.
- There are 2 types of inline form: Javascript-based and HTML-based.
For illustration, we will select Lightbox. Click Lightbox now before moving on to the next step.
6) Click '2. Template' (arrow 8 above).
You'll see a list of templates similar to the ones below.

7) Choose a template that you like (arrow 9 for example).
The template will be loaded into the creator.
8) Click '3. List' to link the Form to a List (arrow 10).

After clicking '3. List', you will see 3 options similar to the screenshot below.

- If you are building list using SendSteed, select the first option.
- If you are building list using another List Manager, select the second option.
- If you are not building a list, i.e. this Form is not really an opt-in form but a popup offer, select the third option.
9) In this guide, we will link the Form to a SendSteed List. Select Use SendSteed (LeadsLeap List Manager) (arrow 11).
A set up form will appear (see the screenshot in the next step).
10) Click 'Get List ID' (arrow 12) to show all the SendSteed Lists you have, then select the SendSteed List that you want to connect to this Form.

If you have not set up any SendSteed List, you should set up the List at List Manager before proceeding.
Once the List is linked, all the emails collected from this Form will go into the List you've selected.
That's how you link SendSteed List to Form.
11) If you want to redirect the subscriber to another URL after opting in, you can enter the URL in the next field (arrow 13 in screenshot above). In this guide, we will not do that. So we will just leave it empty.
If you have linked a SendSteed List to the Form, you should see the List ID (arrow 14).

If you do not see the List ID, that means you have not linked any SendSteed List to the Form. Go back to Step 8.
There are other customization you can make, such as how you want the popup to be Activated, Animated and whether to show Credit (arrows 15). You can try them out and see the effects.
The last two settings 'Cookies' and 'Wordpress' (arrows 16) are advanced features. If you are savvy in cookies and Wordpress, you can learn about them in the links below:
Read > How to customize the Form by audience (using cookies)
Read > How to customize the Form by Wordpress content
12) Design the Form.
The Form Creator is very similar our Page Builder. In fact, it is a simplified version.
If you are familiar with our Page Builder, the Form Creator should be easy.
Different from Page Builder, there is no Page Background, Column or Row. You can think of it as having only 1 Row.
To change an element, just click and change (see demo below).

To add an element, just click the Element button you want to add (see demo below).

13) When you are done with the Form design, click Save (arrow 17).

Form design is now complete. You may close the Form Creator window and go back to the Form/Popup Manager, i.e. this page that you are reading now.
14) Back to this Form/Popup Manager, i.e. this page that you are reading now, click Inactive (arrow 18) to change the status to Active.

Please remember that all newly added Forms are inactive by default. It has to be so to prevent new empty Forms from being loaded by accident.
15) Click 'Get Code' (arrow 19) to get the javascript code (or plugin if you are adding it to a Wordpress blog), follow the instruction shown on how to add the code or plugin to your website or blog.
After the code is added, in the future, if you want to make any amendment, there is no need to upload the code again. Simply make the changes in the Form campaign and the popup on your website will be updated automatically. (If it doesn't update, it is due to your browser cache. Clear browser cache and refresh your browser.)
Throughout the Form/Popup Manager, you'll see the terms Form and Variant (or FormID and VariantID). It's important to understand the difference.
A Form is like a Campaign. It can contain multiple Variants, which are individual versions of the form.
The system will rotate among the active Variants automatically when the Form loads.
In other words, a Form is a container (or rotator) that manages and rotates different form Variants for purposes like split-testing.
That's why in the Form/Popup Manager, VariantID is nested under FormID.
You can also set conditions for each Variant. For example, displaying one version to mobile users and another to desktop users.
Throughout LeadsLeap, the terms Form and Campaign may be used interchangeably:
Form = Campaign. Variants = Different versions of the form within the Campaign
Yes and no.
Here in Form/Popup Manager, it's 'Yes'.
The word 'Form' is used loosely for both opt-in form and popup.
But strictly speaking, it is 'No'.
An opt-in Form can be inline (i.e. within the content that your users are reading) or popup (i.e. float on top of the content, hence covering the content).
Conversely, not all popups are opt-in fields.
A popup can just be an offer with a clickable button to send people to another website, without any opt-in form.
Our Form/Popup Creator can be used to create both form and popup of any type.
Both Form/Popup and Page (in Page Manager) allow you to create opt-in form/popup for people to subscribe to your SendSteed List.
But there is one important difference.
Page is a standalone web page with unique URL that you can use for advertising and promotion.
Form does not have a URL. It is just a piece of code that you have to insert into the web page where you want it to be shown.
Form is like a parasite. It needs a hosting URL.
When you want to
1) add an inline or popup opt-in form to your own blog.
2) add an inline or popup opt-in form to your own website.
3) add a popup opt-in form to your tracked link.
4) add a popup opt-in form to your Page.
1) Click 'Launch Editor' (arrow 5) to launch the Form Creator.
2) Click '1. Form Type' to show list options (arrow 6).

3) Under 'Inline Form' (arrow 7), select Javascript Form (arrow 8) or HTML Form (arrow 9).
Javascript Form
This inline form is insert into your website using Javascript code. This means your website or web builder must allow Javascript insertion.
The advantage is the form can be animated, tracked and modified remotely.
The disadvantage is some website builders do not allow javascript.
HTML Form
This inline form is the raw HTML code.
The advantage is that it is supported by almost every website builders.
The disadvantage is that animation, tracking and remote editing is not possible.
4) Continue with Step 6 in How to create a Form/Popup? to design the Inline Form.
First, you have to design the form using our Form/Popup editor. Then you'll get the raw html form code.
Below are the steps to do that.
1) Click 'Launch Editor' (arrow 5) to launch the Form Creator.
2) Click '1. Form Type' to show list options (arrow 6).
3) Under 'Inline Form' (arrow 7), select HTML Form (arrow 9).
4) Continue with Step 6 in How to create a Form/Popup? to design the Inline Form.
5) When you are done with the design, save it in the Form/Popup Editor.
6) Come back to this Form/Popup Manager, and click the 'Get HTML Form Code' button.

If you have not created a Form/Popup, please read > How to create a Form/Popup? for the full answer.
If you want to link a Popup/Form to a 3rd party list like Aweber or Mailchimp, please read > How to link a Popup/Form to a 3rd party list like Aweber or Mailchimp?
To learn how to link a Popup/Form to SendSteed list, here are the step by step:
1) Click 'Launch Editor' (arrow 5) to launch the Form Creator.
2) Click '3. List' to show list options (arrow 10).
3) Select Use SendSteed (LeadsLeap List Manager) (arrow 11).
A set up form will appear (see the screenshot in the next step).
4) Click 'Get List ID' (arrow 12) to show all the SendSteed Lists you have, then select the SendSteed List that you want to connect to this Form.
If you have linked a SendSteed List to the Form, you should see the List ID (arrow 14).

If you do not see the List ID, that means you have not linked any SendSteed List to the Form. Go back to Step 2.
Read > How to create a Form/Popup? before following the instruction below.
1) Click 'Launch Editor' (arrow 5) to launch the Form Creator.
2) Click '3. List' to show list options (arrow 10).
3) Select Use 3rd-Party List Manager (arrow 11).

4) Click 'Import Form Details' (arrow 12).

A form similar to the screenshot below will be shown.
5) Go to your 3rd party list manager and copy the HTML Form Code.
The form code should start with <form ...> and end with </form>..
Below is a sample form code taken from Aweber site.
6) Copy the form code, starting from <form ...> until </form>, ignoring all other codes before and after, then paste it into the textarea above (arrow 14).
7) Click 'Import this form' (arrow 15).
8) Match the input names.
This step is a little technical. Basically different list managers use different input name. You will have to match it with the name of the input fields in your Page.
Take the Aweber code for example, there are 3 input fields and hence 3 input names: name, email and custom Color.
name and email is the same as our input names for first name and email, hence it is already matched. But custom Color doesn't exist in the Page. Hence the system will prompt you for further action (arrow 16).
If you need the 'custom Color' input field, you can choose the first option 'Create a new input field'. If you do not need the input, choose 'Ignore this input field' (arrow 17).
Some list managers use input names like da_name and da_email. In this case, you will have to match da_name to input field 'name', and da_email to input field 'email'. You will be prompt if you need to do that match. It's not hard once you understand the methodology.
After you have done the input field matching, the form will automatically be merged into your Page.
1) Locate the Popup/Form and look at the List setting. (See arrow 1)

2) If it says 'SendSteed ListID XXXX',
it means the Popup/Form is linked to a SendSteed List. To access the emails, go to List Manager, locate the List and click (see arrow 2).
3) If the setting says 'Third party list manager',
it means you have linked the Popup/Form to your own autoresponder system. Please go to that autoresponder to access the emails.
4) If the setting says 'Nil',
it means you have not linked the Popup/Form with any list manager. Opt-in form is not working. To link a list manager to the page, follow one of these 2 guides:
Read > How to link a Popup/Form to SendSteed list?
Read > How to link a Popup/Form to a 3rd party list like Aweber or Mailchimp?
Free Members can have up to 10 forms/popups. No limit for Pro Members.
Why customize based on device?
Note: The instruction below applies to all form types except HTML Form.
Although our Form/Popup will resize to fit mobile view, a good design for PC may not be a good design for mobile browser.
Moreover, an animation that is suitable for PC may not work in a mobile phone.
To get the best of both worlds, you can create two different forms to cater to different devices.
How to customize?
1) You have to create 2 Variants in a Form. One suitable for PC, another suitable for Mobile devices.

2) For the Form that is suitable for PC, click Device Change (arrow 1) to change to PC only (Mobile will be struck through).
3) For the Form that is suitable for Mobile, click Device Change (arrow 2) to change to Mobile only (PC will be struck through).
Bear in mind that the Status of both Forms must be Active (arrow 3)
You can trigger a popup by adding an 'onClick' event to a text link or button.
Here are the steps to do it:
1) You should have created a popup form.
2) You should have added the Code or Plugin to your website.
Step 1 and 2 are detailed in How to create a Form?
3) Locate the Campaign for the popup and click 'Use onClick' (arrow 1).

4) Follow the instruction to add the 'onClick' event to the button or link on your website.
You can create a duplicate of the existing Form, edit it and save the changes. When it is ready, set its Status to 'Active' and set the original Form to 'Inactive'.
Share Code is a unique function in LeadsLeap that allows members to share their work with other members.
Members can share their Page design, Popup design and Email Series.
For example, you may want to share your Popup/Form design with your team members, so that they can duplicate your success.
How To Get The Share Code Of A Popup/Form?
1) Locate the Popup/Form that you want to share.
2) Click 'Share Code' (arrow 1).

3) (Optional) Set up Share Code Replacer (arrow 2).

Read > What is Share Code Replacer? How to set it up?
4) (Optional) Test the Share Code (arrow 3).
Read > What is Share Code Test Account? How to access it?
5) Copy the Share Code (arrow 4).
6) Give the Share Code to those you want to share.
Read > How to import a Share Code?
1) Locate the Form Share Code that you want to import the Popup/Form into.
If your intention is to add the Popup/Form into a new Form Campaign, click 'Add a new form campaign'.
2) Click '+' (arrow 1) in the Form control panel.
You'll see a form similar to the screenshot below.
3) Enter the Share Code (arrow 2) and click Import Now.
If you see a form that ask you to fill in your SendSteed ListID, affiliate link or other data, please follow the instruction accordingly.
Otherwise, the shared Popup/Form will be added to the Campaign.
4) Click Launch Editor (arrow 5) to open the Popup/Form Creator for the Popup/Form you've added.
5) Make the necessary customization. For example, you may want to link the Popup/Form to your own SendSteed List, or change the links on the Popup/Form to your own affiliate links.
Share Code Replacer allows you to set up a replacer form for the recipients of your Share Code to replace your ListID, URL or other info with theirs.
For example, let's say in your Form, there is a link to your affiliate link, https://someprogram.com/?r=myusername. You can create a form like the example shown below to instruct your lead to replace it with their affiliate link.
When the recipients of your Share Code fill up the form, their data will automatically replace your current values.
That's it. No need to do further customization. No need to create any shortcode. No need to set up any special template.
Their imported form is immediately ready to use.
Please note that the Replacer simply replaces everything that matches and it is case sensitive. If you set the replacer to replace the word apple, and the recipient enters orange, the replacer will replace all the 'apple' found with 'orange', but it will not replace Apple, since it is case sensitive.
How to set up the Share Code replacer?
1) Click the button shown below.
2) Click 'Add a new replacer'.
3) Set up the replacer following the instructions below.
For 'Type' (arrow 1), select ListID if you're replacing a ListID, because ListID requires special database processing. Otherwise, select Others.
For 'Current' (arrow 2), enter your current value. This value will be replaced with the data that the recipient enters.
For example, to replace the link https://somedomain.com/?r=yourusername, you will enter https://somedomain.com/?r=yourusername as the current value.
For 'Instruction' (arrow 3), enter the instruction to the recipients, such as 'Enter your affiliate link here' or anything you want them to enter.
That's it.
You can add unlimited number of replacers.
To sort the order of the replacers, use the drag icon (see arrow 4 above).
Share Code Test Account is a dummy account that allows you to test your Share Code and Replacer.
You can go to your Test Account, import your Share Code and see how your Share Code and Replacer work in the experience of the recipient.
You can also use it to create screenshot or video instructions for your recipients.
You can easily delete or reset the items in the Test Account with a button, so that you can import and test again.
How to access the Share Code Test Account?
1) Click the get Share Code button
2) Under the Share Code, click 'Test Share Code' to access the Test Account.
Read > How to create a Form/Popup? for the full answer.
Below is the short answer.
1) Click 'Launch Editor' (arrow 5) to launch the Form Creator.
2) Click '3. List' to show list options (arrow 10).
3) Select Use SendSteed (LeadsLeap List Manager) (arrow 11).
A set up form will appear (see the screenshot in the next step).
4) Enter the URL you want the subscriber to be redirected to (arrow 13).
5) Save the work.
Please note that if you use a 3rd party list manager instead of SendSteed, redirect is done by the 3rd party list manager. You'll have to ask them how to do the redirect.
Most of the time, it's due to your browser cache.
Try clearing your browser cache or using a different browser that has not loaded the form/popup recently.
If it's still the same, please contact our support.
Please let our support know if you've refreshed your browser cache or tried a different browser. Otherwise, we may reply you with the same advice.
Yes. You may do it using our Wordpress plugin. Details below...
Before that, you need to create the form/popup.
To create a form/popup, please follow the step by step instruction here > How to create a Form/Popup?
When creating the form, the Form Type should be Inline > Javascript Form. This is done in the Popup Creator (see screenshot below).

When you are done with the form design and have saved the changes, come back to Form/Popup Manager, i.e. this page that you are reading now, and follow the steps below:
1) Check the form status. If the status is 'Inactive', click Inactive (arrow 18) to change the status to Active.
2) Click 'Get Code' (arrow 19).
3) Under Select the publishing platform, select Wordpress.

4) Continue following the instructions displayed after selecting Wordpress. They will guide you through installing the plugin on your WordPress blog.
After the code is added, in the future, if you want to make any amendment, there is no need to upload the code again. Simply make the changes in the Form campaign and the popup on your website will be updated automatically. (If it doesn't update, it is due to your browser cache. Clear browser cache and refresh your browser.)
Yes. It works for any self-hosted website. It also works for Blogspot (or Blogger.com).
If you do not have a website, you should create a Page instead of creating a Form/Popup.
This Form/Popup Creator only creates the form for people opt-in.
If you have linked the Form/Popup to a SendSteed List, please go to List Manager to learn how to contact the people who have opted in.
If you have linked the Form/Popup to a 3rd-party list manager, please check with the list manager.
Why customize by URL?
One possible scenario is you have a few blogs and you use the same Form/Popup in all the blogs. But you do not want the Form to be shown on certain pages, such as /about/ and /contact/.
Another possible scenario is you want the Form to be shown to ONLY a certain directory of your website.
In such scenarios, you can customize the Form by URL.
How to customize?
In the Form Creator, click 'By URL' (arrow 1)

A form with 2 fields, denoted by arrow 2 and 3 above, will be shown.
Scenario #1 - Do not show when URL contains certain phrases
For example, if you do not want the Form to show when the URL contains /about/ or /contact/, enter
/about/,/contact/
in the (arrow 2) field.
(Note that each phrase is separated by a comma.)
Scenario #2 - Only show when URL contains certain phrases
For example, if you want the Form to show only if the URL contains /blog/ or ?r=, enter
/blog/,?r=
in the (arrow 3) field.
How the matching is done?
1) The system will match ANY part of the URL against the phrase.
For example, if your objective is to refrain the Form from showing in the 'about' page, which typically looks like this https://yourblog.com/about/, you should enter /about/ as the match phrase.
If you enter about, it will match all the URLs with 'about' in it, such as this:
https://yourblog.com/about-the-latest-traffic-system
2) The match is case insensitive.
This means if you enter /about/, it will match against https://yourblog.com/ABOUT/.
What characters are supported?
Most common characters used in a URL are supported, including:
a-z0-9/-_.?=&@#$%
Please note that comma (,) is reserved as the delimiter for multiple phrases.
Note: This function is a little technical. If you do not have a good understanding of how cookies work, it's better not to use it.
Why customize by audience?
If you run a blog and have a list, you may be in a situation where you want to show one offer to your existing subscribers and another to non-subscribers.
For example, you can ask non-subscribers to opt-in to your list, and those who are already in your list to buy something.
How to customize?
To make customization possible, you need to track and classify the visitors on your website/blog.
Once you can classify your visitors into groups, you can then present different offers to different group.
Hence, before customizing the offers, we need to classify the visitors into different groups. This is done by using a web technology called cookie.
What Is Cookie?
Cookie is basically a small piece of data that...
- is
created by you (or rather the script on your website);
- is store in your
visitors' browsers when they visit your website;
- can be retrieved by
you (or rather the script on your website) the next time they visit your
website.
The data stored in a cookie includes:
1. a cookie name, so that you can
retrieve it later by its name,
2. a value (which is the content that the
cookie holds),
3. an expiry date (that decides how long the cookie is valid),
4. a domain and path (that decides whether the cookie is valid throughout the
website, certain directory or subdomain of the site.)
These are the basic things you need to know about cookie. If that sounds overwhelming, just know that a cookie has a name and a value. You only need to know that to classify your visitors.
How to use cookie to classify site visitors?
When someone subscribes to your list, chances are he/she will go to a thank-you page or some kind of download page.
On that page, you can create a cookie called 'userType' and set its value as 'subscriber'. This cookie will be saved in the subscriber's browser.
To bring the idea further, say if someone buys something, on the product download page, you can create the same cookie called 'userType' but set its value as 'buyer'.
This means you can now classify your visitors into 3 groups:
Group 1 - non-subscribers (i.e. those without 'userType' cookie in their browsers)
Group 2 - subscribers (i.e. those with 'userType' cookie and 'subscriber' as the value)
Group 3 - buyers (i.e. those with 'userType' cookie and 'buyer' as the value)
Whenever someone visits your website, you can retrieve the 'userType' cookie and find out if that visitor is a subscriber or buyer. If nothing is retrieved, it means that visitor is a non-subscriber.
"How about the existing subscribers? They are not going to visit the thank-you page again."
For these people, you can email them an offer and add the cookie when they visit the offer page. You may have to do that a few times to cover most of your existing subscriber.
If you are running a membership site, it's easier. Just add the cookie to their browsers whenever your members visit the Members Area.
How to create the cookie?
For that, we've created a useful tool called Cookie Generator.

Fill in the cookie name and value, click 'Generate Code', copy and paste the code into your thank-you page, product download page or Members Area. When your subscribers or buyers go to that page, the cookie will be added to their browsers.
How to customize the offers
Once you have the cookie set in your subscribers' and buyers' browsers, you can now use the Form/Popup Creator to make your Form read the cookie and respond accordingly.
In the Form/Popup Creator, click 'Cookie' (arrow 1).

You will see 2 settings denoted by arrow 2 and 3 above.
You can either tell the script NOT to show the Form when a cookie exists, or FORCE show a Form when a cookie exists.
For example, let's say you have 2 offers - an opt-in offer and a product sale offer.
- The opt-in offer is shown to non-subscribers
- The product sale offer is
shown to subscribers but NOT buyers, since they have already bought.
Conceptually, for the first offer, you want to show to visitors with NO cookie set (since those with cookies are either subscribers or buyers). Make sense?
For this offer, you activate 'Do not show when this cookie exists' (arrow 2 above) by entering the Cookie name as 'userType', leaving Cookie value empty. What it means is this offer will not be shown if the cookie 'userType' exists, regardless of what its value is.
For the second offer, you only want to show to your subscribers who haven't bought from you. You can accomplish this by setting 'Force show when this cookie exists' (arrow 3 above). For Cookie name, enter 'userType'. For Cookie value, enter 'subscriber'.
Here is what happen when the campaign is executed:
Non-subscribers will see offer 1, subscribers will see offer 2, and buyers will not see anything.
That's how you customize different offers to different audience.
Note: This feature is only applicable to Wordpress blog.
Why customize based on content?
Imagine when a visitor comes to your blog to read an article about SEO, which offer will appeal to this visitor more?
1) A special report on 'How to rank #1 in Google in just 3 steps'
or
2) A
special report on 'How to build a huge list in 3 days'
Apparently the answer is 1.
But another visitor may come to your blog to read an article about list building. Which offer do you think will appeal to this visitor then?
Obviously it's 2.
It's common sense that if you can present a more relevant offer to your traffic, you can significantly increase the conversion rate on your website.
The question is, how do you make such a customization?
How to customize?
For example, say you have 3 offers (i.e. 3 Forms).
- One offer targets visitors in the SEO, SEM
and Link Building category.
- Another offer targets visitors
in the List Building category.
- The last offer targets
visitors in the rest of your blog.
Under the Wordpress setting of each Form, you can do these settings for the various offers:
For the Form that targets SEO, SEM and Link Building category
1) Click 'Wordpress' (arrow 1)

Remark: Basically you uncheck all the options except the Posts option (arrow 2). Under the Posts option, you select 'Only show in Categories' (arrow 3) and enter the category names 'SEO,SEM,Link Building' (arrow 4). One thing to note is the category name MUST match the category name in your Wordpress exactly, including the case.
For the Form that targets List Building category

Remark: Similarly, you uncheck all the options except the Posts option. Under the Posts option, select 'Only show in Categories' and enter the category names 'List Building'.
For the Form that targets the rest of the blog

Remark: The last offer is shown to all other visitors in your blog. This means you want to include every part of the blog except traffic in the 4 categories 'SEO, SEM, Link Building and List Building'. To do so, you check all the options (arrow 1). Check the Post option (arrow 2), select 'no show in Categories' (arrow 3) and enter 'SEO,SEM,Link Building,List Building' (arrow 4).
That's all. Save the work, download the plugin for the Form and add it your blog. The system will automatically show the intended Form on the intended pages.
Other Possibilities
The illustration above shows you how to customize the offers based on the category.
You can also do customization based on Post ID, Page ID, Home Page, and the various classifications available in Wordpress.
First, you have to create the popup using the Form/Popup Creator found at Form/Popup Manager.
Assuming you already have the popup created, next, go to the Page Manager and follow the steps below.
NOTE: This tutorial can also be found in the Page Manager. It's easier to go to the Page Manager and follow the steps side-by-side.
1) Click the edit button to show the editor for the Page that you are working with.
2) Look for an option called 'Insert Popup'
3) Select the popup you want to show in the Page (arrow 1).
4) Click 'Save' (arrow 2).
Once saved, the popup will be shown on the Page according to the activation settings, such as on Exit.
If the Popup is triggered manually onClick, i.e. visitors need to click a button to show the Popup, then you'll need to do an additional step - You will have to add a button to the page design and set the Button Type to 'initiate popup campaign'. Detailed steps below:
5a) If your Page has many Page Designs, the Designs may be hidden. Click the link shown below to show the Designs if you cannot see the Design control panel. If there is only 1 Design in the Page, skip this step.

5b) Click 'Launch Editor' (arrow 8) to edit the page.
5c) Click the Row that you want to add the button into.
5d) Click the Add Button Element icon (see arrow below) to insert a button element.
5e) Click Button Type and select 'initiate popup campaign'.
That's it. Once you set the button to initiate a popup campaign, when visitors click the button, the popup you've linked earlier will be shown.
If you are savvy in coding, you can create a cookie from scratch. Otherwise, you can use this Cookie Generator to create a cookie for your website.
The Cookie Generator alone is quite meaningless.
It is intended to be used together with the Form/Popup Creator.
To learn more about how to use cookie to customize Forms, please refer to the tutorial at Form / Popup Manager. Look for "How to customize the Form by audience (using cookies)".
Cookie is a web technology that is used to keep track of visitors to a website. It is basically a small piece of data that...
- is
created by you (or rather the script on your website);
- is store in your
visitors' browsers when they visit your website;
- can be retrieved by
you (or rather the script on your website) the next time they visit your
website.
The data stored in a cookie includes:
1. a cookie name, so that you can
retrieve it later by its name,
2. a value (which is the content that the
cookie holds),
3. an expiry date (that decides how long the cookie is valid),
4. a domain and path (that decides whether the cookie is valid throughout the
website, certain directory or subdomain of the site.)
These are the basic things you need to know about cookie. If that sounds overwhelming, just know that a cookie has a name and a value. You only need to know that to classify your visitors.
1) Simply enter the parameters in the form and click the "Generate Code" button.
2) Copy the generated code and paste it into the html code of any webpage on your website where you want the cookie to be set.
The Cookie Generator alone is quite meaningless.
It is intended to be used together with the Form/Popup Creator.
For more information on how to use this Cookie Generator together with the Form/Popup Creator, please refer to the tutorial at Form / Popup Manager. Look for "How to customize the Form by audience (using cookies)".
Before you start, please note that PDF Link Rebrander is an advanced tool. You need to have the following before you continue:
- You have an ebook that others can rebrand and give away. It should be an ebook you have written or have private label rights to.
- You know how to create a web page. (If you know how to use LeadsLeap Page Builder, then you qualify.)
With these prerequisite, follow the steps below to create your own rebrandable PDF eBook:
1) Click 'Add a new rebrander'.
You will see a popup form similar to the screenshot below:

2) Enter a Rebrander Name (arrow 1) for your personal reference.
3) Click 'Add Now' (arrow 2).
A control panel similar to the screenshot below will be added.

4) Click (arrow 3) to open the setup form.
5) Click the button indicated by arrow 4 to download the 'How To Create A PDF Source File' guide.

6) Follow the guide to complete Step 1 to 5 of the setup form.
You may want to pause this tutorial and read the guide now. If not, the rest of the instructions may not make sense to you.
7) When done, click 'Save' (arrow 5)

Please note that the PDF Link Rebrander only creates an Embed Code that generates the Rebrander Setup Form, which allows others to fill in their details so they can download a rebranded version of your PDF eBook.
The PDF Link Rebrander does not provide a URL for promotion. Instead, you'll need to insert the Embed Code into your web page using your preferred website builder, such as LeadsLeap Page Builder.
Step 8 and 9 below show how to get the Embed Code and insert it into your preferred web page.
8) Click 'Get Embed Code' (arrow 6) to get the Embed Code for the Rebrander Setup Form.
You will see a popup form similar to the screenshot below:

9) Copy the Embed Code indicated by arrow 7
10) If you use a third party website builder, follow the instructions provided in arrow 8. If you are adding the Rebrander Form to a LeadsLeap Page, click on arrow 9 and follow those instructions instead.
11) Promote the web page where you have added the Embed Code. If you're using LeadsLeap Page and have inserted the Embed Code into the Page, then the URL will be the page URL that starts with lllpg.com or llpgpro.com (refer to arrow 26 below).

The PDF Link Rebrander is a tool that allows you to enable others to customize the links in your PDF eBook.
For example, suppose you've written an eBook containing links to your affiliate products. The PDF Link Rebrander enables you to transform your eBook into a rebrandable version, allowing others to customize your affiliate links with their own.
Why would you want to enable others to rebrand your eBook?
Here are some common reasons:
1) You want to assist your leads in succeeding, giving them another way to promote their links.
2) There may be a link in the eBook that cannot be customized, leading directly to your website. By allowing others to rebrand the eBook with their affiliate links, they also drive traffic to your site.
For an example of a rebrandable PDF eBook, visit PDF Rebrander Demo, fill up the form there and download the PDF. Notice how the data you entered is automatically included within the PDF.
Embed Code is the code that you add to your website to display the Rebrander Setup Form.
The Rebrander Setup Form is a user-friendly form that others can use to fill out their details so they can download the rebranded PDF eBook.
They will also get the download link for their rebranded PDF.
To see how it works, go to PDF Rebrander Demo, fill up the form there and download the PDF.
First, you need to set up the rebrander. If you haven't done so yet, please follow the instructions at:
How to set up a PDF Link Rebrander?
The setup MUST be completed. Otherwise, the Embed Code will not be generated.
If you have completed the setup as instructed above, you should know how to retrieve the Embed Code, as detailed step-by-step instructions are provided in the tutorial above.
First, you should know how to create a Page and edit the Page in the Page Builder. If you don't, please go to Page Manager and learn from the Tutorial there.
Assuming you already know how to create a Page, please follow the steps below to add the Embed Code.
1) In the Page Builder of the Page, add a new 1-Column Row.
2) In the newly added Row, click the button shown below to add a Custom Code element.
3) Copy and paste the Embed Code in the textarea below:
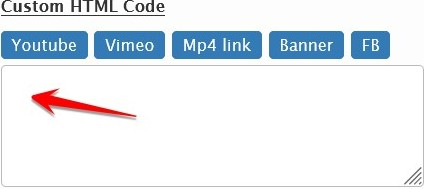
4) Continue to design the page to your liking. For details of how to design a page, please refer to the Tutorial in the page builder.
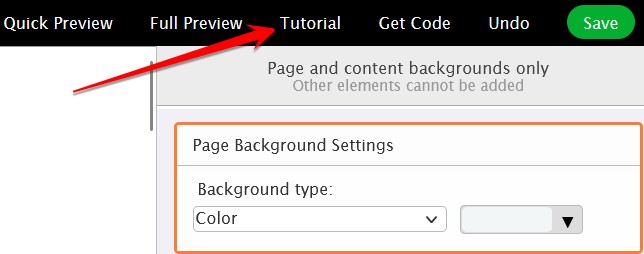
5) Click the green 'Save' button shown in the screenshot above to save changes when done.
No. Only the web address of a hyperlink can be rebranded.
Other text, including the link text, cannot be rebranded.
This rebrander will only generate an Embed Code.
You will need to add the Embed Code to a webpage. The URL of that webpage is the URL you send people to.
To see how a webpage with an Embed Code looks like, go to PDF Rebrander Demo.
From the example, you can see that there is a user-friendly interface that allows your leads to customize the PDF.
Can I share the Download Link instead of the Embed Code?
The download link obtained from the button below is the download link for the rebranded PDF.

You can share this link directly, but your leads will need to know how to customize the parameters in the link.
The benefit of using the Embed Code is that it guides your leads. However, if you and your users know how to customize the parameters in the download link directly, then using the Embed Code is not necessary.
If you were to promote a program, it makes sense to promote something with these characteristics:
1) It allows you to earn recurring income.
- This means your one-time effort is going to pay you a lifetime.
2) The product is evergreen.
- This means your one-time effort is going to pay you a lifetime.
3) The business model is sustainable.
- This means your one-time effort is going to pay you a lifetime.
LeadsLeap started in 2008 as an advertising network. Although we have added many many other functions over the years, our advertising program is still working and it is likely to continue working for many many years.
When you promote LeadsLeap, those who join under your referral will be under your referral for life.
It doesn't matter when they upgrade, but if they upgrade, and whenever they upgrade, you earn commissions.
Your commission is recurring. This means as long as they remain as a Pro Member, you earn commissions months after months.
Other benefits
1) LeadsLeap membership is also a 10-level leads builder.
- This means you can reach out to 10-levels of leads in your network, through our unique non-obtrusive message system called Follower Message.
- Read One Signup A Day and see how one LeadsLeap member has built thousands of leads that continue to grow even though he hasn't been actively promoting LeadsLeap.
2) Earn credits on autopilot.
- You earn credits whenever your 10-levels of followers view ads.
You make a commission when your direct referrals upgrade their account.
25% recurring commissions if you are a Free Member.
50% recurring commissions if you are a Pro Member.
No. You earn commission only when your direct referral upgrades.
Our affiliate program is single level, not multi-level.
Your main affiliate link is https://leadsleap.com/?r=.
There are other affiliate links you can use. Click here.
It depends on what resources you have.
Go to Affiliate Links & Tools. Click on the option that matches your situation.
The best way to get referrals is to simply use LeadsLeap to build your own business. We provide almost every tool you need to build a successful online business.
As you do that, teach others how to do it.
Your main focus should be to build your own business. Promoting LeadsLeap should be secondary and a 'by-the-way' thing.
Whether your referrals upgrade or not depends on their readiness.
The best thing you can do is to exercise patience. One day, they will see the value and upgrade, unless they give up online marketing.
That's our own belief too. We just focus on delivering more values.
You can deliver more values to them too. You can create a guide to show them how you use LeadsLeap.
You can share the guide via Follower Message.
You can create a list and get your followers to opt in to get the guide, then follow up with them via email broadcast.
The reason why they do not upgrade is because of one or all of the following:
- lack of confidence in LeadsLeap,
- lack of confidence in themselves.
By showing them what you did and what they can do, you can help to increase their confidence level.
There is a 60-day withholding period to account for refund, fraud and charge back.
The 60-day withholding period is necessary because it is aligned with the agreement with our payment processors.
You can check how much money is due for withdrawal (arrow 1), how much is still pending (arrow 2) and how many days before it is due (arrow 3).

Traffic cooperative (often referred to as a traffic Coop) is a system that allows marketers to collaborate to drive traffic to each other's websites or offers. In layman's term, it means you send traffic to ads in the system, and in return, your own ads (meaning your Credit Ads) will get traffic from the system. The more you send, the more you get.
Why send traffic to others when I can send it to your own offer?
The reason for this is that you may be active in a few traffic networks but not all of them. Through Traffic Coop, you can expose your ads to other traffic networks to which you do not have access.
How to send traffic to the Coop system?
You do so by promoting your Coop Link below:
https://lltrco.com/?r=
What will happen when I promote the link?
When you promote it in manual traffic exchanges, safelists or other traffic networks, you will earn:
1) Coop Income: This is cash you can withdraw (minimum applies).
2) Ad Credits: These are credits you can use to get traffic to your Credit Ads. It's how the Coop network sends traffic back to you.
After I send traffic to the link, how do I get traffic back?
You'll have to set up your Credit Ads. As long as you have Credits, which you'll automatically earn when you send traffic to your Coop Link, you will get traffic to your Credit Ads.
1 Credit = 1 visitor to your Credit Ad.
How much Credits will I earn?
Credits are earned as follows:
First 5 seconds : 0.2 credit
Thereafter : 0.02 credit every 5 sec, up to 1 min
How much Coop Income will I earn?
Your Coop Income is calculated weekly on every Friday.
The earning typically ranges from $0.10 to $8 CPM (cost per 1000 clicks), depending on the uniqueness, location, surfing duration of the traffic and our earning.
Can I send any traffic to the link?
As long as your traffic doesn't constitute spam and satisfies the three criteria below, you're free to send any type of traffic.
Examples of spamming include posting your Coop Link in your social networks and forums, as well as sending unsolicited or mass emails requesting visits.
Criterion #1: Visitors must spend at least 5 seconds on the link for their visit to be counted. Automatic or bot visits will be disregarded.
Criterion #2: Please refrain from promoting your Coop Link in the LeadsLeap Ad Network. Traffic from the LeadsLeap Ad Network will not be counted.
Criterion #3: Visiting your own Coop Link will not generate any activity. Only visits from third-party visitors are eligible.
To join, you simply promote your Coop Link, which is:
https://lltrco.com/?r=
You can promote it in manual traffic exchanges, safelists or other traffic networks.
Note #1: Visitors have to surf the link for at least 5 seconds before that visit is counted. Automatic or bot visits will be ignored.
Note #2: Please do not promote your Coop Link in LeadsLeap Ad Network. The traffic from LeadsLeap Ad Network will still be ignored.
Once our system detects traffic to your Coop Link, your Credit Ads will start rotating in the Coop Network as long as you have positive Ad Credits.
Note: if you want to receive traffic from the Coop Network, you will need to set up your Credit Ads and Pro Ads if you are a Pro Member. These ads will be shown in the Coop Network.
1) Get Coop Traffic To Your Credit Ads
Our Coop Network is an exclusive network.
Only members who participate in it will have their Credit Ads being rotated in the Coop Link. (Pro Ads are rotated in the Coop Link automatically.)
So, if you want to get free traffic from our Coop Network, you will have to send traffic to your Coop Link.
2) Earn Ad Credits
The traffic from your coop link will earn you Ad Credits.
You can use the credits for advertising or conversion into cash via Credit Encashment.
3) Earn Coop Income
Most traffic coop programs only send you traffic. They don't pay you.
But we do.
Your Coop Income can stack on top of your Daily Active Bonus and Credit Encashment.
This means the credits that you earn from your Coop Link can earn you Coop Income, Daily Active Bonus and Credit Encashment at the same time.
4) Cross Promote Your Own Offer
You can add your own Ad Bar to your Coop Link and cross promote your offer while earning credits and money at the same time.

5) Earn PPC Income
You can show Ad Widget in your Coop Link. When visitors click the ads in it, you will earn PPC Earning, which has a much higher CPM than Coop Earning.

This means simply promoting your coop link can potentially make you money 4 times!
- Coop Income
- Daily Active Bonus (if you view 10 ads personally)
- Credit Encashment (if you encash credits)
- PPC Income (if visitors click your Ad Widget)
In a nutshell, if you participate in our Coop program, you can get traffic from our Coop Network, make money in multiple ways and cross promote your other offers at the same time!
Promote your Coop Link (https://lltrco.com/?r=) in manual traffic exchanges, safelists or other traffic networks.
Do not promote the link in bogus or bot traffic networks. It will be a waste of your effort.
The minimum surfing duration is 5 seconds before credits and income can be earned.
On this page, you should see a form similar to the screenshot below:

Click the dropdown selector (arrow 1) to select the Ad Bar you want to add, then click Save.
If you do not have any Ad Bar, you can create one at Ad Bars, then refresh this page to select it.
On this page, you should see a form similar to the screenshot below:

Under the option 'Show Ad Widget', click Yes.
Then click Save.
1) You earn Coop income only when a 3rd-party visitor surfs through your Coop Link.
Your own visit is not counted.
2) Visitors have to surf for at least 5 seconds before credits and income can be earned.
The earning typically ranges from $0.10 to $8 CPM (cost per 1000 clicks), depending on the uniqueness, location, surfing duration of the traffic and our earning.
Important Note #1: 1 click is 1 visitor who surf the link for at least 5 seconds.
Important Note #2: Visiting your own Coop Link will do nothing. Only 3rd-party visitors are eligible.
Not really. But please note that visitors have to surf the link for at least 5 seconds before that visit is counted.
Low quality traffic sources, such as popup, popunder, autosurf etc, can hardly meet that requirement.
Yes. Sending of traffic to your Coop Link grants you access to the Coop Network. But you still need to have positive Ad Credits before your Credit Ad can be shown.
Note that you will be earning Ad Credits when you send traffic to your Coop Link.
If you are active in promoting your Coop Link and also active in surfing ads yourself, you should have more Ad Credits than you can use.
Yes, if all the 1000 hits surf the link for at least 5 seconds.
Understand that only visitors that surf the Coop Link for at least 5 seconds are counted.
If you promote in sources such as popup, popunder, autosurf etc, in which the links are hardly surfed, most of those hits will not be counted.
Assuming all the 1000 hits are real visitors who surf at least 5 seconds, then you will earn $0.10 to $8 for that 1000 visitors, depending on the uniqueness, location and surfing duration of the traffic.
Why the huge range? Because 1000 duplicated visitors from a country with low purchasing power is very different from 1000 unique visitors from a country with high purchasing power.
Can we give a more precise earning estimate? Unfortunately we can’t. On every Friday, our algorithm will study the integrity of the traffic and calculate the corresponding earnings. Nobody, including me, can predict individual's earning until the algorithm is run.
Your ads that are to be shown in the Coop network is your Credit Ad (and Pro Ads if you are a Pro Member).
Just make sure your ad meets the requirement to be shown in the Coop Network.
On the Credit Ad or Pro Ad set up page, under the URL field, you can see the link shown below:
Click on it to find out if your ad can be shown in the Coop Network.
The exchange ratio is 2:1. This means every 2 traffic you send to your Coop Link will bring you 1 traffic to your Credit Ad, provided you have Ad Credits.
Also, you have to be active in the Coop network in the last 30 days.
Having said that, you are more likely to run out of Ad Credits than hitting the exchange ratio limit because you need to have credits to show Credit Ads.
PPC stands for Pay Per Click. For example, Google runs a PPC program where you can show their ads on your website and make money when people click on them.
Similarly, in our PPC program, you can show our Ad Widget on your website, blog, Tracker or Page.
When the visitors click the ads, you will earn PPC Earning and Ad Credits.
Your PPC earning is calculated weekly on every Friday.
The earning typically ranges from $5 to $100 CPM (cost per 1000 clicks), depending on the uniqueness, location and quality of the traffic.
Important Note #1: Visiting your own Coop Link will do nothing. Only 3rd-party visitors are eligible.
1) Participate with or without your own website
With your own website or blog, you can place get our Ad Widget Code here and insert it to your website.
Otherwise, you can show the Ad Widget in your Track Links or Pages. (Details are in the tutorial of the corresponding sections.)
2) Earn PPC income
The earning typically ranges from $5 to $100 CPM (cost per 1000 clicks), depending on the uniqueness, location and quality of the traffic.
3) Earn Ad Credits
Ad Credits can be used for advertising, or converted into cash via Credit Encashment.
In other words, if you do not use the credits for advertising, the traffic from your Ad Widget will earn you money in 2 ways - Credit Encashment and PPC Earning.
There are 4 ways to take part in our PPC program.
1) Add our Ad Widget to your blog/website
Place our Ad Widget in your blog/website. When your visitors click the ads in the Ad Widget, you will earn PPC income.
To start, go to Get PPC Widget Code.
Get the Ad Widget code and follow the instruction on that page to add the code to your website.
2) Add our Ad Widget to your Page
Place our Ad Widget in your Page in Page Manager. When your visitors click the ads in the Ad Widget, you will earn PPC income.
To start, go to Page Manager.
Read the tutorial there to learn how to add an Ad Widget.
3) Use our Link Tracker
Use our tracker to track your links when you promote those links in other traffic networks. Our tracker is built in with Ad Widget. When people surf the ads in the Ad Widget, you will earn PPC income.
To start, go to Track Links.
4) Promote your Coop Link
You can show our PPC Ad Widget in your Coop link. When you promote the link in other traffic networks, PPC Ads will be shown. When people surf the ads in the Ad Widget, you will earn PPC income.
To start, go to Coop Earnings.
1) In PPC, visitors first see an ad in your Ad Widget, get interested and click to visit the advertised site. In Coop, visitors visit an advertised site through your Coop Link.
2) Since PPC traffic is more targeted, PPC Earning is much higher than Coop Earning.
Similarity between PPC and Coop Earning
1) Both earn you money and credits.
2) Both are calculated on every Friday.
The earning typically ranges from $5 to $100 CPM (cost per 1000 clicks), depending on the uniqueness, location and quality of the traffic.
Your PPC earning is calculated weekly on every Friday.
No. You are not allowed to reward, ask or deceive people, in any way, into clicking the ads.
You earn PPC income only when a 3rd-party visitor clicks and surfs an ad in your Ad Widget.
Your own clicks are not counted.
If no 3rd-party visitor clicks and surfs the ads, there will be no PPC income, regardless of how much traffic your website has received.
Think of LeadsLeap Ad Widget as an Adsense, Taboola or Outbrain type of advertising program.
It is a piece of Javascript code or plugin that you can add to your website or blog.
When your visitors surf the ads, you make money.
It is part of our PPC program.
You can learn more about our PPC Program in the tutorial section at PPC Earnings
1) Customise the Ad Widget to your preference (arrow 1).

2) Click 'Get Code' (arrow 2).
3) Follow the instruction there to upload the code to your website or blog.
1) Check that the widget code is added correctly.
Load your website in a browser, then right click and select 'View Page Source' (or something similar. Most browsers such as Chrome and Firefox uses 'View Page Source').
The source code of your website will open in a new tab.
Locate the widget code within the source code (by using the browser 'find' function, Ctrl F in most browsers).
Compare that widget code with the correct widget code that is given on this page.
Most of the time, you will discover a missing tag or a typo somewhere.
2) There is an ad blocker in your browser.
If you have installed an ad blocker in your browser, the Ad Widget will not show because it is an ad.
Disable ad blocker to see the ads in the widget.
Technically you can't, because you do not have access to the source code of the website.
What you can do is to track the website using Track Links, which is built in with our Ad Widget.
You should add the widget above the fold or somewhere that is visible immediately, so that people can see and click the ads.
You are only allowed to place the ad widget on family-friendly websites. Adult, gambling, drugs and sex-related sites are strictly prohibited. Violation of this term may lead to termination of your account.
You can add up to 3 Ad Widgets.
We have a system in place to make sure that the ads in our network are of high standard.
First, the ads are reviewed by our reviewer. We will not approve ads that contain malicious scripts. Pyramid, ponzi, scam, pornography, drug, firearm, gambling or betting related ads are all forbidden.
Second, we reward members who report offensive ads or ads that violate our advertising terms. We usually take down a reported problem ads within 24 hours.
Selecting the ad categories will limit the type of ads that will be shown in our PPC widget.
To do that, select 'Selected Categories' and check the categories you prefer to be shown.
Please note that only popular categories are available for selection. Some categories have very few ads, hence we do not open those categories for selection.
If the category you want is not found in the list, it means that category is not open for selection.
No. You are not allowed to click the ads in your own ad widget.
Your account may be flagged if you do so.
No. You are not allowed to reward, ask or deceive people, in any way, into clicking the ads.
Yes. Google allows other ads to be displayed along with Google Adsense.
Don't worry. Our responsive widget is mobile friendly too and it will automatically resize to fit any browser size.
To select the responsive widget, choose 'Responsive' as the Widget type. (Note: Even if your website is not responsive, you should use the responsive widget too. It should be the best option for most websites.)
You earn PPC income only when a 3rd-party visitor clicks and surfs an ad in your Ad Widget.
Your own clicks are not counted.
If no 3rd-party visitor clicks and surfs the ads, there will be no PPC income, regardless of how much traffic your website has received.
Credit encashment is our credit buyback scheme, i.e. we buy back credits from members who have nothing to advertise.
In other words, you can convert your unused credits into cash.
Different from Daily Active Bonus, once you encash the credits, the credits cannot be used for advertising.
You should encash credits when:
1) you have nothing to advertise.
2) you have more credits than your Credit Ads can consume.
You should NOT encash credits if you are advertising in our network and the credits you have are barely enough.
You need to have a minimum of 50 credits before you can encash them.
Note: You need to have at least 50 unused credits before you can encash. (Credits that have been used up for Credit Ads cannot be encashed.)
If you have at least 50 unused credits, you will see an encash option similar to the screenshot below

1) Read the 'Cash Encashment Terms' (arrow 1).
2) Click the button denoted by arrow 1 to encash.
That's all.
There isn't a fixed conversion ratio. The actual conversion depends on 2 things:
1) The number of people encashing in the past trailing 24 hours.
The amount of money we set aside for encashment every day is fixed based on our average earning. If many people encash on a particular day, the encash value per credit will be lesser.
2) The amount of credits you encash.
The more credits you encash, the lesser the encash value per credit. Hence we encourage you to encash as soon as you can.
Typically, 50 credits can be encashed into $0.08 - $0.11. (This is based on our recent observation, not a promise.)
Another thing to note is in addition to converting credit into cash through our Credit Encashment scheme, your credit will also earn you Daily Active Bonus.
You can learn more in the Daily Active Bonus section of your member area. Basically, if you view at least 10 ads a day, all credits earned that day will be used to compute your earning for that day. It is a bonus, not a conversion. This means you still keep your credits.
No. When you encash, you will have to encash all your credits up to the nearest 50 credits.
For example, if you have 214 credits, you will have to encash 200 credits at one go.
Some members have nothing to advertise. If we don't allow them to encash it, they will use the credits to post any kind of ads. This will degrade the quality of the ads in our network. We would rather pay these members and save the ad space for other members who have something good to offer.
You can preload your Credit Ads with credits, then encash the rest of the credits.
You can earn cash bonus everyday by simply viewing at least 10 ads personally in a day.
Once you've surfed a minimum of 10 ads, all the credits you've accumulated on that day (from ad surfing, traffic coop, PPC, ad reporting, etc) will be used to calculate your Daily Active Bonus.
This is cash bonus. It doesn't use up your credits.
You can still use your credits for advertising or encashment.
It's just a way for us to say 'Thank you for being active!'.
There is no fixed conversion ratio. We share 5% of our average daily earning with members who qualifies, 10% if you are a Pro Member.
All members who surf at least 10 ads
You can still use the credits for advertising purpose but there will be no Active Bonus for that day.
Clicks from PPC/Coop are not personal clicks. You need to surf at least 10 ads personally to be eligible for Daily Active Bonus.
However, once qualified, all your credits earned from anywhere will be used to calculate your Daily Bonus.
Not necessary.
Our daily emails to you comes with ads too. You can surf ads via your email.
Minimum withdrawal is $10.
Please note that Minimum Withdrawal refers to the amount shown in Total Available (arrow 1), not Pending Commissions (arrow 2).

The amount in Pending Commissions (arrow 2) will become available for withdrawal after 60 days. You can check when the 60-day is due at Affiliate Commissions
There are 3 possible reasons.
1. Your Total Available (arrow 1) is less than $10.
Please note that Pending Commissions (arrow 2) is not payable yet.

2. You have not added a payment method (arrow 3).
Click 'Edit' (arrow 4) to add a payment method.
3. Your account has been flagged.
You can withdraw your earnings through Paypal and Wise.
As a last resort, if you can send us a Credit Card payment link, such as a Stripe payment link, we can do a special arrangement to pay you using our corporate credit card.
I am sorry that we do not offer other payment methods. We have explored many options. But most of them are not feasible due to high funding cost, security issues and geographical constraints.
Affiliate Commissions are subject to a 60-day withholding period to account for refund, fraud and charge back.
There is no withholding period for Daily Active Bonus, Credit Encashment and PPC Earnings, only Affiliate Commissions.
The 60-day withholding period is necessary because it is aligned with the agreement with our payment processors.
You can check when the 60-day is due at Affiliate Commissions
Below is a sample screenshot from Affiliate Commissions
You can check how much money is due for withdrawal (arrow 1), how much is still pending (arrow 2) and how many days before it is due (arrow 3).
There are 5 ways to make money in LeadsLeap.
- Affiliate Commissions
- Coop Earnings
- PPC Earnings
- Credit Encashment
- Daily Active Bonus
The more ways you use, the more money you'll make.
LeadsLeap automatically places all members into a network, with you being the start of your own network.
Those that you refer personally will form the level 1 of your network.
Those that your level 1 refer personally will form the level 2 of your network.
Those that your level 2 refer personally will form the level 3 of your network.
This goes on until level 10.
Everyone in your 10 levels of network are your followers.
The significance of these levels is that they are likely to grow exponentially and you are able to reach out to them via our Follower Message system.
Read One Signup A Day and see how one LeadsLeap member has built thousands of leads that continue to grow even though he hasn't been actively promoting LeadsLeap.
No. Members can't send direct emails to their followers.
We have a better and more sustainable communication platform called Follower Message.
A referral is someone you've referred. If that person upgrades, you will earn commission.
A referral is also your level 1 follower.
When your referrals refer other people, they will be at your level 2. Those your level 2 refer will be at your level 3 and on and on. All of them are your followers up to 10 levels deep.
You do not earn commission if your level 2 to 10 followers upgrade.
You can reach out to your followers via Follower Message.
1) If your referral upgrades, you will earn commissions.
2) If your referral refers more people to join, everyone they refer will become your followers up to 10 levels deep.
You can reach out to your followers via Follower Message.
3) When your referral and followers surf ads, you will earn credits. You can use the credits for Credit Ads or encashment.
No. We do not disclose members' email to anyone.
If you want your referrals' and followers' emails, give them a good offer using the Follower Message and get them to opt-in to your list. That is the right way to build a sustainable relationship.
No. We do not disclose members' email to anyone.
If you want your referrals' and followers' emails, give them a good offer using the Follower Message and get them to opt-in to your list. That is the right way to build a sustainable relationship.
Each member theoretically has 10 associates (aka uplines in a network). However, not all members have 10 associates. Some members may be at the top of the network and some associates may have cancelled their accounts. As a result, there are 'vacant' associate slots. These slots will be taken up by our Pro Members. We call it the Spillover Level (or Level 11).
If you are a Pro Member, you will notice that your Spillover Level will grow automatically. Our system will automatically allocate followers to you.
These are permanent placement, which means even if you cancel your Pro membership, the members in your Spillover Level will still be with you. You will be able to reach out to them via the Follower Message system.
No.
Your spillover followers are someone else's direct referral. They already have a sponsor and their sponsor will earn the commission when they upgrade.
You will only earn a commission when your direct referral (i.e. level 1 follower) upgrade.
1) They are your followers, just like your level 2 to 10 followers. They will be in your team for life. You can reach out to them via Follower Message.
2) You will earn 3% overriding credits when they surf ads.
You can use the credits for your Credit Ads or encash them.
Very fresh.
Let's put it this way. The day they appear in your network is the day they sign up LeadsLeap.
They cannot be more fresh than that.
You can set up 2 messages to connect with your followers. One for your direct referrals and another for your followers at levels 2 to 10.
For the message to your direct referrals, you can give them an incentive to upgrade their account.
For the message to your followers at levels 2 to 10, you can provide something more general.
If you haven't added any message, you will see a 'Add follower messages' button.
Click the button.
Two empty messages will appear, one for Direct Referral, another for other followers.
The message editor look similar to the screenshot below:

It consists of a message (arrow 1) and a url that your followers can click and visit (arrow 2).
To post a Follower Message, enter your message (arrow 1) and the url (arrow 2).
Below are some examples of messages and url you can post:
1) Give them a special offer
Prepare a special offer for them and send them to the offer page.
2) Give them a free gift
The free gift can be an ebook or eCourse that teaches them something.
You can host the ebook using PDF hosting and create the ebook download page using Page Buider.
3) Invite them to opt-in to your personal list
You can use SendSteed as the list manager.
You can create an eCourse using the Email Series function.
"What if I only want to say, 'Thank you'?"
If you only want to say 'Thank you', that is not possible.
But you can say, 'Thank you, I have prepared a special gift for you!', and then send them to the offer page.
LeadsLeap automatically places all members into a network, with you being the start of your own network.
Those that you refer personally will form the level 1 of your network.
Those that your level 1 refer personally will form the level 2 of your network.
Those that your level 2 refer personally will form the level 3 of your network.
This goes on until level 10.
Everyone in your 10 levels of network are your followers.
The significance of these levels is that they are likely to grow exponentially and you are able to reach out to them via our Follower Message system.
Read One Signup A Day and see how one LeadsLeap member has built thousands of leads that continue to grow even though he hasn't been actively promoting LeadsLeap.
Your LeadsLeap membership is also a 10-level network builder.
If you have been referring people, you will eventually realize that you get many leads in return, thanks to the power of networking.
The question is, how do you reach out to your followers?
Let's look at some common member-to-member communication methods in the market:
- safelist
(uplines can email downlines.)
- auto-optin
(downline is automatically opted-in to the uplines' lists.)
- timeline message system
(something like Facebook.)
- private message
(uplines can send private message to downlines.)
Whatever the method is, the success of the system depends on 3 key factors:
1) Whether the uplines are providing values.
2) Whether the downlines stay in the system.
3) Whether the downlines are reading the messages.
In most cases, uplines are as new as downlines. They too are trying to learn the ropes.
If the uplines can't provide much value, the downlines may find their uplines annoying and abandon the system.
How we do it differently?
Our Follower Message system is a unique communication system where you (the associate, also known as the upline) can set up an ad-like message. It is basically a message from you and when your follower click the message, they will visit the website that you've specified.
Your message will be shown to your followers (your 10-levels of downlines) in their member's area and daily email. It is tagged with the posting time, so that they know how recent the message is. Like our ads, your followers can earn credits when they click your message.
The benefits of Follower Message system
1) Your message is non-obtrusive
Your followers do not receive any extra email, unlike Safelist.
2) We reward your followers to read your message
Your followers earn credits when they visit the link in your message.
3) You do not have to keep updating the message
Unlike other communication methods where old messages are buried with time, your Follower Message is visible to your followers all the time.
There is no need to keep sending the message like the case of safelist or timeline-based posting board, which can be annoying.
4) You are given a second chance
It's okay if you don't get it right initially. It takes time to learn how to create real values for your followers. You can always update your Follower Message and reach out to your followers any time you like, for life.
5) The system doesn't exist because of leads building
LeadsLeap is a resource center where members can make money, get traffic, build leads and make use of our proprietary tools to grow their own businesses. I'm pretty sure that our members are not here because of the 10-level leads builder that we have.
This is important because if a network is built solely for leads building, if people fail to build leads, they will leave, and the system will fail. That won't be the case in LeadsLeap.
If you ask this question, half the battle is won.
We can't force them to view your message. But we can incentivize.
Your followers will earn credits when they view their Associates' Messages, just like when they surf ads.
But that is just an incentive. They can earn credits through many other ways.
Ultimately, your message needs to be useful. If your message is useful, plus they can earn credits viewing it, most of them will click.
No. Your message will be shown to all your 10-levels of followers all the time.
Yes, after 6 months.
You should also note that your followers can see how long your message has been posted.
This will help them to decide whether they should visit the link in your message.
Your 10 levels of followers.
If you are a Pro member, you have another spillover level of followers. They will see your Followers' Message too.
No. You should update the message ONLY when you truly have something new for your followers. Any attempt to abuse the Followers' Message system will lead to termination of your account.
Yes you can.
We want members to be able to reach out to their followers as if it is their own list. Just make sure that you are giving values.
If you think your associate is abusing the system, you can either contact our support or click the message and report it via the reporting channel.
You can set up 2 messages. One for your direct referrals and another for your followers at levels 2 to 10.
If you were to promote a program, it makes sense to promote something with these characteristics:
1) It allows you to earn recurring income.
- This means your one-time effort is going to pay you a lifetime.
2) The product is evergreen.
- This means your one-time effort is going to pay you a lifetime.
3) The business model is sustainable.
- This means your one-time effort is going to pay you a lifetime.
LeadsLeap started in 2008 as an advertising network. Although we have added many many other functions over the years, our advertising program is still working and it is likely to continue working for many many years.
When you promote LeadsLeap, those who join under your referral will be under your referral for life.
It doesn't matter when they upgrade, but if they upgrade, and whenever they upgrade, you earn commissions.
Your commission is recurring. This means as long as they remain as a Pro Member, you earn commissions months after months.
Other benefits
1) LeadsLeap membership is also a 10-level leads builder.
- This means you can reach out to 10-levels of leads in your network, through our unique non-obtrusive message system called Follower Message.
- Read One Signup A Day and see how one LeadsLeap member has built thousands of leads that continue to grow even though he hasn't been actively promoting LeadsLeap.
2) Earn credits on autopilot.
- You earn credits whenever your 10-levels of followers view ads.
You make a commission when your direct referrals upgrade their account.
25% recurring commissions if you are a Free Member.
50% recurring commissions if you are a Pro Member.
No. You earn commission only when your direct referral upgrades.
Our affiliate program is single level, not multi-level.
Your main affiliate link is https://leadsleap.com/?r=.
There are other affiliate links you can use.you can find on this page, under My Affiliate Links.
It depends on what resources you have.
Go to How To Promote? on this page.
The best way to get referrals is to simply use LeadsLeap to build your own business. We provide almost every tool you need to build a successful online business.
As you do that, teach others how to do it.
Your main focus should be to build your own business. Promoting LeadsLeap should be secondary and a 'by-the-way' thing.
Whether your referrals upgrade or not depends on their readiness.
The best thing you can do is to exercise patience. One day, they will see the value and upgrade, unless they give up online marketing.
That's our own belief too. We just focus on delivering more values.
You can deliver more values to them too. You can create a guide to show them how you use LeadsLeap.
You can share the guide via Follower Message.
You can create a list and get your followers to opt in to get the guide, then follow up with them via email broadcast.
The reason why they do not upgrade is because of one or all of the following:
- lack of confidence in LeadsLeap,
- lack of confidence in themselves.
By showing them what you did and what they can do, you can help to increase their confidence level.